KiCad Nightly 参考手册
Copyright
本文档版权 © 2010-2024 年,作者如下。您可以根据 GNU 通用公共许可证 (http://www.gnu.org/licenses/gpl.html) 第 3 版或更高版本或知识共享署名许可证 (http://creativecommons.org/licenses/by/3.0/) 第 3.0 版或更高版本的条款分发和/或修改本文档。
本指南中的所有商标均属于其合法所有者。
Contributors
Jean-Pierre Charras, Fabrizio Tappero, Jon Evans, Graham Keeth.
Feedback
KiCad 项目欢迎与软件或其文档相关的反馈、错误报告和建议。 有关如何提交反馈或报告问题的详细信息,请参阅 https://www.kicad.org/help/report-an-issue/ 上的说明
Software and Documentation Version
本用户手册基于 KiCad 9.99 版本。其他版本的 KiCad 在功能和界面外观上可能存在差异。
文档修订版:7cf88bb6。
简介
KiCad 是一款用于创建电子电路原理图和印刷电路板(PCB)的开源软件套件。 KiCad 支持综合设计工作流程,其中原理图和相应的 PCB 一起设计,也支持特殊用途的独立工作流程。 KiCad 还包括一些帮助电路和 PCB 设计的实用程序,包括用于确定电路结构电气属性的 PCB 计算器、用于检查制造文件的 Gerber 浏览器和用于检查电路行为的集成 SPICE 模拟器。
KiCad 可在所有主要的操作系统和广泛的计算机硬件上运行。 它支持多达 32 个铜层的 PCB,适合创建各种复杂的设计。 KiCad 是由世界各地的软件和电气工程师组成的志愿者团队开发的,其使命是创建适合专业设计师的免费和开源的电子设计软件。
该文件的最新版本可在 https://docs.kicad.org 。
系统要求
KiCad 能够在多种硬件和操作系统上运行,但在低端硬件上执行某些任务可能会很慢或很困难。为获得最佳体验,建议使用 1920x1080 或更高分辨率的专用显卡和显示器。
有关最新的系统要求,请查看 KiCad 网站:https://kicad.org/help/system-requirements/
安装和升级 KiCad
导入设置
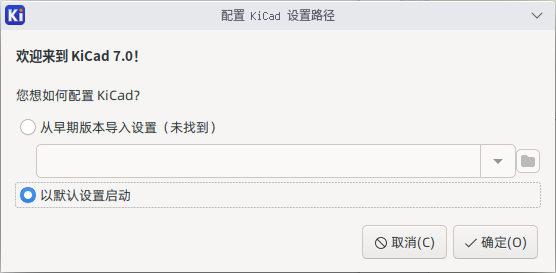
KiCad 的每个主要版本都有自己的配置,因此您可以在同一台计算机上运行多个 KiCad 版本,而不会干扰配置。首次运行新版本的 KiCad 时,系统将询问如何初始化设置:

如果检测到以前版本的 KiCad,您可以选择从该版本导入设置。系统会自动检测以前配置文件的位置,但如果需要,您可以覆盖该位置以选择其他位置。
请注意,KiCad 前一版本的原理图符号和封装库表将 不会 被导入。
如果您不想从以前的版本导入设置,也可以选择从默认设置开始。
KiCad 将设置文件存储在用户目录内的文件夹中。 每个 KiCad 版本将使用不同版本的子文件夹。对于 KiCad 9,这些文件夹是:
Windows |
|
Linux |
|
macOS |
|
从早期版本迁移文件
现代版本的 KiCad 可以打开在早期版本中创建的文件,但只能写入最新格式的文件。这意味着,通常情况下,除了打开文件外,从以前版本迁移文件不需要特殊步骤。在某些情况下,文件的扩展名从一个 KiCad 版本更改到下一个版本。打开这些文件后,它们将以新的文件扩展名以新格式保存。旧文件不会自动删除。
原理图编辑器文档介绍了打开 旧版原理图 时的几个特别注意事项。
一般来说,一个新版本的 KiCad 创建或修改的文件 不能 被旧版本的 KiCad 打开。因此,在测试新的 KiCad 版本时保留项目的备份副本非常重要,直到您确信不再需要使用旧的 KiCad 版本。
目前不会从以前的版本导入快捷键配置。您可以通过将各种 *.hotkeys 文件从旧版本配置目录复制到新版本配置目录中,手动导入快捷键配置。如果这样做,请注意 KiCad 不会自动检测冲突,例如一个键被分配给多个操作。
|
使用 KiCad 工程管理器
The KiCad project manager is the window that opens when you start KiCad. The project manager creates and opens KiCad projects and launches the other KiCad tools:
-
the Schematic Editor
-
the Symbol Editor
-
the PCB Editor
-
the Footprint Editor
-
the Gerber Viewer
-
the Image Converter
-
the Calculator Tools
KiCad 工程管理器窗口由左侧的工作区视图和右侧的启动器组成,前者显示与打开的工程相关的文件,后者则包含各种编辑器和工具的快捷方式。

The tree view shows a list of the files inside the project folder. This includes the KiCad schematic and board design files as well as other files and folders in the project folder. If the project contains multiple schematic sheets, only the root sheet is shown in the tree view.
| 仅显示 KiCad 能够打开的文件在工程工作区视图中。 |
Double-clicking on a file in the tree view will open it in the associated editor. Right-clicking on a file will open a context menu with some file manipulation commands.
If the project is part of a Git repository, the tree shows icons indicating the version control status of each file and lists the active branch next to the project name. While normally the tree view only shows the schematic root sheet, and not any subsheets, all sheets are shown when the project is in a Git repository so that modifications to each sheet can be observed individually.
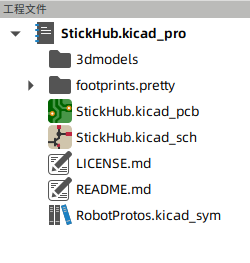
KiCad 工程至少包含一个工程文件、一个原理图和一个电路板设计。原理图可能包含多个图纸,每个图纸都有自己的文件,但一个工程只能包含一个电路板。KiCad 要求工程文件、原理图根图纸文件和电路板文件都具有相同的名称。
窗口左侧的工具栏为常见的工程操作提供快捷键:
|
创建一个新的工程。 |
|
打开一个已存在的工程。 |
|
将整个工程打包成 ZIP 存档,包括原理图文件、库、PCB 等所有相关文件。 |
|
解压工程 ZIP 存档至指定目录。目标目录中的文件将被覆盖。 |
|
刷新树状视图,以检测文件系统上所做的更改。 |
|
在文件浏览器中打开工程的工作目录。 |
单机模式
您也可以在 单机模式 模式下运行 KiCad 编辑器工具,方法是直接从操作系统的应用程序启动器而不是从工程管理器启动这些工具。通常 不建议 在单机模式下运行工具,除非在某些特殊情况下必须这样做,例如从其他 EDA 工具导入工程时。 在单机模式下运行时,某些工程功能不可用,包括:
-
原理图编辑器和电路板编辑器之间的交叉探测
-
原理图和电路板之间的设计同步
创建一个新工程
大多数 KiCad 设计都是从创建工程开始的。从 KiCad 工程管理器创建工程有两种方式:可以创建空工程,也可以基于现有模板创建工程。本节将介绍如何创建一个新的空工程。从模板创建工程在 工程模板一节中介绍。
若要创建新工程,请使用 文件 菜单中的 新建工程… 命令,或单击顶部工具栏中的 新建工程 按钮,或使用键盘快捷键 (默认为 Ctrl+N)。
系统将提示您输入工程名称。默认情况下,将使用相同的名称为您的工程创建一个目录。例如输入名称 MyProject,KiCad 会在其中创建 MyProject 目录和工程文件 MyProject/MyProject.kicad_pro。
如果您已经有一个存储工程文件的目录,可以在 新建工程 对话框中取消选中 为工程创建新目录 复选框。
| 强烈建议您将每个 KiCad 工程保存在其自己的目录中。 |
选择工程名称后,KiCad 将在工程目录中创建以下文件:
|
KiCad 工程文件。 |
|
主原理图文件。 |
|
PCB 文件。 |
从其他 EDA 工具导入工程
KiCad 能够导入某些其他软件包创建的文件。 有些软件格式可以作为完整工程导入。 其他格式目前只能作为独立的原理图或电路板导入,必须手动连接到 KiCad 工程中。目前支持以下类型的工程:
|
Eagle 6.x 或更新版本(XML 格式) |
|
CADSTAR 压缩格式 |
|
EasyEDA (JLCEDA) 标准版备份 |
|
EasyEDA (JLCEDA) 专业版工程 |
要从这些工具中导入工程,请在 文件 菜单的 导入非 KiCad 工程 子菜单中选择合适的选项。
系统将提示您在导入文件浏览器对话框中选择原理图或电路板文件。导入的原理图和电路板文件应具有相同的基本文件名 (例如,project.sch 和 project.brd)。一旦选择了请求的文件,系统将要求您选择一个目录来存储生成的 KiCad 工程。
目前可在单机模式导入以下类型的文档。 要导入这些文件,请单独启动 KiCad 原理图编辑器或 PCB 编辑器(不要先打开 KiCad 工程管理器),然后选择 文件 > 导入 > 非 KiCad 原理图 或 文件 > 导入 > 非 KiCad 电路板文件。 导入 Altium 工程时,我们建议先导入 PCB,保存生成的工程,然后在单机模式的原理图编辑器窗口中导入工程后,将每个原理图页复制到工程中。
|
Altium Designer, Circuit Studio, Circuit Maker 原理图文档 |
|
Altium Designer PCB |
|
Altium Circuit Maker PCB |
|
Altium Circuit Studio PCB |
|
P-Cad 200x ASCII PCB |
|
Fabmaster PCB |
| KiCad 不支持具有多个顶层工作表的原理图。 从支持该功能的其他工具导入设计时,必须导入每个原理图工作表,然后将导入的工作表作为分层工作表放置在新的 KiCad 工程中。 |
保存和加载工程档案
您可以使用存档工具将工程的文件存档到 zip 存档中(文件 → 存档工程…)。
您也可以使用解压缩工具(文件 → 解压缩项目…)来解压缩工程。将项目解压缩到当前加载的工程目录中时,工程将自动重新加载,以反映归档版本中的任何更改。
存档工具会将工程文件夹中的以下文件保存到存档中:
|
KiCad design files |
|
Legacy KiCad design files |
|
3D models |
|
Gerber files |
|
Manufacturing files |
|
Netlists |
|
Python scripts |
|
Documentation files |
|
SPICE models |
|
IBIS models |
Git 集成
KiCad 工程管理器与 Git 版本控制工具集成,用于跟踪工程中的更改。它可以与现有的本地 Git 仓库配合使用,从远程仓库克隆工程,或在现有工程中创建新仓库。您可以使用该工具提交工程中的更改,从远程仓库推送和拉取代码,以及切换分支。
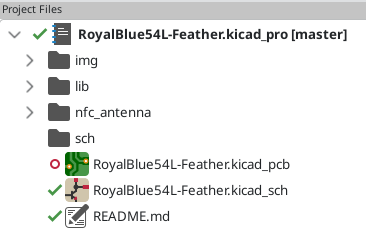
如果您打开一个已经使用 Git 进行版本控制的工程,即该工程属于现有的 Git 仓库,您可以直接使用 KiCad 的版本控制功能来跟踪工程中的更改,无需进行额外配置。当前活动分支会显示在工程名称旁边,而工程中每个文件的版本控制状态会在工程文件工作区中以图形方式显示。例如,图标 ![]() 表示文件未更改,
表示文件未更改,![]() 表示文件有未提交的更改,而
表示文件有未提交的更改,而 ![]() 表示文件未被跟踪。如果工程不属于 Git 仓库,则不会显示任何图标。
表示文件未被跟踪。如果工程不属于 Git 仓库,则不会显示任何图标。
| 您可以在首选项对话框的 版本控制 页面禁用 KiCad 的 Git 集成功能。偏好设置还允许你配置远程更新间隔和默认提交作者信息。 |
将版本控制添加到现有工程
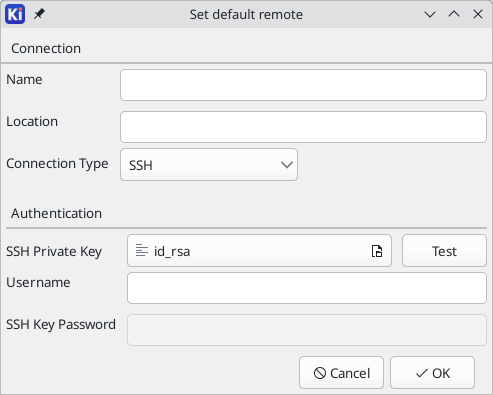
如果现有工程尚未处于版本控制之下,可以右键单击工程文件工作区中的某个文件,然后单击版本控制 → 添加工程到版本控制…,在工程中初始化一个新的 Git 仓库。以这种方式初始化版本库时,必须配置远程。配置版本库需要以下信息:
-
Location: The URL or file path to the remote. HTTPS, SSH, and local (file) connections are supported. The format of the URL is used to automatically determine the type of connection and set the authentication options accordingly.
-
SSH private key: The SSH private keyfile to use for authentication (SSH connections only).
-
User name: The user name to use for authentication. For SSH connections, the user name is often
git. -
Password: The password to use for authentication (HTTPS connections only).
-
SSH key password: The passphrase for your SSH key, if you have configured one (SSH connections only).
单击 测试连接 按钮,即可检查连接和身份验证。
克隆现有仓库
要克隆现有仓库并打开克隆的工程,请使用 文件 → 从仓库克隆工程…。您可以使用 SSH 或 HTTPS 克隆远程仓库,也可以克隆本地仓库。克隆的配置设置与为现有工程配置新仓库和远程仓库的设置相同。
使用 Git 跟踪工程更改
当你做出要提交的更改时,你可以提交整个工程(右击 → 版本控制 → 提交工程…)或某个特定文件(右击文件 → 版本控制 → 提交文件…)。两种操作都会打开 “提交更改” 对话框,但 “提交工程” 操作会显示仓库中所有更改的文件,而 “提交文件” 操作只会显示右键点击的文件。 在 “提交更改” 对话框中,您可以选择要包含在提交中的更改文件,提供提交信息和作者,并提交更改。

要向远程推送更改,请在工程文件工作区中单击右键,然后选择 版本控制 → 推送。要从远程调用,请右击并选择 版本控制 → 调用。从版本控制 → 切换到分支 菜单中选择所需的分支,即可切换分支。
Finally, you can disable version control tracking for the project by right clicking and selecting Version Control → Disable Git Integration. This disables KiCad’s Git integration when editing the current project, but it does not remove the project’s Git history or otherwise affect the actual Git repository on disk, so you can continue to version control the project with another Git tool. It also does not disable KiCad’s Git integration with other projects. You can disable the Git integration for all projects in the Version Control page of the Preferences dialog.
KiCad 文件和文件夹
KiCad 创建并使用具有以下特定文件扩展名(和文件夹)的文件进行原理图和电路板编辑。
这些文件中包含大量重要设计信息,尤其是工程文件 (.kicad_pro)、原理图文件 (.kicad_sch) 和电路板文件 (.kicad_pcb)。其他文件也可能需要包含。在分发工程时,应始终包含这些文件。某些文件无需与工程一起分发,例如工程本地设置文件 (.kicad_prl) 或 fp-info-cache 文件。无需分发的文件在下方表格中有所标注。
工程文件
|
Project file, containing settings that are shared between the schematic and PCB |
|
Legacy (KiCad 5.x and earlier) project file.
Can be read and will be converted to a |
原理图编辑器文件
|
Schematic files, containing all symbol and connection information. |
|
Schematic symbol library file, containing the symbol descriptions: graphic shape, pins, fields. |
|
Schematic design block library folders. The folder itself is the library. |
|
Schematic design block folder for defining a reusable schematic design.
The folder is the design block, and contains a |
|
Simulator workbook file containing SPICE simulation setup information. |
|
Legacy (KiCad 5.x and earlier) schematic file.
Can be read and will be converted to a |
|
Legacy (KiCad 5.x and earlier) schematic library file. Can be read but not written. |
|
Legacy (KiCad 5.x and earlier) schematic library documentation. Can be read but not written. |
|
Legacy (KiCad 5.x and earlier) schematic component library cache file.
Required for proper loading of a legacy schematic ( |
|
Symbol library table: list of symbol libraries available in the schematic editor. |
|
Design block library table: list of design block libraries available in the schematic editor. |
PCB 编辑器的文件和文件夹
|
Board file containing all info but the page layout. |
|
Footprint library folders. The folder itself is the library. |
|
Footprint files, containing one footprint description each. |
|
Design rules file, containing custom design rules for a certain |
|
Legacy (KiCad 4.x and earlier) board file. Can be read, but not written, by the current board editor. |
|
Legacy (KiCad 4.x and earlier) footprint library file. Can be read by the footprint or the board editor, but not written. |
|
Footprint library table: list of footprint libraries available in the board editor. |
|
Cache to speed up loading of footprint libraries. Does not need to be distributed with the project or put under version control. |
通用文件
|
Local settings for the current project; helps KiCad remember the last used settings such as layer visibility or selection filter. Does not need to be distributed with the project or put under version control. |
|
Page layout (drawing border and title block) description file. |
|
Jobset definition file containing output jobsets. |
|
Netlist file created from the schematic, and read by the board editor. Note that the recommended workflow for transferring information from the schematic to the board does not require the use of netlist files. |
|
Association between components used in the schematic and their footprints.
It can be created by the Board Editor and imported by the Schematic Editor.
Its purpose is to import changes from the board to the schematic, for users
who change footprints in the Board Editor (for instance using Exchange
Footprints command) and want to import these changes back to the schematic.
Note that the
recommended
workflow for transferring information from the board to the schematic does not
require the use of |
制造和文档文件
|
Gerber files, for fabrication. |
|
Drill files (Excellon format), for fabrication. |
|
Position files (ASCII format), for automatic insertion machines. |
|
Report files (ASCII format), for documentation. |
|
Plot files (Postscript), for documentation. |
|
Plot files (PDF format), for documentation. |
|
Plot files (SVG format), for documentation. |
|
Plot files (DXF format), for documentation. |
储存和发送 KiCad 文件
KiCad 原理图和电路板文件包含设计中使用的所有原理图符号和封装,因此您可以单独备份或发送这些文件,无需担心。一些重要的设计信息存储在工程文件(.kicad_pro)中,因此,如果您要发送完整的设计,请确保将该文件包括在内。
某些文件,例如工程本地设置文件(.kicad_prl)和 fp-info-cache 文件,无需随工程一起发送。如果您使用 Git 等版本控制系统来管理 KiCad 工程,可以将这些文件添加到忽略文件列表中,以便它们不被跟踪。
KiCad 配置
KiCad 偏好设置可随时从 偏好设置 菜单访问,或使用热键(默认 Ctrl+,)访问。运行中的 KiCad 工具共享偏好设置对话框。 有些偏好设置适用于所有工具,有些则针对特定工具(如原理图或电路板编辑器)。
共同偏好设置
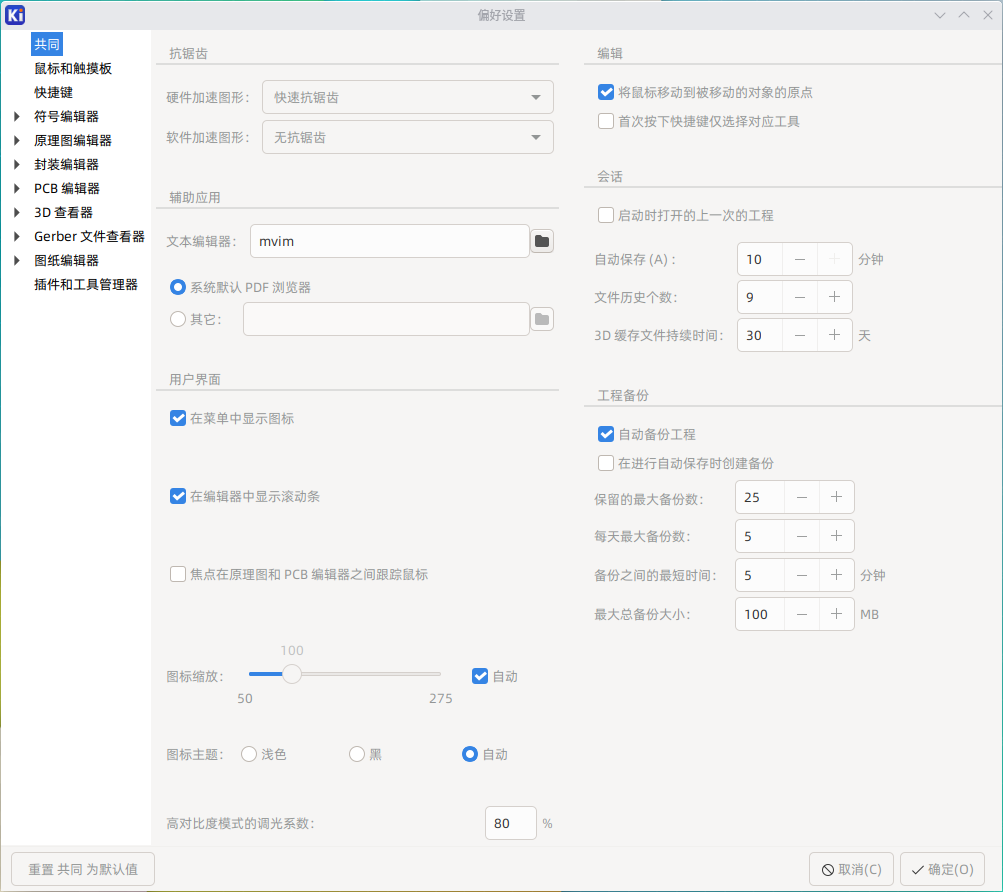
Accelerated graphics antialising: KiCad can use different methods to prevent aliasing (jagged lines) when rendering using a graphics card. Different methods may look better on different hardware, so you may want to experiment to find the one that looks best to you.
Fallback graphics antialiasing: KiCad can also apply antialiasing when using the fallback graphics mode. Enabling this feature may result in poor performance on some hardware.
Text editor: Choose a text editor to use when opening text files from the project tree view.
PDF viewer: Choose a program to use when opening PDF files.
Show icons in menus: Enables icons in drop-down menus throughout the KiCad user interface.
| 菜单中的图标在某些操作系统上不显示。 |
Show scrollbars in editors: When enabled, scrollbars are displayed next to the editing canvases in each tool. When disabled, scrollbars are not shown.
Focus follows mouse between schematic and PCB editors: When enabled, the window under the mouse cursor will automatically become focused.
Icon scale: Sets the size of the icons used in menus and buttons throughout KiCad. Choose Automatic to pick an appropriate icon scale automatically based on your operating system settings.
Icon theme: Sets whether to use the icon theme designed for light window backgrounds or dark window backgrounds. The default setting of Automatic will choose the theme based on the lightness of the operating system window theme.
High-contrast mode dimming factor: Sets how much non-focused items are dimmed in high-contrast display mode.
Warp mouse to origin of moved object: When enabled, the mouse cursor will be repositioned (warped) to the origin of an object when you start a move command on that object.
First hotkey selects tool: When disabled, pressing the hotkey for a command such as Add Wire will immediately start the command at the current cursor location. When enabled, pressing the hotkey the first time will just select the Add Wire tool but will not immediately begin a wire.
Remember open files for next project launch: When enabled, KiCad will automatically re-open any files that were previously open when a project is re-opened.
Auto save: When editing schematics and board files, KiCad can automatically save your work
periodically. Set to 0 to disable this feature.
File history size: Configure the number of entries in the list of recently-opened files
3D cache file duration: KiCad creates a cache of 3D models in order to speed up the 3D viewer. You can configure how long to keep this cache before deleting old files.
Automatically backup projects: When enabled, KiCad projects will be archived to ZIP files automatically according to the settings below. The archives will be stored in a subfolder of the project folder. Backups are created when saving files in the project.
Create backups when auto save occurs: When enabled, a backup will be created every time an
automatic file save occurs (if the backup is permitted by the settings below). This setting has
no effect if the auto save interval is set to 0 (disabled).
Maximum backups to keep: When creating a new backup, the oldest backup file will be deleted to keep the total number of backup files below this limit.
Maximum backups per day: When creating a new backup, the oldest backup file created on the current day will be deleted to stay below this limit.
Minimum time between backups: If backup is triggered (for example, by saving a board file), the backup will not be created if an existing backup file is newer than this limit.
Maximum total backup size: When creating a new backup file, the oldest backup files will be deleted to keep the total size of the backup files directory below this limit.
鼠标和触摸板偏好设置
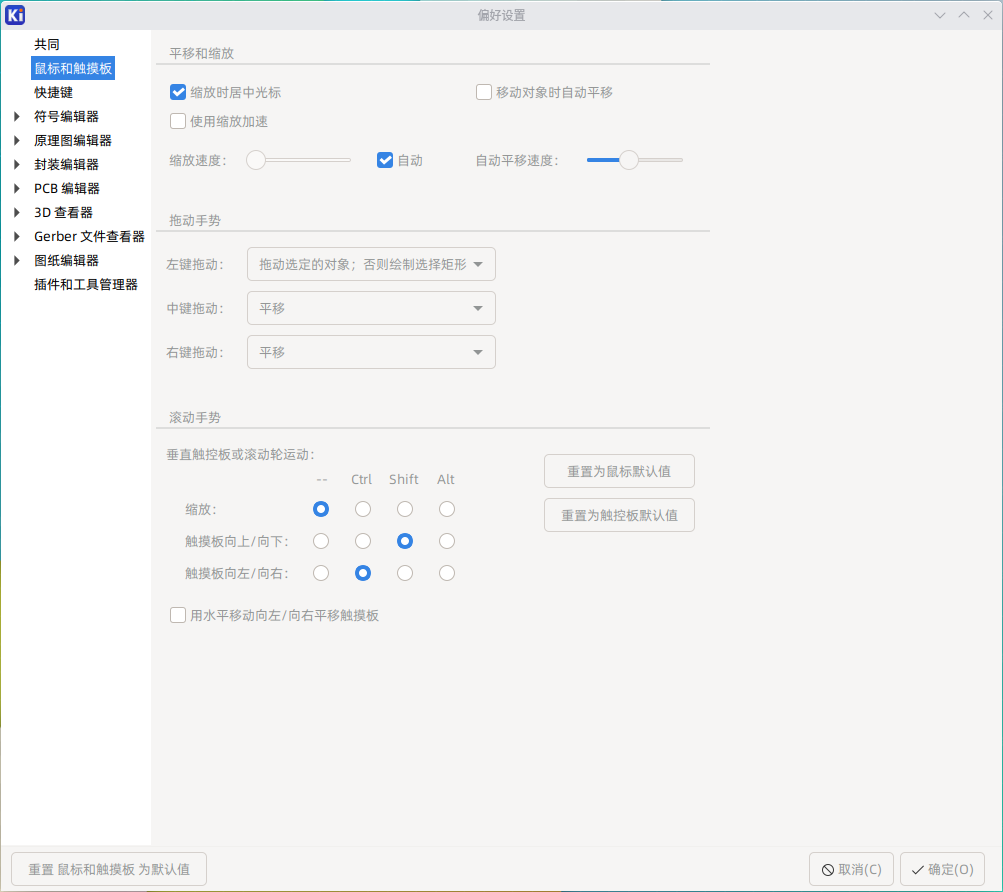
Center and warp cursor on zoom: When enabled, zooming using the hotkeys or mouse wheel will cause the view to be centered on the cursor location.
Use zoom acceleration: When enabled, scrolling the mouse wheel or touchpad faster will cause the zoom to change faster.
Zoom speed: Controls how much the zoom changes for a given amount of scrolling the mouse wheel or touchpad. Use Automatic to set a default value depending on your operating system.
Automatically pan while moving object: When enabled, the view can be panned while moving an object by moving close to the edge of the canvas.
Auto pan speed: Controls how fast the canvas pans while moving an object.
Mouse buttons: You can set the behavior of dragging the middle and right mouse buttons to zoom the view, pan the view, or have no effect. You can also set the behavior of dragging the left mouse button depending on whether or not any objects are already selected in the editing canvas.
| 鼠标左键始终用于选择和操作对象。 |
Mouse wheel and touchpad scrolling: You can set the behavior of scrolling the mouse wheel or vertical motion of the touchpad while pressing certain modifier keys.
Pan left/right with horizontal movement: When enabled, you can pan the view using the touchpad or horizontal scroll wheel (if present on your mouse).
快捷键偏好设置
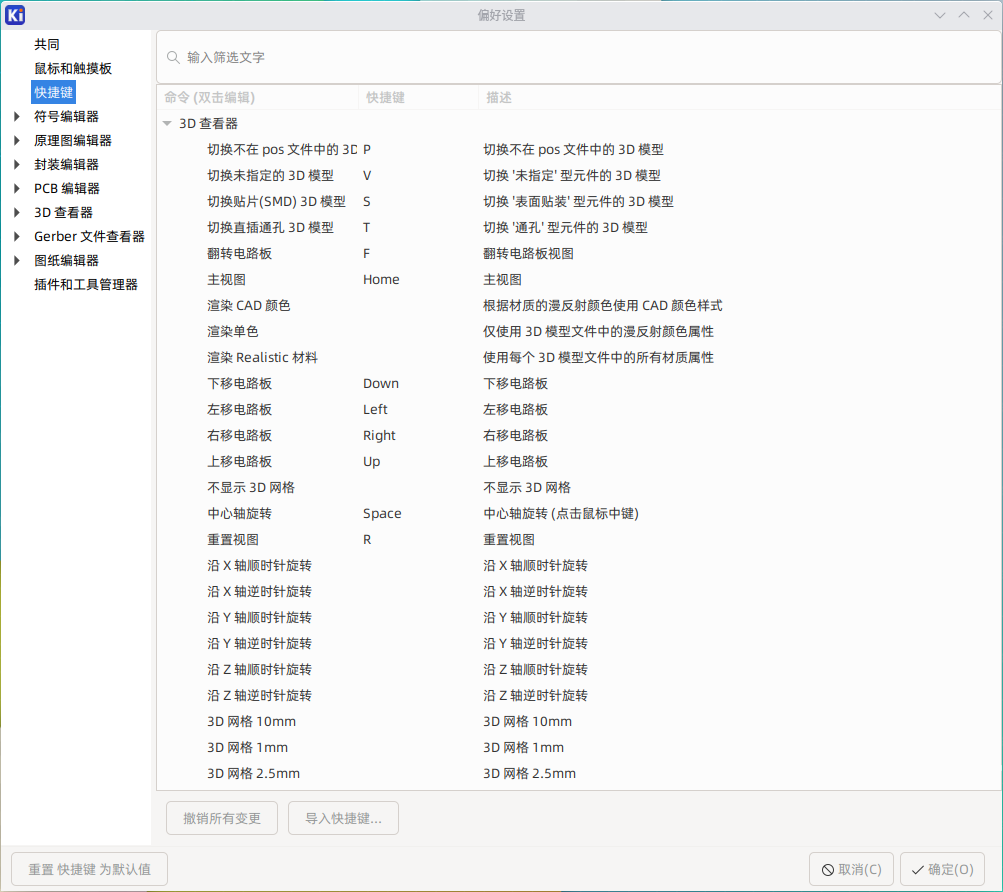
可以使用此对话框自定义用于控制 KiCad 的快捷键。公用 部分中的快捷键在每个 KiCad 程序之间共享。当程序运行时,会显示每个特定 KiCad 程序的快捷键。您可以将相同的快捷键分配给不同 KiCad 程序 (例如原理图编辑器和电路板编辑器) 中的不同操作,但不能将一个快捷键分配给同一程序中的多个操作。
有许多可用命令,因此并非所有命令都默认分配了快捷键。您可以通过双击列表中的命令将快捷键添加到任何命令。如果选择已分配给其他命令的快捷键,则可以选择在所选命令上使用该快捷键,这将从冲突的命令中删除指定的快捷键。
你对快捷键分配所做的改变会在命令名称的末尾显示一个 \* 字符。 你可以通过右键单击某个特定的命令并选择 撤销更改 来撤销对该命令的更改,或者你可以通过命令列表下面的按钮撤销所有的更改。
Importing hotkeys
快捷键偏好设置存储在 KiCad 设置目录的 .hotkeys 文件中 (有关设置目录在操作系统上的位置,请参阅 设置 一节)。如果您在一台计算机上以您喜欢的方式配置了 KiCad 快捷键,则可以通过导入适当的 .hotkeys 文件将该配置传输到另一台计算机。
路径配置
在 KiCad 中,可以使用 路径变量 定义路径。 KiCad 内部定义了一些路径变量,可用于为库、3D 图形等定义路径。
当绝对路径未知或可能发生变化时(例如,当您将工程传输到另一台计算机时),以及许多类似工程共享一个基本路径时,这非常有用。 请考虑以下可能安装在不同位置的内容:
-
原理图符号库
-
封装库
-
封装定义中使用的 3D 模型文件
例如,当使用 KICAD9_FOOTPRINT_DIR 路径变量时,connect.pretty 封装库的路径将被定义为 ${KICAD9_FOOTPRINT_DIR}/connect.pretty。
通过 偏好设置 → 配置路径… 菜单,可以为一些内置的 KiCad 路径变量定义路径,并根据需要添加自己的路径变量来定义个人路径。
只要旧变量本身没有显式定义,KiCad 就会自动将旧版本 KiCad 中的版本化路径变量解析为当前 KiCad 版本中相应变量的值。例如,如果没有定义 KICAD8_FOOTPRINT_BALL 变量,则 ${KICAD8_FOOTPRINT_BALL} 将自动解析为值 ${KICAD9_FOOTPRINT_BALL}。
|
KiCad 路径变量
|
Base path of KiCad’s standard 3D footprint model library files. |
|
Location for plugins, libraries, and color themes installed by the Plugin and Content Manager. |
|
Base path of KiCad’s standard footprint library files. |
|
Base path of KiCad’s standard symbol library files. |
|
Location of KiCad’s standard project template library files. |
|
Location of personal project templates. |
|
Location of personal simulation model libraries. This variable is not defined by default. |
|
Absolute path to the current project directory. This variable is set automatically and cannot be redefined. |
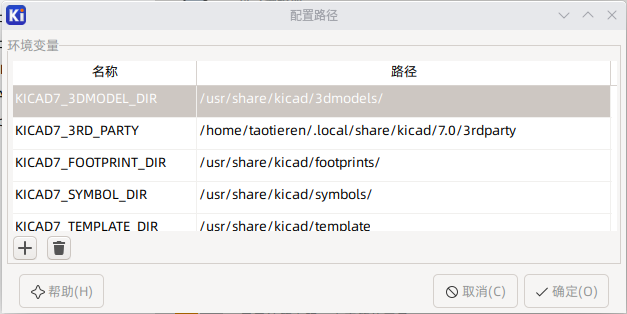
在配置路径对话框中设置的路径是 KiCad 内部的,在 KiCad 之外不可见环境变量。它们被保存在 KiCad 的用户配置文件章节。
路径还可以设置为 KiCad 外部的系统环境变量,这将覆盖用户配置中的任何设置。
使用 配置路径 对话框无法覆盖在 KiCad 外部设置的系统环境变量。任何外部设置的变量都将在对话框中显示为只读。
|
还请注意,路径变量 KIPRJMOD 始终 由 KiCad 内部定义,并展开为 当前工程的绝对路径。 例如,${KIPRJMOD}/connect.pretty 始终是 当前工程文件夹 内的 connect.pretty 文件夹(封装库)。 KIPRJMOD 变量不能在 配置路径 对话框中更改,也不能被外部环境变量覆盖。
高级环境变量
可以设置一些高级环境变量,自定义 KiCad 预计某些文件的位置。默认情况下,这些位置是根据你的平台设置的,但它们可以被系统环境变量覆盖。这些变量不会在 配置路径 对话框中显示,也不能用于路径替换。
改变这些变量不会导致 KiCad 将任何文件从默认位置移动到新的位置,所以如果你改变这些变量,你将需要手动复制任何需要的设置或文件。
|
KiCad 配置文件的基础路径。此目录下将为每个 KiCad 次版本创建子目录,用于存储特定版本的配置文件。 |
|
KiCad 用户可修改文档的基础路径,如工程、模板、Python 脚本、库等。此目录下也将为每个 KiCad 次版本创建子目录。该目录作为推荐的用户数据存储位置,但并非强制使用。 |
|
KiCad 标配数据的基础路径,包含默认库等资源。此目录中的数据由 KiCad 安装程序或系统包管理器管理,不建议用户在此目录中写入自定义数据。 |
| 如果您修改了路径的配置,请退出并重新启动 KiCad,以避免在路径处理方面出现任何问题。 |
作业集
KiCad 可让您配置输出作业列表,只需单击一下即可生成所有输出作业。输出作业列表及其保存目的地称为 作业集。例如,一个作业集可能包含生成 Gerber 文件、装配数据、BOM、原理图和 PCB 的 PDF 图的作业,同时还运行 ERC 和 DRC 检查,并将所有输出保存到压缩文档中。可用工作的完整列表 如下章节。
作业集中的每个 作业 都定义了单一类型的生成输出,如 BOM 或一组 Gerbers。作业的配置方式与从原理图或电路板编辑器手动生成输出的方式相同。每个作业的配置都存储在作业集中,并在以后加载作业集时被记住。作业是单独配置的,因此如果在一个作业集中多次包含相同类型的作业,每个作业都将有自己独立的配置。例如,这样就可以生成彩色和黑白 PDF 输出。
除作业外,作业集还包含 目标,它定义了要运行的作业列表以及如何存储其输出。作业集目标可以简单地将所选作业的输出文件存储在指定位置,也可以将输出文件添加到压缩档案中。每个作业集目标都可以从作业集的完整作业列表中选择不同的作业子集。您可以单独运行每个作业集目标,也可以一次性运行所有作业集目标。例如,您可以设置一个作业集目标,生成电路板和原理图的 PDF 文件并将其复制到外部位置,而另一个目标则生成制作文件并将其压缩到 zip 压缩包中发送给电路板制造商。
工程可以有多个作业集,每个作业集定义不同的作业列表和输出配置。每个作业集都存储在一个 .kicad_jobset 文件中,该文件可以特定于单个工程,也可以在工程之间复制,甚至可以存储在一个中心位置并在工程之间共享。
要使用作业集,首先要在 KiCad 工程管理器中创建一个新的作业集文件(文件 → 新建作业集文件…),并为其选择名称和位置。或者,您也可以使用 文件 → 打开作业集文件… 打开现有的作业集文件。存储在工程目录中的作业集文件被视为工程的一部分,并显示在工程文件工作区中。双击工程文件工作区中的作业集文件,即可打开该文件。
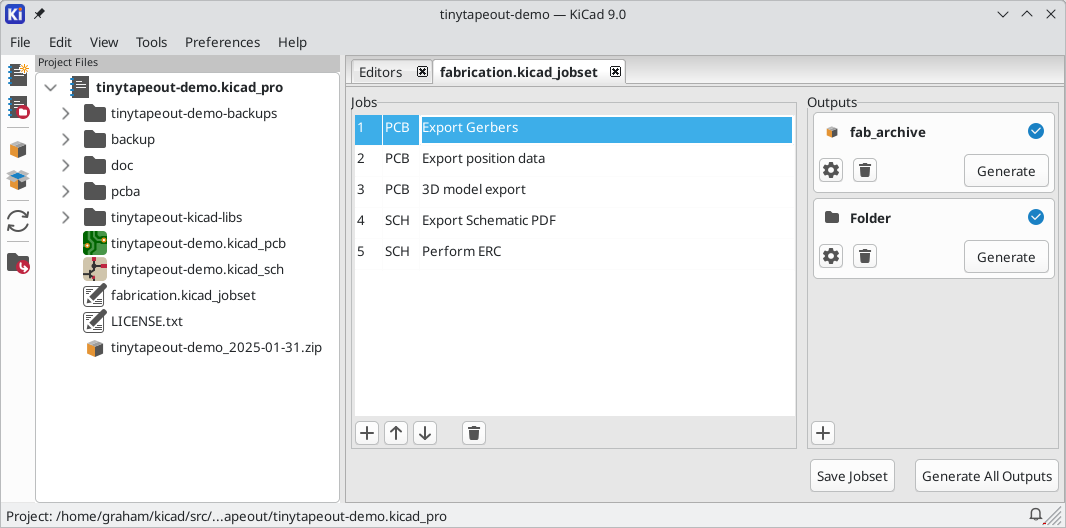
创建或打开作业集后,作业集就会显示在工程管理器的新标签页中。作业列表显示在中间,作业集目标列表显示在右侧。新作业集不包含任何作业,但会自动创建一个目标,将输出保存到文件夹中。对作业集进行更改时,可单击 保存作业集 按钮保存更改。
定义作业
要添加新任务,请单击任务列表下的 ![]() 按钮。在出现的添加新任务对话框中,选择所需的任务类型。您可以在底部的 筛选器 文本框中输入内容,过滤列表中显示的工作类型。
按钮。在出现的添加新任务对话框中,选择所需的任务类型。您可以在底部的 筛选器 文本框中输入内容,过滤列表中显示的工作类型。
选择作业并按下 确定 后,将出现该类型输出的设置对话框。每个作业设置对话框提供的选项与从原理图或电路板编辑器手动生成该类型输出时相同。
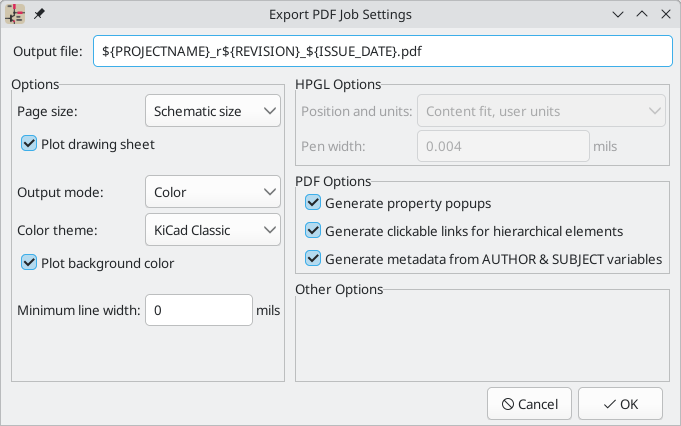
接受作业设置对话框后,作业将被添加到作业列表中,您可以选择更改新作业的默认描述。要稍后更改作业描述或设置,请右键单击列表中的作业并选择 编辑作业描述 或 编辑作业设置…。双击一项作业也可编辑其设置。要删除作业,请选择作业并单击 ![]() 按钮。要对列表重新排序,请选择一项作业,然后使用
按钮。要对列表重新排序,请选择一项作业,然后使用 ![]() 或
或 ![]() 按钮将其上移或下移。
按钮将其上移或下移。
定义工作集目标
在添加作业集目标之前,无法从作业集生成任何输出。创建作业集时会自动创建一个目标,但您可以根据需要添加任意多个目标。
要添加作业集目标,请单击目的地列表下的 ![]() 按钮。出现添加新目标对话框后,选择目标类型:
按钮。出现添加新目标对话框后,选择目标类型:
-
Archive saves the outputs generated by the jobs in a compressed zip archive.
-
Folder saves the outputs generated by the jobs uncompressed in a folder.
选择输出类型后,将出现 “目标” 选项对话框。
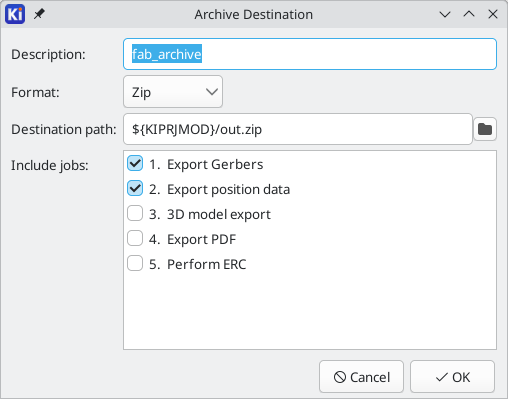
在这里,您可以选择哪些作业将作为此作业集目标的一部分运行,以及用于存储这些作业的文件夹或存档名称。默认情况下,所有作业都将启用。您还可以为目标设置一个描述,以便显示在 “目标” 列表中。输出路径控制作业生成的文件的保存位置。此处的路径可以是工程目录的绝对路径或相对路径,可以使用 路径变量章节 或某些文本变量(${PROJECTNAME}、${CURRENT_DATE} 和 工程文本变量)。作业配置中定义的文件名是相对于作业集目标目录或归档根目录而言的。
单击对话框中的 确定 后,新的作业集目标就会添加到目的地列表中。您可以单击现有作业集目标的 ![]() 按钮修改该目标,或单击其
按钮修改该目标,或单击其 ![]() 按钮删除该目标。
按钮删除该目标。
配置好作业和目标后,您可以单击所需目标的 生成 按钮,生成一组单独的输出。单击 生成所有目标 按钮,可以同时运行所有目标。
如果作业集目标成功运行并生成其输出,则会显示一个蓝色检查符,表示上次运行成功。如果作业集目标未成功完成,则会显示红色感叹号,表示运行不成功。单击成功/失败指示符将显示作业集运行日志对话框,其中显示作业集目标中每个作业的状态。单击特定作业将显示该作业的日志输出(如果有的话)。
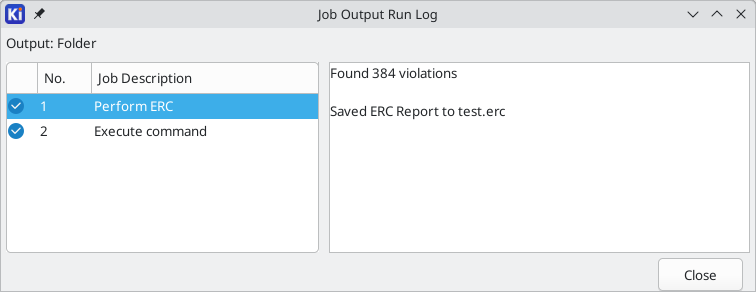
After a jobset destination runs successfully, you can click the destination’s Open Output button to open a file browser in the destination location. This button is disabled if the jobset destination has not run or hasn’t successfully finished.
Jobset destination details
When jobs run, output files are initially generated in a temporary folder. After all jobs in a jobset destination are completed, the output files are moved from the temporary folder to the folder or archive specified by the jobset destination. None of the outputs are moved until all of the jobs finish. Therefore, if a job needs to access files that are generated by another job in the same jobset destination, these files will be located in the temporary folder, not the final jobset destination.
KiCad defines the ${JOBSET_OUTPUT_WORK_PATH} environment variable while jobs are running and sets it to the temporary path for the current jobset destination. You can use this environment variable if a job needs to be aware of the temporary folder’s actual location. For example, if an Execute Command job runs a script that renames the outputs of another job, the script needs to know the temporary location of the outputs being renamed, before they are moved to the jobset destination. ${JOBSET_OUTPUT_WORK_PATH} provides this location.
可用的作业类型
可提供以下类型的作业:
Job |
Description |
PCB: Export 3D Model |
Exports a 3D model of the board. The model format can be STEP, GLB (binary glTF), XAO, BREP (OCCT), PLY, STL, STPZ, U3D, or PDF. |
PCB: Export Drill Data |
Exports a drill file from the board. |
PCB: Export DXF |
Exports the board design to a DXF file. |
PCB: Export Gencad |
Exports the board design in GenCAD format. |
PCB: Export Gerbers |
Exports the board design to Gerber files, with one file per selected layer. |
PCB: Export IPC-2581 |
Exports the board design in IPC-2581 format. |
PCB: Export ODB++ |
Exports the board design in ODB++ format. |
PCB: Export PDF |
Exports the board design to PDF files, with one file per selected board layer. You can also generate a single PDF with multiple layers depending on the plot configuration. |
PCB: Export Position Data |
Exports a position (component placement) file from the board. |
PCB: Export PostScript |
Exports the board design to a PostScript file. |
PCB: Export Statistics |
Generates a Board Statistics report in either JSON or text report format. |
PCB: Export SVG |
Exports the board design to a SVG file. |
PCB: Perform DRC |
Performs a Design Rule Check on the board and generates a report. If DRC violations are found, this job can optionally report a job failure. |
PCB: Render |
Generates a raytraced rendering of the 3D model of the board as a PNG or JPG file. |
Schematic: Export DXF |
Exports the schematic to a DXF file. |
Schematic: Export Netlist |
Exports a netlist from the schematic, with various formats available. |
Schematic: Export PDF |
Exports the schematic to a PDF file. |
Schematic: Export Postscript |
Exports the schematic to a PostScript file. |
Schematic: Export SVG |
Exports the schematic to a SVG file. |
Schematic: Generate Bill of Materials |
Exports a bill of materials from the schematic. |
Schematic: Perform ERC |
Performs an Electrical Rule Check on the schematic and generates a report. If ERC violations are found, this job can optionally report a job failure. |
Special: Copy Files |
Copies the specified file to the specified location. A failure to copy the files can optionally cause the output job to fail. You can control whether files in the output location should be overwritten or not. |
Special: Execute Command |
Executes an arbitrary command. Output from the command can optionally be logged to a file. You can either ignore non-zero output codes or cause them to fail the output job. Note: Job output files are generated in a temporary folder, then moved to the location specified by the jobset destination after all jobs for that destination are executed. In other words, when an Execute Command job runs, the output from other jobs in the same jobset destination are still in a temporary location and not yet in the ultimate destination folder or archive. You can use the |
工程模板
使用工程模板有助于使用预定义设置设置新工程。 模板可能包含预定义的电路板边框,连接器位置,原理图元素,设计规则等。甚至可以包括用作新工程的种子文件的完整原理图和/或 PCB。
使用模板
文件 → 从模板新建工程 菜单将打开工程模板选择器对话框:
单击模板图标将显示模板信息,进一步单击确定按钮将创建新工程。模板文件将被复制到新工程位置并重新命名以反映新工程的名称。
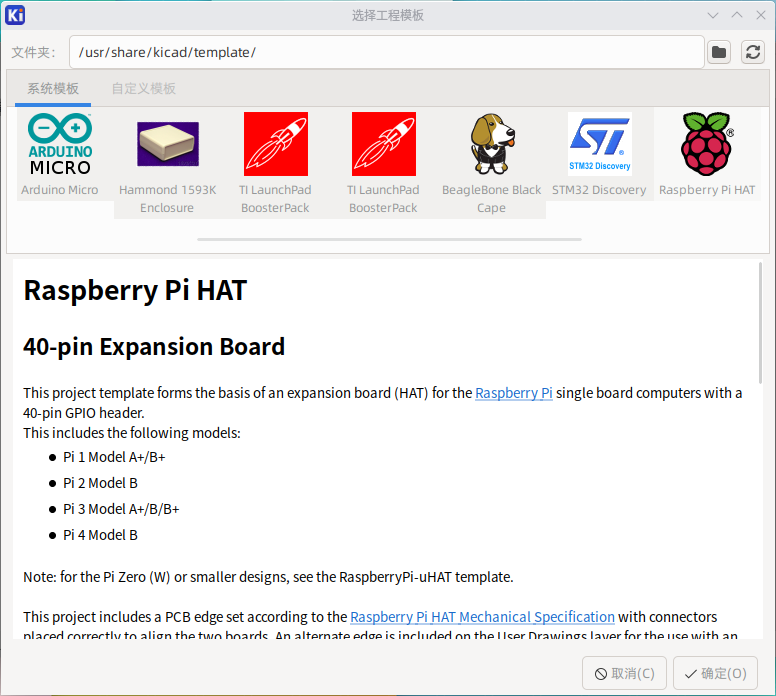
模板位置
KiCad 会在 KICAD9_TEMPLATE_DIR 路径变量定义的路径中查找系统模板,并在 KICAD_USER_TEMPLATE_DIR 定义的路径中查找用户模板。不过,您可以使用对话框顶部的 文件夹 控件浏览任意目录中的模板。
创建模板
KiCad 模板只是一个包含模板工程文件的目录,以及子目录 meta 中模板所需的一些元数据。包含模板文件的目录名称决定了模板的名称。根据模板创建工程时,KiCad 会将模板文件复制到新的工程目录,并重新命名这些文件以匹配新工程名称,如下所述。
模板中的所有文件都会被复制,但有两个例外:
-
名称以
.开头的文件(隐藏文件)不会被复制。 名为.gitignore或.gitattributes的文件有一个特殊情况,如果它们存在,就会被复制。 -
不复制
meta目录
meta 目录必须包含一个名为 info.html 的 HTML 文件,该文件将显示在 KiCad 模板浏览器中,并应包含描述模板的基本信息。支持基本的 HTML 功能,包括图像。 由 info.html 引用的任何图像也应存储在 meta 目录中。
<title> 标记决定模板选择时显示的模板名称。请注意,如果工程模板名称太长,将会被截断。显示名称不必与模板目录名称相同。
这里有一个 info.html 文件的例子:
<!DOCTYPE HTML PUBLIC "-//W3C//DTD HTML 4.0 Transitional//EN">
<HTML>
<HEAD>
<META HTTP-EQUIV="CONTENT-TYPE" CONTENT="text/html;
charset=windows-1252">
<TITLE>树莓派 (Raspberry Pi) - 扩展板开发模板</TITLE>
</HEAD>
<BODY LANG="fr-FR" DIR="LTR">
<P>本设计模板用于开发树莓派扩展电路板,兼容
<A HREF="http://www.raspberrypi.org/" TARGET="blank">树莓派 $25 ARM 开发板</A> <BR><BR>基础设计包含与树莓派 PCB 等尺寸的板框定义,并通过精确定位连接器实现双板对齐。
树莓派开发板的所有 I/O 接口均通过 0.1 英寸 (2.54mm)扩展排针连接至本设计。
<BR><BR>电路板外形如下图所示:
</P>
<P><IMG SRC="brd.png" NAME="brd" ALIGN=BOTTOM WIDTH=680 HEIGHT=378
BORDER=0><BR><BR><BR><BR>
</P>
<P>(c)2012 Brian Sidebotham<BR>(c)2012 KiCad 开发团队</P>
</BODY>
</HTML>最后,meta 可选择包含一张名为 icon.png 的图片,该图片将在模板选择对话框中用作模板的图标。图标应为 64 x 64 像素的 PNG 图像。
模板文件重命名
当使用模板创建工程时,模板中的所有文件和目录都会复制到新工程路径,meta 和任何 dotfile(隐藏文件) 除外。包含模板目录名称的文件和目录将用新工程文件名称重命名。
例如,使用名为 example(左)的模板创建名为 newproject(右)的工程,重命名后的文件以 粗体 显示:
模板 example 目录下的文件 |
在工程 newproject 目录下创建的文件 |
|---|---|
|
|
模板不需要包含完整的工程。如果缺少必需的工程文件,KiCad 将使用默认的创建工程行为来生成该文件:
Files in template example directory |
Files created in newproject directory |
|---|---|
|
|
作为模板名称重命名规则的一个例外,如果模板包含一个工程文件(.kicad_pro)且其名称与模板名称不匹配,KiCad 将根据该工程文件的名称进行重命名:
模板 example 目录下的文件 |
在 newproject 目录下创建的文件 |
|---|---|
|
|
| 不建议创建包含多个工程文件的模板。 |
插件和内容管理器
KiCad 提供了一个插件和内容管理器,允许您浏览、安装和管理由其他用户和组织提交的软件包。这些软件包可以是提供特定功能的插件、用于从特定制造商订购 PCB 的工具、符号和封装库,或是新的编辑器配色方案。您可以通过从 KiCad 工程管理器主窗口启动来访问 PCM。
PCM 从互联网上的软件包仓库下载软件包。每个仓库都是由个人或组织管理的软件包集合。默认情况下,PCM 使用由 KiCad 组织管理的单一仓库。用户和组织可以自由创建自己的仓库,其他用户随后可以将这些仓库添加为自己 KiCad 安装中的额外仓库。第三方仓库可以是公开的,也可以是私有的。
| 软件包可能会安装运行在您计算机上的代码。这些软件包并非由 KiCad 开发人员开发。KiCad 组织不对通过 PCM 安装的软件包的质量或安全性做出任何保证。请确保您仅安装您信任的软件包。 |
| 如果您对某个软件包有反馈意见,请将其提交给该软件包的开发者,而不是 KiCad 团队。每个软件包的联系信息显示在软件包的描述中。 |
要分享您开发的软件包,您可以将其提交到 KiCad 官方仓库。如果被接受,其他用户在浏览 KiCad 仓库时就能看到并使用它。您也可以创建自己的仓库,或将软件包提交到由他人或团队管理的仓库,但在这种情况下,除非用户在自己的安装中配置了该仓库,否则他们将无法看到您的软件包。有关创建自己的软件包和仓库的更多信息,请参见 下文章节。
浏览软件包
仓库中的所有包都显示在 PCM 的 仓库 选项卡中。 您可以通过选择选项卡顶部的下拉列表中的仓库来选择要浏览的仓库。默认情况下,仅启用 KiCad 官方仓库。
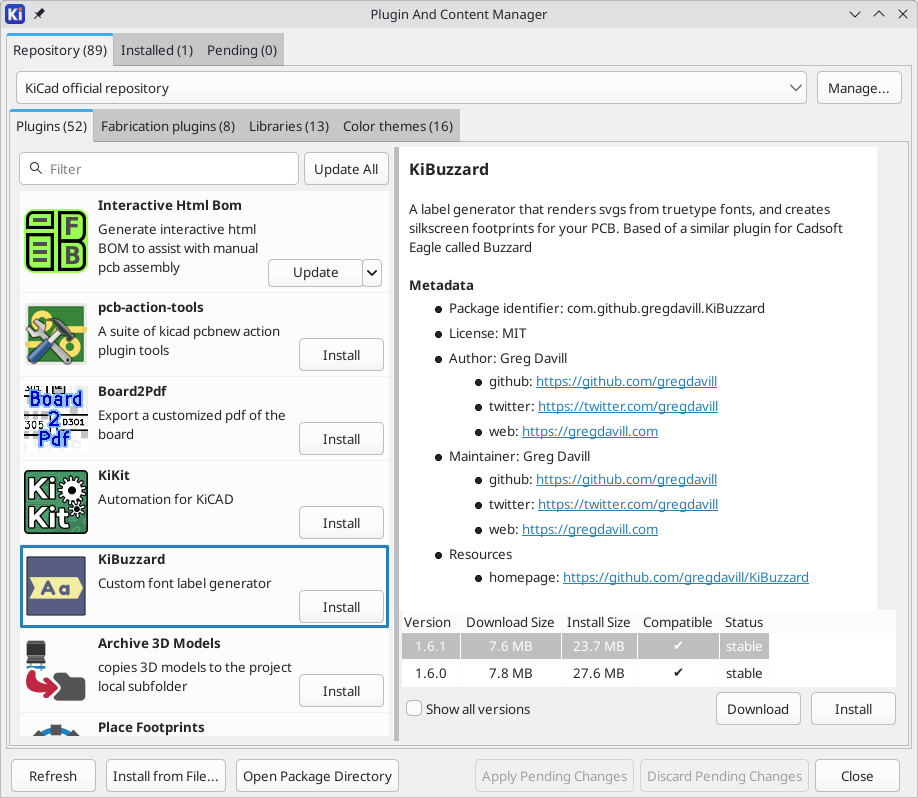
包被分为四个类别,每个类别在 仓库 标签下都有其专属的标签页:
-
Plugins are additional tools that can be launched from the PCB Editor. Plugins can have many purposes, for example modifying a board design or generating specific outputs. Footprint wizards can also be distributed as plugins.
-
Fabrication plugins are a sub-category of plugins for ordering your PCBs from specific fabricators. These plugins may be a convenient way to order from a manufacturer, but they are typically not required; you can usually provide manufacturers with normal fabrication outputs instead. Consult with your manufacturer to find out the best way to order from them.
-
Libraries contain symbols, footprints, and/or 3D models. By default, libraries installed by a library package are automatically added to the appropriate symbol and/or footprint library tables when the package is installed, and removed from the table when the package is uninstalled. Libraries installed by a package have configurable library name prefix (
PCM_by default). These settings are configurable in the Packages and Updates section of Preferences. -
Color themes are color themes for the Schematic, Symbol, Board, and Footprint editors. You can select an installed theme in the Colors section of the Preferences for each editor.
窗口左侧的列表显示了每个类别中的软件包。您可以通过在软件包列表顶部的筛选框中输入内容来过滤软件包列表。按下 刷新 按钮可从在线仓库重新加载软件包列表。
当您在列表中选择一个软件包时,右侧会显示该软件包的相关信息。其中包括软件包的描述、许可证信息以及开发者的联系方式,还提供了报告错误和提交其他反馈的途径。
软件包信息还包括一个表格,列出了当前可用的软件包版本。对于每个版本,表格中显示了软件包的大小、其状态以及是否与您使用的 KiCad 版本兼容。
一个软件包的状态可以是以下几种之一,具体由软件包的开发者标明:
-
稳定版:该软件包版本适合一般使用。
-
测试版:该软件包版本处于测试阶段;用户应谨慎使用,并将遇到的任何问题报告给软件包的开发者。
-
开发版:该软件包版本处于开发阶段;用户不应期望其完全正常运行。
-
已弃用:该软件包不再维护。
默认情况下,版本表仅显示与您当前使用的 KiCad 版本兼容的软件包版本。您可以通过勾选 显示所有版本 复选框,查看软件包的所有版本,包括那些与您的 KiCad 版本不兼容的版本。如果某个软件包有多个版本可供选择,您可以自行决定安装哪个版本。
安装软件包
当您决定安装一个软件包时,请在软件包的描述页面点击 安装 按钮。如果有多个版本的软件包可供选择,请在安装前在版本表中选择所需的版本。您还可以在软件包列表中点击 安装 按钮来安装最新版本。这并不会立即安装软件包;相反,软件包会被排队等待稍后安装,并显示在 待处理 标签页中。直到您点击 应用待处理更改 按钮时,软件包才会被安装,该按钮会一次性安装所有待处理的软件包。
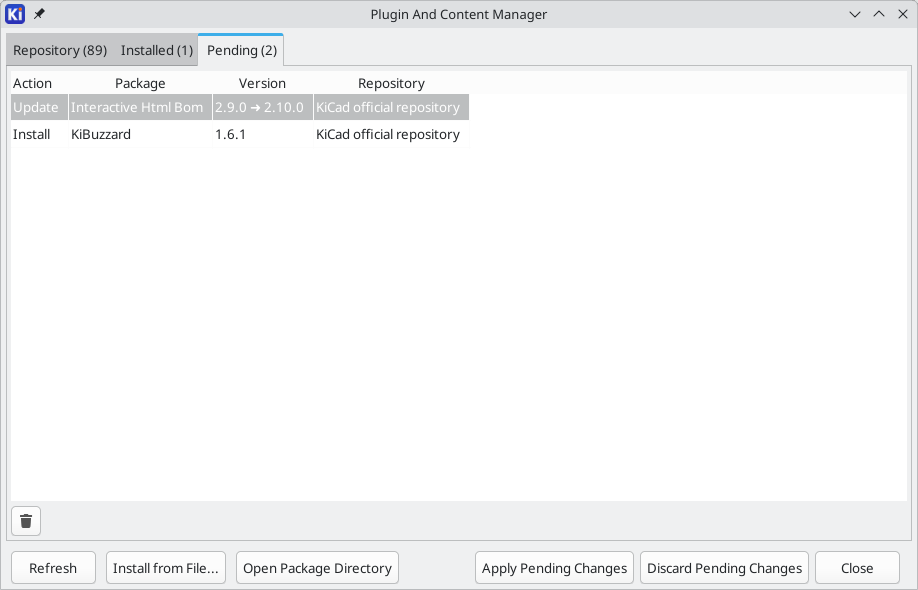
要从待安装列表中移除单个软件包,请在 待处理 选项卡中选择该软件包,然后按下 ![]() 按钮。若要取消所有待安装软件包的安装,请点击 放弃待处理更改 按钮。
按钮。若要取消所有待安装软件包的安装,请点击 放弃待处理更改 按钮。
一旦安装了一个包,它就会列在 已安装 标签页中。在此标签页中,您可以查看已安装包的列表,并更新或卸载其中的任何一个。
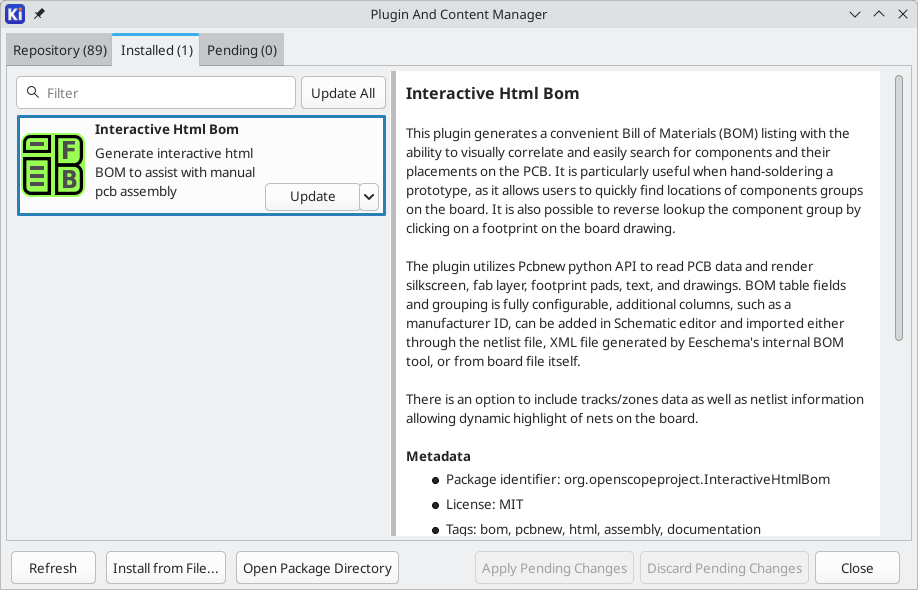
如果有任何软件包有新版本可用,工程管理器中的 PCM 图标会显示一个指示器,显示可用更新的数量。

要将某个包更新到不同版本,请在其版本表中选择新版本,然后点击 更新 按钮。您还可以在已安装包列表中,点击其 卸载 按钮旁边的下拉菜单中的 更新,将包更新到最新版本。要更新所有已安装的包,请点击已安装包列表顶部的 全部更新 按钮。如果在其下拉菜单中选择了 锁定包,则该包将不会被更新。
要卸载一个软件包,请在已安装软件包列表中或软件包的描述页面上点击其 卸载 按钮。
与安装过程类似,当您点击 更新 或 卸载 按钮时,软件包并不会立即更新或卸载。相反,该操作会被排入 待处理 标签页中,直到您单独应用每个更改或点击 应用待处理更改 按钮。
最后,您可以通过点击包描述底部的 下载 按钮并选择保存包的位置来下载包而不安装它。这使您可以在安装之前检查包中的文件。要安装已下载但尚未安装的包,请点击 从文件安装… 按钮并选择该包。打开包目录 按钮将在 KiCad 安装包的文件夹中打开文件浏览器。
管理仓库
默认情况下,PCM 仅使用 KiCad 官方仓库。您可以通过点击 仓库 选项卡顶部的 管理… 按钮来添加第三方仓库或移除现有仓库。
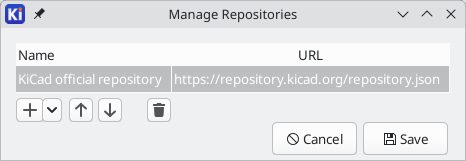
要添加仓库,请点击 ![]() 按钮并指定仓库的完整 URL。要移除仓库,请选中它并按下
按钮并指定仓库的完整 URL。要移除仓库,请选中它并按下 ![]() 按钮。使用
按钮。使用 ![]() 和
和 ![]() 按钮可以重新排列列表中的仓库顺序。
按钮可以重新排列列表中的仓库顺序。
如果您移除了默认的 KiCad 官方仓库,可以通过点击图片旁边的下拉菜单中的 添加默认仓库 按钮轻松重新添加它 ![]() 。
。
创建软件包和仓库
要为 PCM 创建软件包,请按照以下链接中的说明操作:https://dev-docs.kicad.org/en/addons/index.html。这些说明解释了如何为任何仓库创建 PCM 软件包,包括但不限于 KiCad 官方仓库。它们还解释了 KiCad 仓库中包含的软件包的规则,以及如何向该仓库提交软件包。第三方仓库使用相同的软件包格式,但可能有不同的提交规则和流程。
要创建您自己的仓库,请按照在 https://go.kicad.org/pcm/schemas/v1 发布的模式发布一个仓库 JSON 文件。
操作参考
以下是 KiCad 工程管理器中每个可用 操作 的列表:可以分配给快捷键的命令。
KiCad 工程管理器
以下操作在 KiCad 工程管理器中是可用的。热键可以分配给偏好设置中的 快捷键 部分的任何动作。
| Action | Default Hotkey | Description |
|---|---|---|
关闭工程 |
关闭当前工程 |
|
图像转换 |
Ctrl+B |
将位图图像转换为原理图或 PCB 元件 |
图框编辑器 |
Ctrl+Y |
编辑图框页边框和标题栏 |
封装编辑器 |
Ctrl+F |
编辑 PCB 封装 |
PCB 编辑器 |
Ctrl+P |
编辑 PCB 布局 |
原理图编辑器 |
Ctrl+E |
编辑电路原理图 |
符号编辑器 |
Ctrl+L |
编辑原理图符号 |
从仓库克隆工程… |
从现有仓库克隆工程 |
|
从模板新建工程… |
Ctrl+T |
从模板创建新工程 |
新建空白工程… |
Ctrl+N |
创建新的空白工程 |
打开演示工程… |
打开演示工程 |
|
打开工程… |
Ctrl+O |
打开已有工程 |
打开文本编辑器 |
启动偏好设置的文本编辑器 |
|
插件与内容管理器 |
Ctrl+M |
运行插件与内容管理器 |
计算器工具 |
运行元件计算、走线宽度计算等 |
|
Gerber 查看器 |
Ctrl+G |
预览 Gerber 输出文件 |