KiCad Nightly Reference Manual
Copyright
This document is Copyright The KiCad Documentation Contributors. You may distribute it and/or modify it under the terms of either the GNU General Public License (http://www.gnu.org/licenses/gpl.html), version 3 or later, or the Creative Commons Attribution License (http://creativecommons.org/licenses/by/3.0/), version 3.0 or later.
Tutti i marchi registrati all’interno di questa guida appartengono ai loro legittimi proprietari.
Collaboratori
Jean-Pierre Charras, Fabrizio Tappero, Jon Evans, Graham Keeth.
Traduzione
Marco Ciampa <[email protected]>, 2014-2018.
Commenti
The KiCad project welcomes feedback, bug reports, and suggestions related to the software or its documentation. For more information on how to submit feedback or report an issue, please see the instructions at https://www.kicad.org/help/report-an-issue/
Software and Documentation Version
This user manual is based on KiCad 10.99. Functionality and appearance may be different in other versions of KiCad.
Documentation revision: 2e473680.
Introduzione
KiCad è una suite software open source per la creazione di schemi elettrici e circuiti stampati (PCB). KiCad supporta un flusso di lavoro di progettazione integrato in cui uno schema e un C.S. corrispondente sono progettati insieme, nonché flussi di lavoro autonomi per usi speciali. KiCad include anche diverse utilità per aiutare con la progettazione di circuiti e C.S., tra cui una calcolatrice per determinare le proprietà elettriche delle strutture dei circuiti, un visualizzatore di file Gerber per l’ispezione dei file di produzione e un simulatore SPICE integrato per la verifica del comportamento del circuito elettrico.
KiCad funziona su tutti i principali sistemi operativi e su un’ampia gamma di computer. Supporta C.S. con un massimo di 32 strati di rame ed è adatto per creare progetti di ogni complessità. KiCad è sviluppato da un team di volontari di software ed ingegneri in tutto il mondo con la missione di creare software di progettazione elettronica gratuito e open source adatto a progettisti professionisti.
L’ultima versione di questa documentazione è disponibile all’indirizzo https://docs.kicad.org.
Requisiti di sistema
KiCad è in grado di funzionare su un’ampia varietà di macchine e di sistemi operativi, ma alcune attività potrebbero essere più lente o più difficili su dispositivi di fascia bassa. Per un’esperienza ottimale, si consiglia una scheda grafica e uno schermo dedicati con risoluzione 1920x1080 o superiore.
Controllare sul sito Web di KiCad per i requisiti di sistema più recenti: https://kicad.org/help/system-requirements/
Installazione e aggiornamento KiCad
First time setup
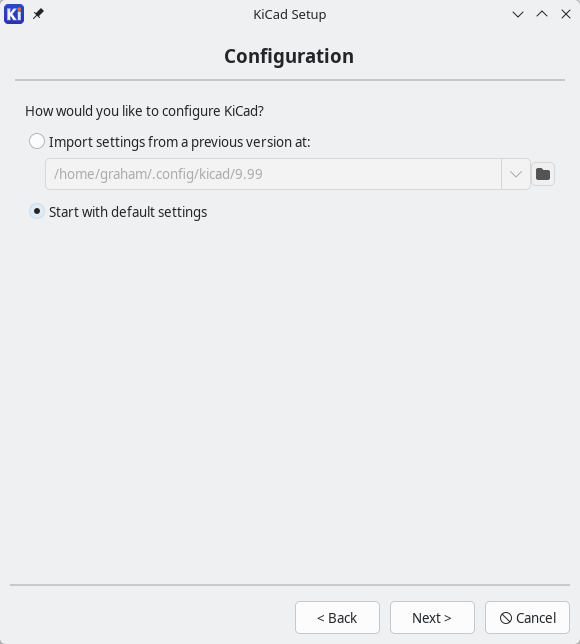
The first time you run a new major version of KiCad, a Welcome window will appear to ask you how to initialize your settings. Each major release of KiCad has its own configuration, so that you may run multiple KiCad versions on the same computer without the configurations interfering.
Configuration setup
You always have the option to start with default settings for the new version. If a previous version of KiCad is detected, you will have the option to import the settings from that version. The location of the previous configuration files is detected automatically, but you may override it to choose another location if desired.
Hotkey configurations are not imported from previous versions.
You can manually import hotkey configurations by using the Import Hotkeys… button on the Hotkeys page of Preferences,
then browsing to the .hotkeys file from the old version’s configuration directory.
If you do so, please note that this will replace the current version’s hotkey settings.
|
KiCad stores the settings files in a folder inside your user directory. Each KiCad version will use a different versioned subfolder. For KiCad 10, those folders are:
Windows |
|
Linux |
|
macOS |
|
Libraries setup
You also have options for how to initialize your symbol, footprint, and design block libraries.
If you are setting up KiCad for the very first time, you should select the first option, Start with the built-in KiCad libraries. This initializes your library tables to include all of the libraries that come with KiCad.
If you have used an older version of KiCad and are updating it to the newest version, and therefore already have a library setup that worked in the old version, you can instead the select the second option, Import tables from the previous version. In this case, it is recommended to also select the option Migrate built-in libraries to the latest version, which replaces references to the old-version built-in libraries with references to the updated libraries.
You also have the option to start with no libraries and do all of the configuration yourself. Refer to the Schematic Editor and PCB Editor documentation for details on how to manually configure libraries.
Depending on your system and how KiCad was installed, some options may not be available. KiCad may also not be able to locate any libraries installed on your system. In this case, you should ensure you have installed the libraries, or you can manually configure the libraries after completing setup.
| On some systems the KiCad libraries are installed as a separate package. |
The location of the default library table files depends on operating system and may vary based on installation location. Below are the defaults for each operating system:
Windows |
|
Linux |
|
macOS |
|
Updates & Privacy setup
You can also choose whether to be notified about updates to the KiCad application and to third party packages you may have installed through KiCad’s Plugin and Content Manager (plugins, themes, libraries, etc.). On Windows, you also have the option to enable anonymous crash reporting, which helps the KiCad team diagnose and fix critical issues in the application.
Migrating design files from previous versions
Le versioni moderne di KiCad possono aprire file creati da versioni precedenti, ma possono solo scrivere file nei formati più recenti. Ciò significa che in generale non ci sono passaggi speciali per migrare i file da una versione precedente oltre all’apertura dei file. In alcuni casi, l’estensione di un file viene modificata da una versione di KiCad a quella successiva. Dopo aver aperto questi file, verranno salvati nel nuovo formato con la nuova estensione del file. I vecchi file non verranno eliminati automaticamente.
The schematic editor documentation describes several particular considerations for opening legacy schematics.
In generale, i file creati o modificati da una versione di KiCad non possono essere aperti da versioni precedenti di KiCad. Per questo motivo, è importante conservare copie di salvataggio dei propri progetti durante le prove di una nuova versione di KiCad, finché non si è sicuri di non dover più utilizzare la versione precedente di KiCad.
Using the KiCad project manager
The KiCad project manager is the window that opens when you start KiCad. The project manager creates and opens KiCad projects and launches the other KiCad tools:
-
the Schematic Editor
-
the Symbol Editor
-
the PCB Editor
-
the Footprint Editor
-
the Gerber Viewer
-
the Image Converter
-
the Calculator Tools
La finestra del gestore progetti di KiCad è composta da una vista ad albero sulla sinistra che mostra i file associati al progetto aperto, e un pannello di avvio sulla destra contenente i pulsanti da usare per eseguire vari editor e strumenti software.
![][scaledwidth="90%"](images/it/main_window.png)
The tree view shows a list of the files inside the project folder. This includes the KiCad schematic and board design files as well as other files and folders in the project folder. If the project contains multiple schematic sheets, only the root sheet is shown in the tree view.
| Solo i file che KiCad sa come aprire vengono visualizzati nella vista ad albero del progetto. |
Double-clicking on a file in the tree view will open it in the associated editor. Right-clicking on a file will open a context menu with some file manipulation commands.
If the project is part of a Git repository, the tree shows icons indicating the version control status of each file and lists the active branch next to the project name. While normally the tree view only shows the schematic root sheet, and not any subsheets, all sheets are shown when the project is in a Git repository so that modifications to each sheet can be observed individually.
![][scaledwidth="35%"](images/project_tree.png)
KiCad projects contain at least a project file, a schematic, and a board design. Schematics may contain multiple sheets, each in its own file, but a project can only contain a single board. KiCad expects the project file, schematic root sheet file, and board file to all have the same name.
La barra degli strumenti sul lato sinistro della finestra fornisce scorciatoie per le operazioni di progetto comuni:
|
Create a new project. |
|
Open an existing project. |
|
Create a zip archive of the whole project. This includes schematic files, libraries, PCB, etc. |
|
Extract a project zip archive into a directory. Files in the destination directory will be overwritten. |
|
Refresh the tree view, to detect changes made on the filesystem. |
|
Open the project working directory in a file explorer. |
Standalone mode
You can also run the KiCad editor tools in standalone mode, by launching them directly from your operating system’s application launcher rather than from the project manager. It is usually not recommended to run the tools in standalone mode, except for some specific situations where it is necessary, such as when importing projects from other EDA tools. When running in standalone mode, some project features are not available, including:
-
cross probing between the schematic editor and the board editor
-
design synchronization between the schematic and the board
Creazione di un nuovo progetto
Most KiCad designs start with the creation of a project. When you create a new project, you always begin by choosing a project template, even if that template is the default, blank project template.
To create a new project, use the New Project… command in the File menu, click the New Project button in the top toolbar, or use the keyboard shortcut (Ctrl+N by default).
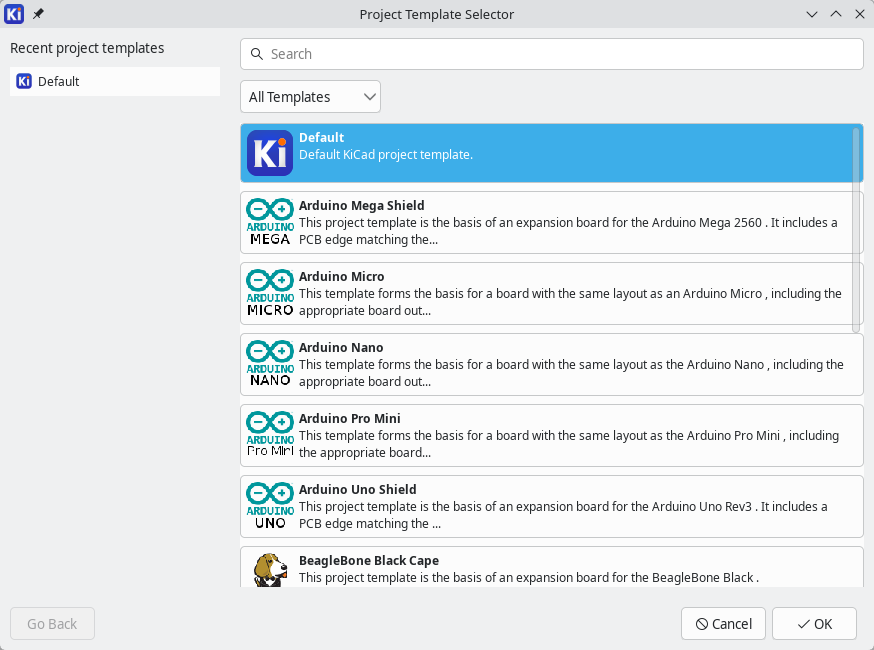
The right side of this dialog shows a list of all installed project templates. The Default template is always available for you to create an empty project. Clicking one of these templates will show the template’s description in a new panel. The left side of the dialog shows a list of your recently used project templates.
| Creating new project templates is covered in the Project Templates section. |
| Creating your own project templates is a good way to easily create new projects that are preconfigured with your preferred drawing sheets, design rules, PCB outlines, logos, etc. |
When you have chosen a template, click the OK button to create a new project from that template.
Ti verrà chiesto un nome da assegnare al progetto. Per impostazione predefinita, verrà creata una directory per il tuo progetto con lo stesso nome. Ad esempio, se si inserisce il nome MioProgetto, KiCad creerà la cartella MioProgetto e il file di progetto MioProgetto/MioProgetto.kicad_pro al suo interno.
If you already have a directory to store your project files in, you can uncheck the Create a new directory for the project checkbox in the New Project dialog.
| È fortemente raccomandato memorizzare ogni progetto KiCad dentro la corrispondente cartella. |
Una volta selezionato il nome del progetto, KiCad creerà i seguenti file all’interno della cartella del progetto:
|
KiCad project file. |
|
Main schematic file. |
|
Printed circuit board file. |
Other files may also be created, depending on the contents of the template.
Importazione di un progetto da un altro strumento EDA
KiCad is able to import files created by some other software packages. Some software formats can be imported as complete projects. Others can only be imported as standalone schematics or boards, and must be manually linked together into a KiCad project. The following types of projects are supported:
| Source EDA Tool | File Extension(s) |
|---|---|
Altium Designer |
|
CADSTAR archive format |
|
Eagle 6.x or newer (XML format) |
|
EasyEDA (JLCEDA) Standard Backup |
|
EasyEDA (JLCEDA) Pro Project |
|
PADS ASCII Project |
|
gEDA / Lepton EDA Project |
|
Per importare un progetto da uno di questi strumenti, scegliere l’opzione appropriata dal sottomenu Importa progetto non KiCad del menu File.
Depending on the format, you will be prompted to select either a project, schematic, or a board file in the import file browser dialog. The imported schematic and board files should have the same base file name (e.g. project.sch and project.brd). Once the requested files are selected, you will be asked to select a directory to store the resulting KiCad project.
A greater number of formats can be imported as either schematics or boards, rather than complete projects. The following schematic formats can be imported into the Schematic Editor:
| Source EDA Tool | File Extension(s) |
|---|---|
Altium Designer |
|
Eagle (Autodesk) |
|
LTspice |
|
PADS Logic |
|
CADSTAR Schematic Archive |
|
gEDA / Lepton EDA |
|
EasyEDA (JLCEDA) Standard |
|
EasyEDA (JLCEDA) Professional |
|
Importing these schematic formats is explained in more detail in the Schematic Editor documentation.
The following PCB formats can be imported into the PCB Editor:
| Source EDA Tool | File Extension(s) |
|---|---|
Altium Designer |
|
Altium Circuit Maker |
|
Altium Circuit Studio |
|
Cadence Allegro |
|
CADSTAR PCB Archive |
|
Eagle (Autodesk) |
|
EasyEDA / JLCEDA Standard |
|
EasyEDA / JLCEDA Professional |
|
Fabmaster |
|
gEDA / Lepton EDA |
|
P-CAD 200x |
|
PADS (ASCII) |
|
Solidworks PCB |
|
Importing these PCB formats is explained in more detail in the PCB Editor documentation.
Project backups and autosave
KiCad can automatically create backups of your projects. When enabled, KiCad will automatically create backups of the entire current project in two situations:
-
When you manually save in any editor.
-
When there are unsaved changes after a few seconds of inactivity (an autosave).
You can enable and configure project backups in KiCad’s Project Backup preferences.
KiCad can create project backups in two ways: incremental backups or Zip archives.
Incremental backups
When configured for incremental backups, project backups are saved as incremental snapshots of project files.
You can view each of these snapshots in the Local History panel (View → Panels → Local History).
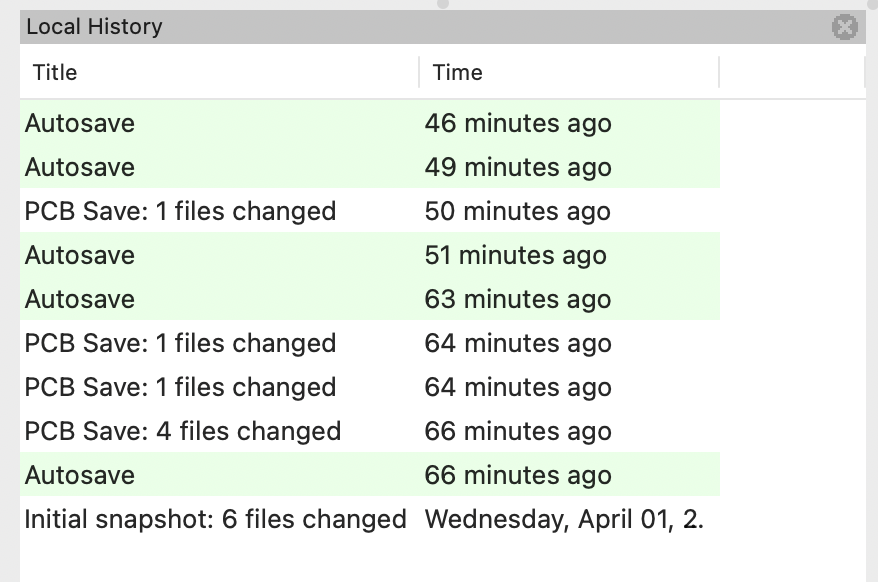
The Local History panel shows each snapshot event and when the snapshot was taken. If you hover over an event, a tooltip shows the files that changed in the snapshot.
To restore from a snapshot, right click the snapshot in the Local History panel and choose Restore Commit.
Behind the scenes, the incremental backup system uses a Git repository in a hidden .history folder. KiCad manages this Git repository automatically.
If you use a version control system to track your project’s changes, you may want to exclude the .history folder.
|
Zip archives
When configured for Zip archives, project backups are saved as a Zip archives of the project directory and its contents. Each backup is a separate Zip file.
You can restore from these archives by using the Unarchive tool or by manually extracting the archive and loading the project.
Saving and loading project archives
You can archive your project’s files into a zip archive with the Archive tool (File → Archive Project…).
You can also unarchive a project using the Unarchive tool (File → Unarchive Project…). When you unarchive a project into the currently loaded project directory, the project will be reloaded automatically to reflect any changes that were in the archived version of the project.
The archive tool saves the following files from your project folder into the archive:
|
KiCad design files |
|
Legacy KiCad design files |
|
3D models |
|
Gerber files |
|
Manufacturing files |
|
Netlists |
|
Python scripts |
|
Documentation files |
|
SPICE models |
|
IBIS models |
Git integration
The KiCad Project Manager integrates with the Git version control tool for tracking changes in your projects. It can work with an existing local Git repository, clone a project from a remote repository, or create a new repository in an existing project. You can use the tool to commit changes from your project, push and pull from a remote repository, and switch branches.
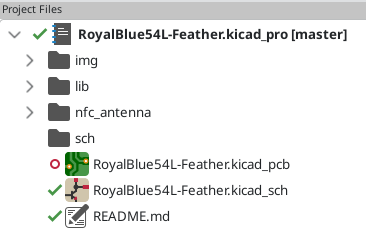
If you open a project that is already under version control with Git, i.e. it is part of an existing Git repository, you can use KiCad’s version control features to track changes in the project without any additional configuration. The active branch is displayed next to the project name, and the version control status of each file in your project is shown graphically in the project files tree. For example, the ![]() icon indicates a file is unchanged,
icon indicates a file is unchanged, ![]() indicates a file has uncommitted changes, and
indicates a file has uncommitted changes, and ![]() indicates a file is not tracked. No icons are shown if the project is not part of a Git repository.
indicates a file is not tracked. No icons are shown if the project is not part of a Git repository.
| You can disable KiCad’s Git integration features in the Version Control page of the Preferences dialog. The preferences also let you configure the remote update interval and the default commit author information. |
Adding version control to an existing project
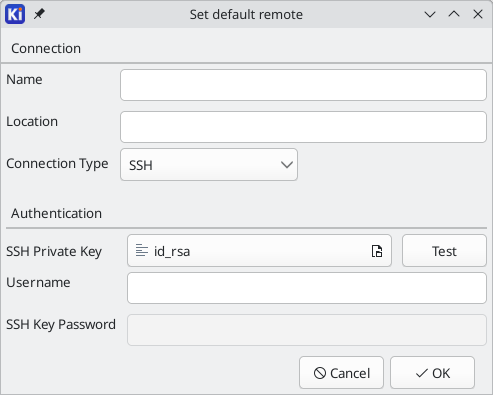
If an existing project is not already under version control, you can initialize a new Git repository in the project by right clicking on one of the files in the project files tree and clicking Version Control → Add Project to Version Control…. You must configure a remote when initializing a repository in this way. Configuring the repository requires the following information:
-
Location: The URL or file path to the remote. HTTPS, SSH, and local (file) connections are supported. The format of the URL is used to automatically determine the type of connection and set the authentication options accordingly.
-
SSH private key: The SSH private keyfile to use for authentication (SSH connections only).
-
User name: The user name to use for authentication. For SSH connections, the user name is often
git. -
Password: The password to use for authentication (HTTPS connections only).
-
SSH key password: The passphrase for your SSH key, if you have configured one (SSH connections only).
You can check the connection and authentication by clicking the Test Connection button.
Cloning an existing repository
To clone an existing repository and open the cloned project, use File → Clone Project from Repository…. You can clone a remote repository using SSH or HTTPS, or clone a local repository. The configuration settings for cloning are the same as the settings for configuring a new repository and remote for an existing project.
Tracking project changes with Git
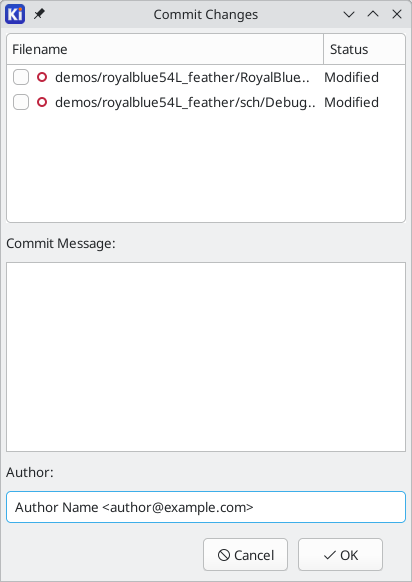
When you have made changes that you want to commit, you can commit either the entire project (right click → Version Control → Commit Project…) or a specific file (right click the file → Version Control → Commit File…). Both actions open the Commit Changes dialog, but the Commit Project action shows all changed files in the repository, while the Commit File action shows only the file that was right clicked. The Commit Changes dialog lets you select the changed files you want to include in the commit, provide a commit message and author, and commit the changes.
To push changes to the remote, right click in the project files tree and select Version Control → Push. To pull from the remote, right click and select Version Control → Pull. You can switch branches by selecting the desired branch from the Version Control → Switch to Branch menu.
Finally, you can disable version control tracking for the project by right clicking and selecting Version Control → Disable Git Integration. This disables KiCad’s Git integration when editing the current project, but it does not remove the project’s Git history or otherwise affect the actual Git repository on disk, so you can continue to version control the project with another Git tool. It also does not disable KiCad’s Git integration with other projects. You can disable the Git integration for all projects in the Version Control page of the Preferences dialog.
Cartelle e file di KiCad
KiCad crea e usa file con le seguenti estensioni (e cartelle) per la modifica di schemi e schede.
Many of these files include important design information, especially the project file (.kicad_pro), the schematic file(s) (.kicad_sch), and the board file (.kicad_pcb). Other files may also be necessary. Such files should always be included when distributing the project. Some files are not necessary to distribute with the project, such as the project-local settings file (.kicad_prl) or the fp-info-cache file. Files that are unnecessary to distribute are noted in the table below.
File di progetto
|
Project file, containing settings that are shared between the schematic and PCB |
|
Legacy (KiCad 5.x and earlier) project file.
Can be read and will be converted to a |
Schematic editor files and folders
|
Schematic files, containing all symbol and connection information. |
|
Schematic symbol library file, containing the symbol descriptions: graphic shape, pins, fields. This is a packed library, i.e. all of the symbols in the library are in a single file. This can also be an individual symbol in an unpacked library,
where the library is a folder containing individual |
|
Schematic symbol library folder.
The folder itself is the library, and contains individual |
|
Simulator workbook file containing SPICE simulation setup information. |
|
Legacy (KiCad 5.x and earlier) schematic file.
Can be read and will be converted to a |
|
Legacy (KiCad 5.x and earlier) schematic library file. Can be read but not written. |
|
Legacy (KiCad 5.x and earlier) schematic library documentation. Can be read but not written. |
|
Legacy (KiCad 5.x and earlier) schematic component library cache file.
Required for proper loading of a legacy schematic ( |
|
Symbol library table: list of symbol libraries available in the schematic editor. |
|
Design block library table: list of design block libraries available in the schematic editor. |
File e cartelle dell’editor schede
|
Board file containing all info but the page layout. |
|
Footprint library folders. The folder itself is the library. |
|
Footprint files, containing one footprint description each. |
|
Design rules file, containing custom design rules for a certain |
|
Legacy (KiCad 4.x and earlier) board file. Can be read, but not written, by the current board editor. |
|
Legacy (KiCad 4.x and earlier) footprint library file. Can be read by the footprint or the board editor, but not written. |
|
Footprint library table: list of footprint libraries available in the board editor. |
|
Cache to speed up loading of footprint libraries. Does not need to be distributed with the project or put under version control. |
File comuni
|
Local settings for the current project; helps KiCad remember the last used settings such as layer visibility or selection filter. Does not need to be distributed with the project or put under version control. |
|
Page layout (drawing border and title block) description file. |
|
Jobset definition file containing output jobsets. |
|
Design block library folders. The folder itself is the library. Design blocks can contain both schematic and layout fragments. |
|
Design block folder for defining a reusable design.
The folder is the design block,
and contains a |
|
Netlist file created from the schematic, and read by the board editor. Note that the recommended workflow for transferring information from the schematic to the board does not require the use of netlist files. |
|
Association between components used in the schematic and their footprints.
It can be created by the Board Editor and imported by the Schematic Editor.
Its purpose is to import changes from the board to the schematic, for users
who change footprints in the Board Editor (for instance using Exchange
Footprints command) and want to import these changes back to the schematic.
Note that the
recommended
workflow for transferring information from the board to the schematic does not
require the use of |
File di fabbricazione e documentazione
|
Gerber files, for fabrication. |
|
Drill files (Excellon format), for fabrication. |
|
Position files (ASCII format), for automatic insertion machines. |
|
Report files (ASCII format), for documentation. |
|
Plot files (Postscript), for documentation. |
|
Plot files (PDF format), for documentation. |
|
Plot files (SVG format), for documentation. |
|
Plot files (DXF format), for documentation. |
Memorizzazione e invio file KiCad
I file di schemi elettrici e C.S. di KiCad contengono tutti i simboli schema e le impronte utilizzati nel progetto, quindi si può eseguire il salvataggio o inviare questi file senza problemi. Alcune importanti informazioni sul progetto sono memorizzate nel file di progetto (.kicad_pro), quindi se si sta inviando un progetto completo, bisogna assicurarsi di includerlo.
Some files, such as the project-local settings file (.kicad_prl) and the fp-info-cache file, are not necessary to send with your project. If you use a version control system such as Git to keep track of your KiCad projects, you can add these files to the list of ignored files so that they are not tracked.
Paths and libraries configuration
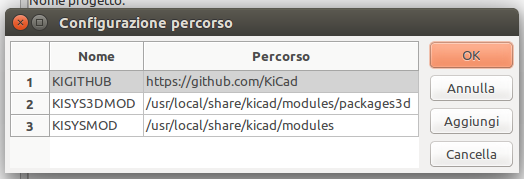
In KiCad, one can define paths using a path variable. A few path variables are internally defined by KiCad, and can be used to define paths for libraries, 3D shapes, etc.
Ciò è utile quando i percorsi assoluti non sono conosciuti o sono soggetti a cambiamenti (per es. quando si trasferisce un progetto su un altro computer), o anche quando un percorso base viene condiviso con altri simili. Si consideri per esempio i seguenti che possono essere installati in posizioni variabili:
-
Librerie di simboli di schema elettrico
-
Librerie di impronte
-
File modelli 3D usati nelle definizioni delle impronte
For instance, the path to the connect.pretty footprint library, when using the KICAD10_FOOTPRINT_DIR path variable, would be defined as ${KICAD10_FOOTPRINT_DIR}/connect.pretty.
The Preferences → Configure Paths… menu allows you to define paths for some built-in KiCad path variables, and add your own path variables to define personal paths, if needed.
KiCad will automatically resolve versioned path variables from
older versions of KiCad to the value of the corresponding variable from
the current KiCad version, as long as the old variable is not explicitly
defined itself. For example, ${KICAD9_FOOTPRINT_DIR} will
automatically resolve to the value of ${KICAD10_FOOTPRINT_DIR} if there
is no KICAD9_FOOTPRINT_DIR variable defined.
|
KiCad path variables
|
Base path of KiCad’s standard 3D footprint model library files. |
|
Location for plugins, libraries, and color themes installed by the Plugin and Content Manager. |
|
Base path of KiCad’s standard footprint library files. |
|
Base path of KiCad’s standard symbol library files. |
|
Location of KiCad’s standard project template library files. |
|
Location of personal project templates. |
|
Location of personal simulation model libraries. This variable is not defined by default. |
|
Absolute path to the current project directory. This variable is set automatically and cannot be redefined. |
I percorsi impostati nella finestra di dialogo Configura percorsi sono interni a KiCad e non sono visibili come variabili ambiente al di fuori di KiCad. Sono memorizzati nei file di configurazione utente di KiCad.
Paths can also be set as system environment variables outside of KiCad, which will override any settings in the user’s configuration.
| You cannot override a system environment variable that has been set outside of KiCad by using the Configure Paths dialog. Any variable that has been set externally will be shown as read-only in the dialog. |
Note also that the path variable KIPRJMOD is always internally defined by KiCad, and expands to the current project absolute path. For instance, ${KIPRJMOD}/connect.pretty is always the connect.pretty folder (the footprint library) inside the current project folder. The KIPRJMOD variable cannot be changed in the Configure Paths dialog or overridden by an external environment variable.
Variabili ambiente avanzate
Some advanced environment variables can be set to customize where KiCad expects certain files to be located. By default, these locations are set based on your platform, but they can be overridden by system environment variables. These variables are not shown in the Configure Paths dialog and cannot be used in path substitutions.
La modifica di queste variabili non comporterà lo spostamento di alcun file da parte di KiCad dalla posizione predefinita alla nuova posizione, quindi se si modificano queste variabili sarà necessario copiare manualmente le impostazioni o i file desiderati.
|
Base path of KiCad configuration files. Subdirectories will be created within this directory for each KiCad minor version. |
|
Base path of KiCad user-modifiable documents, such as projects, templates, Python scripts, libraries, etc. Subdirectories will be created within this directory for each KiCad minor version. This directory is provided as a suggested user data location, but does not need to be used. |
|
Base path of KiCad stock data, including default libraries. The data in this directory is managed by the KiCad installer or system package manager, and is not intended for user-writeable data. |
| Se si modifica la configurazione dei percorsi, uscire e riavviare KiCad, per evitare qualsiasi problema nella gestione dei percorsi. |
Configurazione librerie
The Preferences → Manage Symbol Libraries… menu lets you manage the list of symbol libraries (symbol library table).
Likewise, use the Preferences → Manage Footprint Libraries… menu to manage the list of footprint libraries (footprint library table).
Per ogni tipo di libreria (simboli e impronte), ci sono 2 tabelle di librerie: globali e specifiche del progetto. La tabella delle librerie globali si trova nella cartella di configurazione dell’utente e contiene l’elenco delle librerie disponibili per tutti i progetti. La tabella delle librerie specifiche del progetto è facoltativa, contiene appunto l’elenco delle librerie specifiche del progetto, e si trova nella cartella del progetto.
Jobsets
KiCad lets you configure a list of outputs that are all generated with a single click. The list of output jobs and the destinations where they will be saved is called a jobset. For example, a jobset might contain jobs to generate Gerber files, assembly data, a bill of materials, PDF plots of the schematic and PCB, while also running ERC and DRC checks, with all of the outputs saved to a compressed archive. The full list of available jobs is given below.
Each job in a jobset defines a single type of generated output, such as a bill of materials or a set of Gerbers. A job can be configured in the same way as if the output was manually generated from the schematic or board editor. The configuration for each job is stored in the jobset and remembered when you load the jobset later. Jobs are configured individually, so if you include the same type of job multiple times in a single jobset, each job will have its own independent configuration. For example, this lets you generate PDF outputs in color as well as black and white.
In addition to the jobs, jobsets also contain destinations, which define a list of jobs to run and how to store their outputs. A jobset destination can simply store the chosen jobs' output files in a specified location, or it can add the output files to a compressed archive. Each jobset destination can select a different subset of jobs from the full list of jobs in the jobset. You can run each jobset destination individually or run all jobset destinations at once. As an example, you could set up one jobset destination that generates PDFs of the board and schematic and copies them to an external location, while another destination generates the fabrication files and compresses them in a zip archive to send to the board manufacturer.
Projects can have multiple jobsets, with each jobset defining a different list of jobs and output configurations. Each jobset is stored in a .kicad_jobset file, which can be specific to a single project, copied between projects, or even stored in a central location and shared between projects.
To use a jobset, first create a new jobset file in the KiCad project manager (File → New Jobset File…) and choose a name and location for it. Alternatively, you can open an existing jobset file with File → Open Jobset File…. Jobset files that are stored in the project directory are considered part of the project and are displayed in the project file tree. You can open a jobset file in the project file tree by double clicking on it.
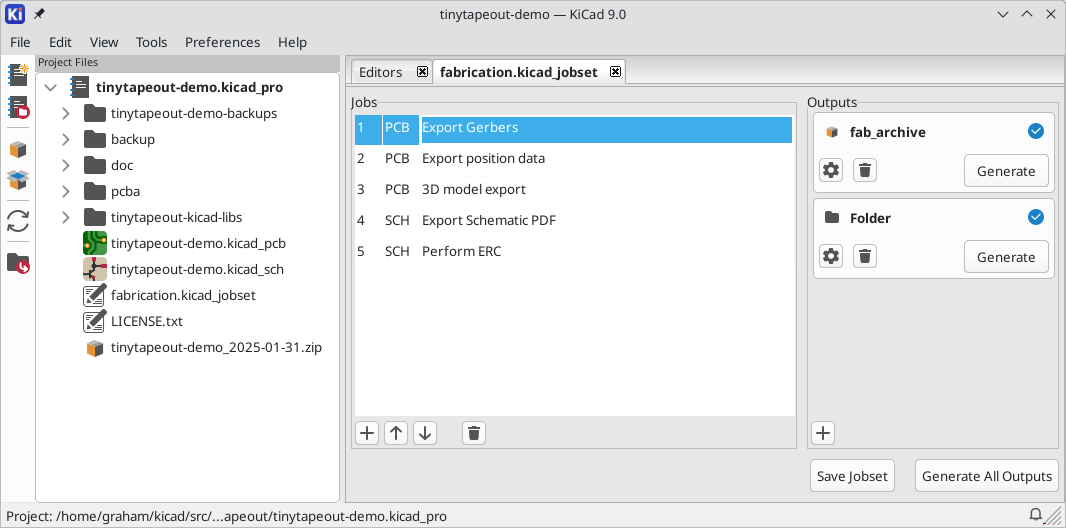
Once you create or open a jobset, it is displayed in a new tab in the project manager. The list of jobs is shown in the middle and the list of jobset destinations is shown on the right. New jobsets will not contain any jobs, but a destination is automatically created to save outputs to a folder. When you make changes to a jobset, you can save the changes by clicking the Save Jobset button.
Defining jobs
To add a new job, click the ![]() button under the Jobs list. In the Add New Job dialog that appears, select the desired type of job. You can filter which types of jobs are shown in the list by typing in the Filter textbox at the bottom.
button under the Jobs list. In the Add New Job dialog that appears, select the desired type of job. You can filter which types of jobs are shown in the list by typing in the Filter textbox at the bottom.
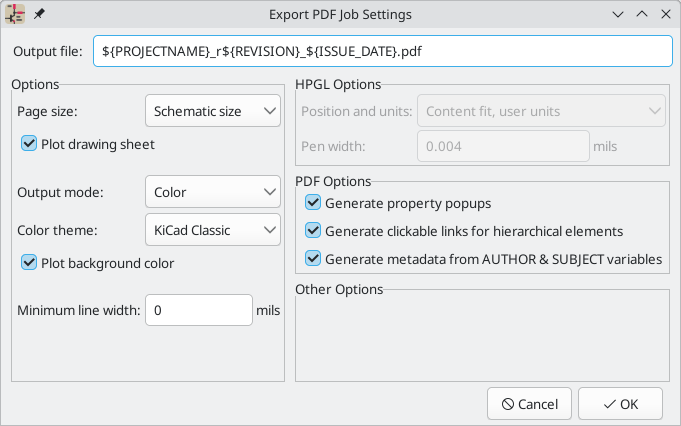
When you select a job and press OK, the settings dialog for that type of output will appear. Each job settings dialog provides the same options you would have if you manually generated that type of output from the schematic or board editor.
Output filenames and paths specified in job settings are relative to the jobset destination folder or archive root. You can use certain text variables, like ${PROJECTNAME}, ${CURRENT_DATE}, and project text variables.
|
When you accept the job settings dialog, the job is added to the list of jobs, where you can optionally change the new job’s description from its default. To change a job’s description or settings later, right click the job in the list and select Edit Job Description or Edit Job Settings…. Double clicking on a job also edits its settings. To remove a job, select the job and click the ![]() button. To reorder the list, select a job and move it up or down using the
button. To reorder the list, select a job and move it up or down using the ![]() or
or ![]() buttons.
buttons.
Defining jobset destinations
You cannot generate any outputs from a jobset until you add a jobset destination. One destination is created automatically when a jobset is created, but you can add as many destinations as you need.
To add a jobset destination, click the ![]() button under the Destinations list. When the Add New Destination dialog appears, select a type of destination:
button under the Destinations list. When the Add New Destination dialog appears, select a type of destination:
-
Archive saves the outputs generated by the jobs in a compressed zip archive.
-
Folder saves the outputs generated by the jobs uncompressed in a folder.
Once you have selected a type of output, the Destination options dialog appears.
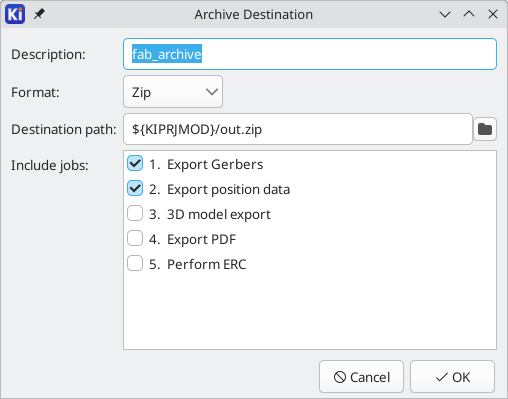
Here you can select which jobs will be run as part of this jobset destination, as well as the folder or archive name that will be used to store them. By default all jobs are enabled. You can also set a description for the destination to be displayed in the Destinations list. The output path controls where the files generated by the jobs will be saved. The path here can be absolute or relative to the project directory, and it can use path variables or certain text variables (${PROJECTNAME}, ${CURRENT_DATE}, and project text variables). Filenames defined in job configurations are relative to the jobset destination directory or archive root.
When you click OK in this dialog, the new jobset destination is added to the Destinations list. You can modify an existing jobset destination by clicking its ![]() button, or remove it by clicking its
button, or remove it by clicking its ![]() button.
button.
After configuring your jobs and destinations, you can generate an individual set of outputs by clicking the Generate button for the desired destination. You can run all destinations at once by clicking the Generate All Destinations button.
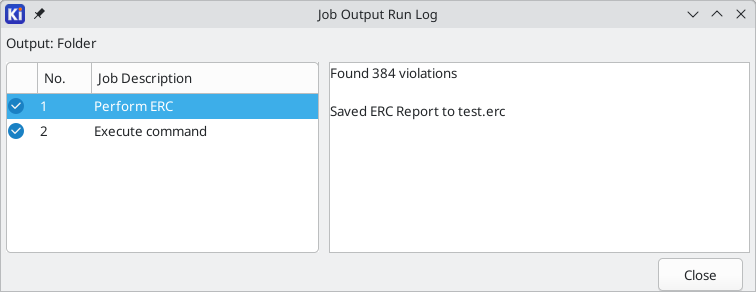
If a jobset destination runs and generates its outputs successfully, a blue check is shown that indicates the last run was successful. If a jobset destination fails to complete successfully, a red exclamation point is shown to indicate the run was not successful. Clicking on the success/failure indicator will display the Jobset Run Log dialog, which displays the status of each job in the jobset destination. Clicking on a specific job will display the logged output from that job, if there is any.
After a jobset destination runs successfully, you can click the destination’s Open Output button to open a file browser in the destination location. This button is disabled if the jobset destination has not run or hasn’t successfully finished.
Jobset destination details
When jobs run, output files are initially generated in a temporary folder. After all jobs in a jobset destination are completed, the output files are moved from the temporary folder to the folder or archive specified by the jobset destination. None of the outputs are moved until all of the jobs finish. Therefore, if a job needs to access files that are generated by another job in the same jobset destination, these files will be located in the temporary folder, not the final jobset destination.
KiCad defines the ${JOBSET_OUTPUT_WORK_PATH} environment variable while jobs are running and sets it to the temporary path for the current jobset destination. You can use this environment variable if a job needs to be aware of the temporary folder’s actual location. For example, if an Execute Command job runs a script that renames the outputs of another job, the script needs to know the temporary location of the outputs being renamed, before they are moved to the jobset destination. ${JOBSET_OUTPUT_WORK_PATH} provides this location.
Available job types
The following types of jobs are available:
Job |
Description |
PCB: Export 3D Model |
Exports a 3D model of the board. The model format can be STEP, GLB (binary glTF), XAO, BREP (OCCT), PLY, STL, STPZ, U3D, or PDF. |
PCB: Export Board Statistics |
Generates a Board Statistics report in either JSON or text report format. |
PCB: Export Drill Data |
Exports a drill file from the board. |
PCB: Export DXF |
Exports the board design to a DXF file. |
PCB: Export Gencad |
Exports the board design in GenCAD format. |
PCB: Export Gerbers |
Exports the board design to Gerber files, with one file per selected layer. |
PCB: Export IPC-2581 |
Exports the board design in IPC-2581 format. |
PCB: Export ODB++ |
Exports the board design in ODB++ format. |
PCB: Export PDF |
Exports the board design to PDF files, with one file per selected board layer. You can also generate a single PDF with multiple layers depending on the plot configuration. |
PCB: Export PNG |
Exports the board design to PNG files, with one file per selected board layer. |
PCB: Export Position Data |
Exports a position (component placement) file from the board. |
PCB: Export PostScript |
Exports the board design to a PostScript file. |
PCB: Export SVG |
Exports the board design to a SVG file. |
PCB: Perform DRC |
Performs a Design Rule Check on the board and generates a report. If DRC violations are found, this job can optionally report a job failure. |
PCB: Render |
Generates a raytraced rendering of the 3D model of the board as a PNG or JPG file. |
Schematic: Export DXF |
Exports the schematic to a DXF file. |
Schematic: Export Netlist |
Exports a netlist from the schematic, with various formats available. |
Schematic: Export PDF |
Exports the schematic to a PDF file. |
Schematic: Export PNG |
Exports the schematic to a PNG file. |
Schematic: Export Postscript |
Exports the schematic to a PostScript file. |
Schematic: Export SVG |
Exports the schematic to a SVG file. |
Schematic: Generate Bill of Materials |
Exports a bill of materials from the schematic. |
Schematic: Perform ERC |
Performs an Electrical Rule Check on the schematic and generates a report. If ERC violations are found, this job can optionally report a job failure. |
Special: Copy Files |
Copies the specified file to the specified location. A failure to copy the files can optionally cause the output job to fail. You can control whether files in the output location should be overwritten or not. |
Special: Execute Command |
Executes an arbitrary command.
Output from the command can optionally be logged to a file.
You can either ignore non-zero output codes or cause them to fail the output job.
The command is executed in the platform’s shell ( Note: Job output files are generated in a temporary folder, then moved to the location specified by the jobset destination after all jobs for that destination are executed. In other words, when an Execute Command job runs, the output from other jobs in the same jobset destination are still in a temporary location and not yet in the ultimate destination folder or archive. You can use the |
Modelli di progetto
Using a project template facilitates setting up a new project with predefined settings. Templates may contain pre-defined sheet sizes, drawing sheets, board outlines, connector positions, schematic elements, design rules, logos, etc. Complete schematics and/or PCBs used as seed files for the new project may even be included.
Uso dei modelli
Creating a new project (File → New Project…) opens the Project Template Selector dialog. By default, all installed templates are shown in the list of templates, but you can limit the list to system templates or user templates using the dropdown menu above the list.
-
System templates are installed with KiCad and include templates for designs in some common form factors.
-
User templates are any templates created by you. The default, blank KiCad template is also considered a user template.
When you click on a template, information about the template is shown in the right panel.
![][scaledwidth="80%"](images/it/template_selected.png)
A further click on the OK button creates a new project based on the selected template. You can pick the name of the new project and where to create it. The template files will be copied to the new project location and renamed to reflect the new project’s name.
Posizioni modelli
When you create a new project, the Project Template Selector dialog shows templates from two locations:
-
System Templates are templates in the path defined by the
KICAD10_TEMPLATE_DIRpath variable. These templates are installed with KiCad’s default libraries and generally should not be modified by users. -
User templates are templates in the path defined by the
KICAD_USER_TEMPLATE_DIRpath variable. When you create your own project templates, store them in this location so you can use them when you create a new project.
To change the location of the user template folder, edit the KICAD_USER_TEMPLATE_DIR path variable in your paths configuration.
Template contents
A KiCad template is a directory containing the template project files, as well as some required metadata for the template in a subdirectory named meta. The name of the directory containing the template files determines the name of the template. This means that a KiCad template folder is simply a KiCad project folder with an additional meta subdirectory.
When you create a project from a template, KiCad copies the template files to the new project directory, renaming them to match the new project name as described below. All files in the template are copied, with three exceptions:
-
Files with names beginning with the
.character (dotfiles) are not copied. There is a special case for files named.gitignoreor.gitattributes, which are copied if they exist. -
If there is a
.gitignorefile, any files that are ignored in it are not copied. -
The
metadirectory is not copied.
Other than the exceptions above, all files in the template are copied, even if they are not KiCad design files.
This means you can use templates to create projects that are already set up with non-KiCad files you need to include, such as documentation templates, license files, logos, .gitignore files, etc.
|
Template metadata
A template’s meta directory must contain an HTML file named info.html, which is displayed in the KiCad template browser and should contain basic information describing the template. Basic HTML features are supported, including images. Any images referenced by info.html should also be stored in the meta directory.
The <title> tag determines the name of the template that is displayed during template selection. Note that the project template name will be cut off if it’s too long. This display name does not need to be the same as the template directory name.
Ecco un file info.html di esempio:
<!DOCTYPE HTML PUBLIC "-//W3C//DTD HTML 4.0 Transitional//EN">
<HTML>
<HEAD>
<META HTTP-EQUIV="CONTENT-TYPE" CONTENT="text/html;
charset=windows-1252">
<TITLE>Raspberry Pi - Expansion Board</TITLE>
</HEAD>
<BODY LANG="fr-FR" DIR="LTR">
<P>This project template is the basis of an expansion board for the
<A HREF="http://www.raspberrypi.org/" TARGET="blank">Raspberry Pi $25
ARM board.</A> <BR><BR>This base project includes a PCB edge defined
as the same size as the Raspberry-Pi PCB with the connectors placed
correctly to align the two boards. All IO present on the Raspberry-Pi
board is connected to the project through the 0.1" expansion
headers. <BR><BR>The board outline looks like the following:
</P>
<P><IMG SRC="brd.png" NAME="brd" ALIGN=BOTTOM WIDTH=680 HEIGHT=378
BORDER=0><BR><BR><BR><BR>
</P>
<P>(c)2012 Brian Sidebotham<BR>(c)2012 KiCad Developers</P>
</BODY>
</HTML>Finally, meta can optionally contain an image named icon.png, which will be used as the template’s icon in the template selection dialog. The icon should be a 64 x 64 pixel PNG image.
Template file renaming
All files and directories in a template are copied to the new project path when a project is created using a template, except meta and dotfiles. Files and directories containing the template directory name will be renamed with the new project file name. Files and directories that don’t contain the template name keep their original name.
For example, using a template named example (left) to create a project named newproject (right), with renamed files shown in bold:
Files in template example directory |
Files created in project newproject directory |
|---|---|
|
|
A template does not need to contain a complete project. If a required project file is missing, KiCad will create the file using the default create project behavior:
Files in template example directory |
Files created in newproject directory |
|---|---|
|
|
As an exception to the template name renaming rule, if the template contains one project file (.kicad_pro) and its name doesn’t match the template name, KiCad will do the renaming based on that project file name instead:
Files in template example directory |
Files created in newproject directory |
|---|---|
|
|
| Non è consigliabile creare un modello con più di un file progetto. |
Creating new templates
Because a KiCad template is just a Kicad project with an additional metadata folder, the easiest way to create a new template is to start from a project. If you save a project in your user template folder and add a meta folder to it, you can use it as a template.
To find out where your user template folder is, check the value of the KICAD_USER_TEMPLATE_DIR path variable in the Configure Paths dialog (Preferences → Configure Paths…).
|
If you are creating a template from scratch, you can create a new project in the user template folder, then edit the project until you have created your desired template. This new project will be your template, so when you create it you should choose the name based on what you want the template to be called.
If you have an existing project that you want to turn into a template, you can save a copy of that project into your user template folder (File → Save As… from the Project Manager). The name you choose for the re-saved project will be the template name. After saving in the template folder, you can edit the template project so that it exactly matches your desired template.
In either case, templates are required to have a metadata directory, so you must add a meta folder inside the template folder. The metadata folder must also contain an info.html file, which is intended to contain a description of the template. You can copy the sample info.html above as a starting point.
In general, you will also want to remove any files and folders that you don’t want to include each time you use the template. Some examples of things to remove include the *-backups folder, the .history snapshot folder, any unneeded version control files (.git, etc.), and anything else you don’t want to include in new projects.
Plugin e gestore contenuti
KiCad has a Plugin and Content Manager that lets you browse, install, and manage packages submitted by other users and organizations. Packages can be plugins offering specialized functionality, tools for ordering PCBs from specific manufacturers, libraries of symbols and footprints, or new editor color schemes. You can access the PCM by launching it from the main KiCad Project Manager window.
The PCM downloads packages from repositories on the internet. Each repository is a collection of packages that is managed by an individual or an organization. By default, the PCM uses a single repository managed by the KiCad organization. Users and organizations are free to create their own repositories, which other users can can then add as additional repositories in their own KiCad installation. Third-party repositories can be public or private.
| Packages may install code that runs on your computer. Packages are not developed by the KiCad developers. The KiCad organization does not make any guarantees about the quality or safety of packages installed through the PCM. Make sure you only install packages that you trust. |
| If you have feedback regarding a package, please submit it to the package’s developer, not the KiCad team. Contact information for each package is shown in the package’s description. |
To share a package that you have developed, you can submit it to the KiCad official repository. If it is accepted, it will then be available to other users browsing the KiCad repository. You can also create your own repository or submit your package to a repository managed by another person or group, but in that case users will not see your package unless they have configured that repository in their own installation. More information about creating your own packages and repositories is available below.
Browsing packages
All of the packages in a repository are shown in the PCM’s Repository tab. You can choose which repository to browse by selecting the repository in the dropdown at the top of the tab. By default, only the KiCad official repository is enabled.
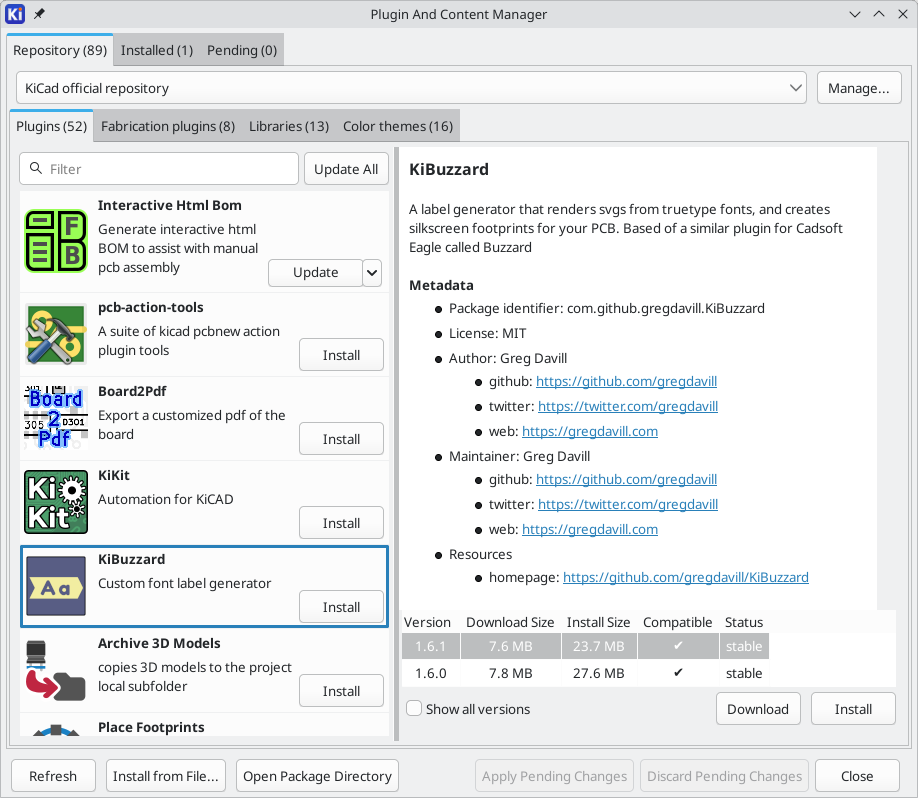
Packages are grouped into four categories, each with its own tab within the Repository tab:
-
Plugins are additional tools that can be launched from the PCB Editor. Plugins can have many purposes, for example modifying a board design or generating specific outputs. Footprint wizards can also be distributed as plugins.
-
Fabrication plugins are a sub-category of plugins for ordering your PCBs from specific fabricators. These plugins may be a convenient way to order from a manufacturer, but they are typically not required; you can usually provide manufacturers with normal fabrication outputs instead. Consult with your manufacturer to find out the best way to order from them.
-
Libraries contain symbols, footprints, and/or 3D models. By default, libraries installed by a library package are automatically added to the appropriate symbol and/or footprint library tables when the package is installed, and removed from the table when the package is uninstalled. Libraries installed by a package have configurable library name prefix (
PCM_by default). These settings are configurable in the Packages and Updates section of Preferences. -
Color themes are color themes for the Schematic, Symbol, Board, and Footprint editors. You can select an installed theme in the Colors section of the Preferences for each editor.
The list on the left of the window shows the packages within each category. You can filter the list of packages by typing in the filter box at the top of the package list. Press the Refresh button to reload the list of packages from the online repository.
When you select a package in the list, information about the package is shown on the right. This includes a description of the package, the package’s license, and contact information for the package’s developer, including a place to report bugs and other feedback for the package.
The package information also includes a table of the versions of the package that are currently available. For each version, the table displays the package size, its status, and whether it is compatible with your version of KiCad.
A package’s status can be one of the following, as indicated by the package’s developer:
-
Stable: the package version is suitable for general use.
-
Testing: the package version is in a testing phase; users should be cautious and report any issues they encounter to the package’s developers.
-
Development: the package version is in a development phase; users should not expect it to work fully.
-
Deprecated: the package is no longer maintained.
By default, the version table only shows versions of the package that are compatible with your version of KiCad. You can show all versions of the package, even those that will not work with your KiCad version, by checking the Show all versions box. If multiple versions of a package are available, you can choose which to install.
Installing packages
When you decide to to install a package, click the package’s Install button in the package’s description page. If there are multiple versions of the package available, select the desired version in the version table before installing. You can also install the latest version by clicking the Install button in the list of packages. This does not immediately install the package; the package is instead queued for later installation and is shown in the Pending tab. The package will not be installed until you click the Apply Pending Changes button, which installs all pending packages at once.

To remove a single package from the pending installation list, select it in the Pending tab and press the ![]() button. To cancel the installation of all pending packages, click the Discard Pending Changes button.
button. To cancel the installation of all pending packages, click the Discard Pending Changes button.
Once a package is installed, it is listed in the Installed tab. In this tab you can see the list of installed packages and update or uninstall any of them.

If any packages have new versions available, the PCM icon in the Project Manager displays an indicator showing the number of available updates.

To update to a different version of a package, select the new version in its version table and click the Update button. You can also update a package to the newest version by clicking Update in the dropdown menu next to its Uninstall button in the list of installed packages. To update all installed packages, click the Update All button at the top of the installed package list. A package will not be updated if Pin Package is selected in its dropdown menu.
To uninstall a package, click its Uninstall button in the list of installed packages or in the package’s description page.
As with installation, packages are not updated or uninstalled immediately when you click the Update or Uninstall button. Instead, the operation is queued in the Pending tab until you apply each change individually or click the Apply Pending Changes button.
Finally, you can download a package without installing it by clicking the Download button at the bottom of the package’s description and selecting a location to save the package. This lets you inspect the files in the package before installing it. To install a package that has been downloaded but not yet installed, click the Install from file… button and select the package. The Open Package Directory button opens a file browser in the folder where KiCad installs packages.
Managing repositories
By default, only the KiCad official repository is used by the PCM. You can add a third party repository, or remove existing repositories, by clicking the Manage… button at the top of the Repository tab.
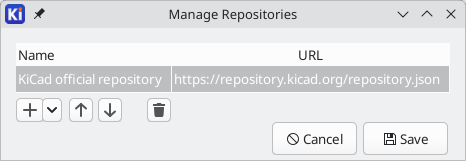
To add a repository, click the ![]() button and specify the full URL to the repository. To remove a repository, select it and press the
button and specify the full URL to the repository. To remove a repository, select it and press the ![]() button. Use the
button. Use the ![]() and
and ![]() buttons to reorder repositories in the list.
buttons to reorder repositories in the list.
If you remove the default KiCad official repository, you can easily re-add it by clicking Add Default Repository in the dropdown menu next to the ![]() button.
button.
Creating packages and repositories
To create a package for the PCM, follow the instructions at https://dev-docs.kicad.org/en/addons/index.html. These instructions explain how to create PCM packages for any repository, including but not limited to the KiCad official repository. They also explain the rules for packages included in the KiCad repository and how to submit packages to this repository. Third-party repositories use the same package format but may have different rules and procedures for submitting packages.
To create your own repository, publish a repository JSON file following the schema published at https://go.kicad.org/pcm/schemas/v1.
KiCad preferences
The KiCad preferences can always be accessed from the Preferences menu, or by using the hotkey (default Ctrl+,).
| On macOS, the KiCad preferences are accessed via KiCad → Settings…. |
The Preferences dialog is shared between the KiCad tools. Some preferences apply to all tools, and some are specific to a certain tool (such as the schematic or board editor).
Preferenze comuni
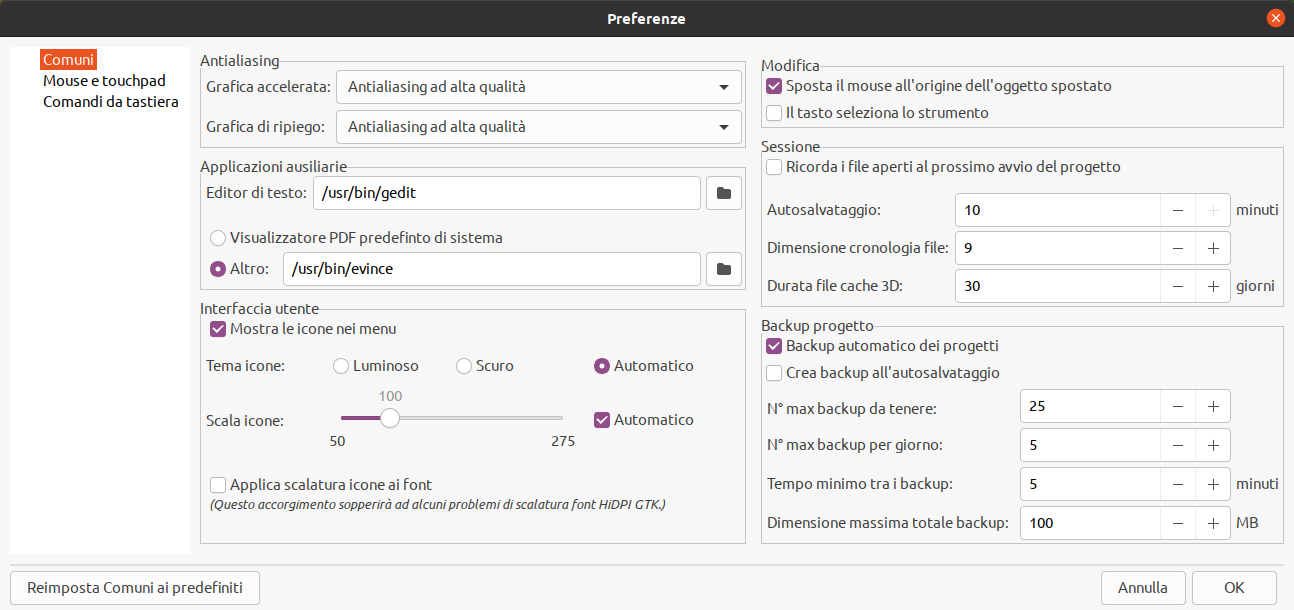
Rendering engine
Antialising grafico accelerato: KiCad può utilizzare diversi metodi per prevenire l’aliasing (linee frastagliate) durante il rendering utilizzando una scheda grafica. Diversi metodi possono avere un aspetto migliore su hardware diverso, quindi è meglio sperimentare per trovare quello che sembra migliore.
Antialiasing grafica di ripiego: KiCad può fare l’antialiasing anche in modalità grafica di ripiego. L’abilitazione di questa funzione però può comportare prestazioni scadenti su alcuni dispositivi.
Helper applications
Editor di testo: scegli un editor di testo da usare per aprire i file di testo dalla finestra dell’albero del progetto.
Visualizzatore PDF: scegli un programma da usare per aprire i file PDF.
User interface
Mostra le icone nei menu: abilita le icone nei menu a discesa in tutta l’interfaccia utente di KiCad.
| Le icone nei menu non vengono comunque visualizzate in alcuni sistemi operativi. |
Show scrollbars in editors: When enabled, scrollbars are displayed next to the editing canvases in each tool. When disabled, scrollbars are not shown.
Il focus segue il mouse tra gli editor dello schema e del C.S.: Quando abilitata, la finestra sotto il puntatore del mouse prenderà il focus automaticamente.
Show popup indicator when toggling settings with hotkeys: When enabled, certain hotkeys that cycle between settings will show a popup indicator briefly to indicate the change in settings.
Use alternating row colors in tables: When enabled, tables (such as the library tables and the Symbol Fields table) will use alternating colors for each row.
Disable custom cursors: When enabled, KiCad will use the system cursors instead of custom context-specific cursors.
Tema icone: imposta se usare il tema icone progettato per gli sfondi finestre chiari o per quelli scuri. L’impostazione predefinita automatica sceglierà il tema in base alla luminosità del tema delle finestre del sistema operativo.
| The light icon theme has darker icons that are more visible against light window backgrounds. The dark icon theme has lighter icons designed for dark window backgrounds. |
Scala icona: imposta la dimensione delle icone usate nei menu e nei pulsanti in tutto KiCad. Scegliere Automatico per fare in modo che scelga automaticamente una scala icone appropriata in base alle impostazioni del proprio sistema operativo.
Fattore di attenuazione modalità alto contrasto: imposta la quantità di oscuramento degli elementi non a fuoco nella modalità di visualizzazione ad alto contrasto.
Scaling
Display PPI: When set to the pixel density of your display, the editing canvas will be scaled so that objects are life sized at 100% zoom. You can press the Detect button to use the pixel density reported by your display, or manually adjust the density until the ruler is displayed at the correct size.
Editing
Sposta il mouse all’origine dell’oggetto spostato: se abilitata, il cursore del mouse verrà riposizionato all’origine di un oggetto quando si avvia un comando di spostamento su quell’oggetto.
Il tasto seleziona la strumento: se disabilitata, eseguendo un comando da tastiera come Aggiungi filo inizierà immediatamente il comando alla posizione corrente del puntatore. Se abilitata, premendo il comando la prima volta selezionerà solamente lo strumento Aggiungi filo ma non comincerà immediatamente un filo.
Session
Ricorda i file aperti per il prossimo lancio del progetto: se abilitata, KiCad riaprirà automaticamente tutti i file che erano stati aperti in precedenza alla riapertura di un progetto.
Project backup
Automatically backup projects: When enabled, KiCad will automatically make backups and autosaves of the current project. A project autosave is automatically saved when there are unsaved changes after a few seconds of inactivity. Backups are also performed each time you manually save.
Format: Controls the backup format.
-
When set to Incremental, project backups are saved using an incremental backup system that stores snapshots of files as they change. These incremental snapshots are shown in the Local History panel (View → Panels → Local History). You can restore from an earlier snapshot by right clicking a snapshot in the Local History panel and choosing Restore Commit. Behind the scenes, the incremental backup system uses a Git repository in a hidden
.historyfolder. -
When sent to Zip archive, project backups are saved as a Zip archives of the project directory and its contents. You can restore from these archives by using the Unarchive tool or by manually extracting the archive and loading the project.
Location: Controls where backups are saved. Backups can be saved in the project directory or in your KiCad user data (configuration) directory.
Dimensione massima totale backup: quando si crea un nuovo backup, i file di backup meno recenti verranno eliminati per mantenere la dimensione totale della cartella dei file di backup al di sotto di questo limite.
Preferenze di mouse e touchpad
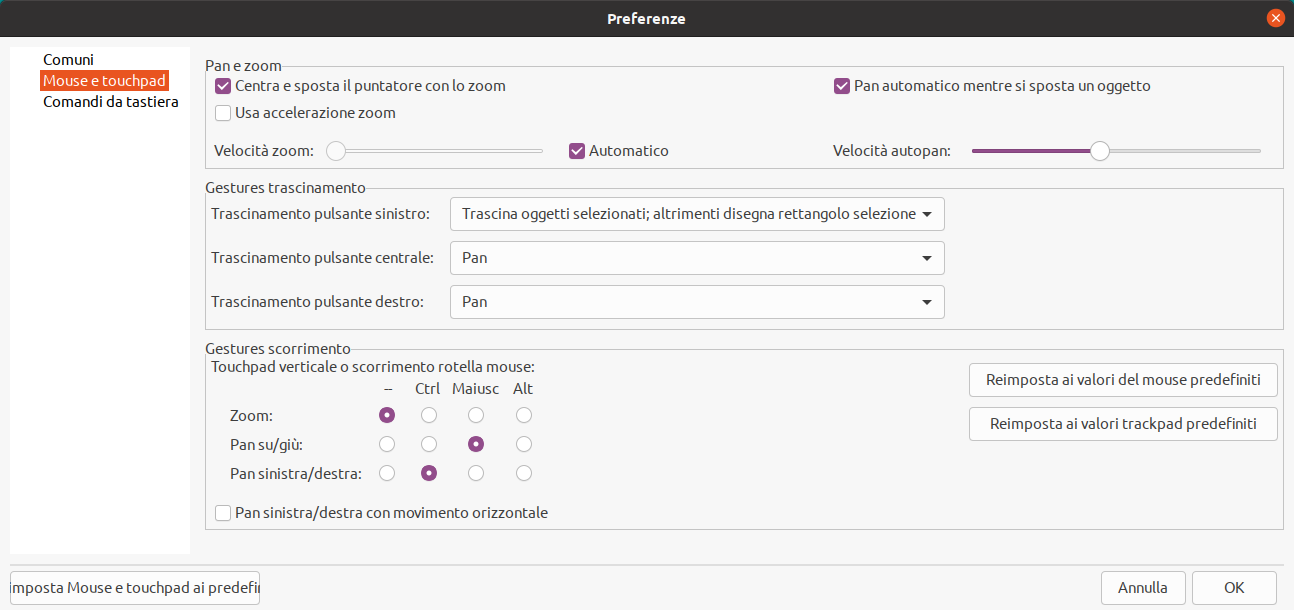
Centra e sposta il puntatore con lo zoom: se abilitata, facendo zoom usando i comandi da tastiera o la rotellina del mouse, la vista verrà centrata sulla posizione del puntatore.
Usa accelerazione zoom: se abilitata, lo scorrimento più veloce della rotellina del mouse o del touchpad farà cambiare lo zoom più velocemente.
Velocità zoom: controlla quanto cambia lo zoom per una determinata quantità di scorrimento della rotellina del mouse o del touchpad. Utilizzare Automatico per impostare un valore predefinito a seconda del sistema operativo.
Pan automatico mentre si sposta un oggetto: se abilitata, la vista può essere spostata (pan) mentre si sta spostando un oggetto in prossimità del bordo dell’area di disegno.
Velocità autopan: controlla la velocità di spostamento dell’area di disegno durante lo spostamento di un oggetto.
Mouse buttons: You can set the behavior of dragging the middle and right mouse buttons to zoom the view, pan the view, or have no effect. You can also set the behavior of dragging the left mouse button depending on whether or not any objects are already selected in the editing canvas. If a key is configured for Pan on mouse movement with key, you can pan the canvas by holding the configured key and moving the mouse.
| Il pulsante sinistro del mouse viene usato sempre per selezionare e gestire oggetti. |
Rotellina del mouse e scorrimento touchpad: si può impostare il comportamento della rotellina del mouse o del movimento verticale del touchpad durante la pressione di certi tasti modificatori.
Pan sinista/destra con movimento orizzontale: se abilitata, si può ottenere lo scorrimento orizzontale della vista usando il touchpad o la rotellina di scorrimento orizzontale (se presente nel mouse).
SpaceMouse preferences
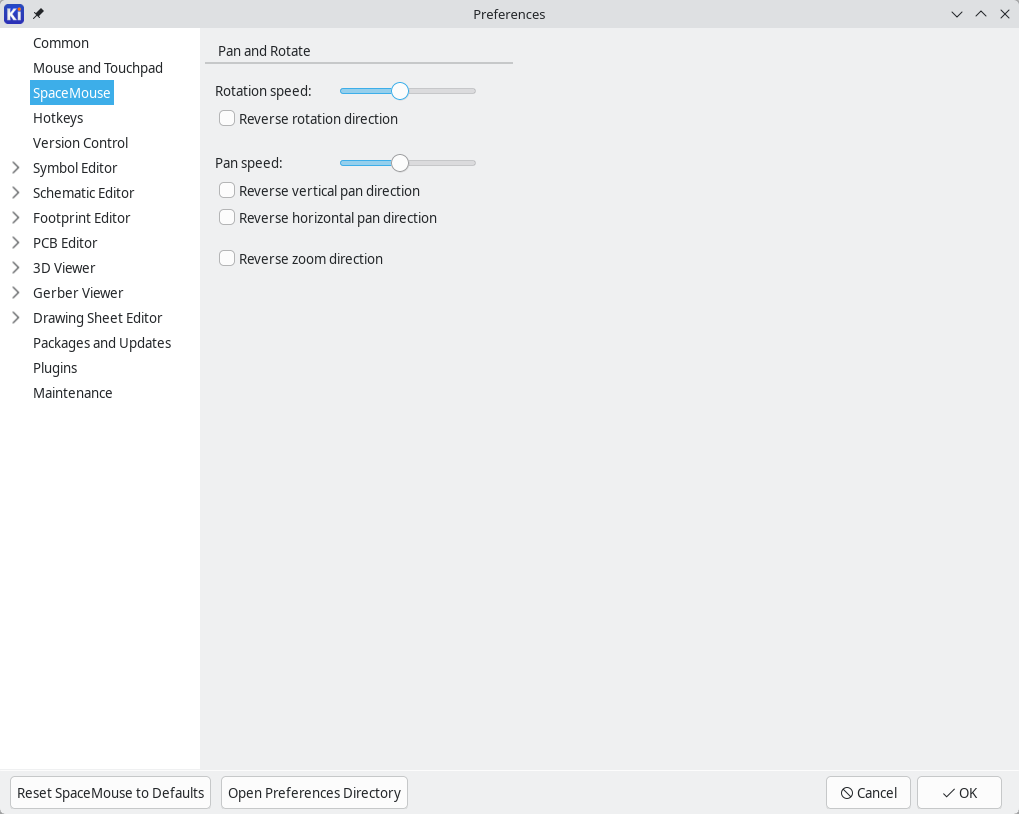
This page contains settings for KiCad’s integration with SpaceMouse peripherals.
Rotation speed and Pan speed control how quickly to rotate and pan in response to a SpaceMouse input.
Reverse rotation direction: When enabled, rotations will go in the opposite direction from the default.
Reverse vertical pan direction: When enabled, vertical pans will go in the opposite direction from the default.
Reverse horizontal pan direction: When enabled, horizontal pans will go in the opposite direction from the default.
Reverse zoom direction: When enabled, zooms will go in the opposite direction from the default.
Preferenze comandi da tastiera
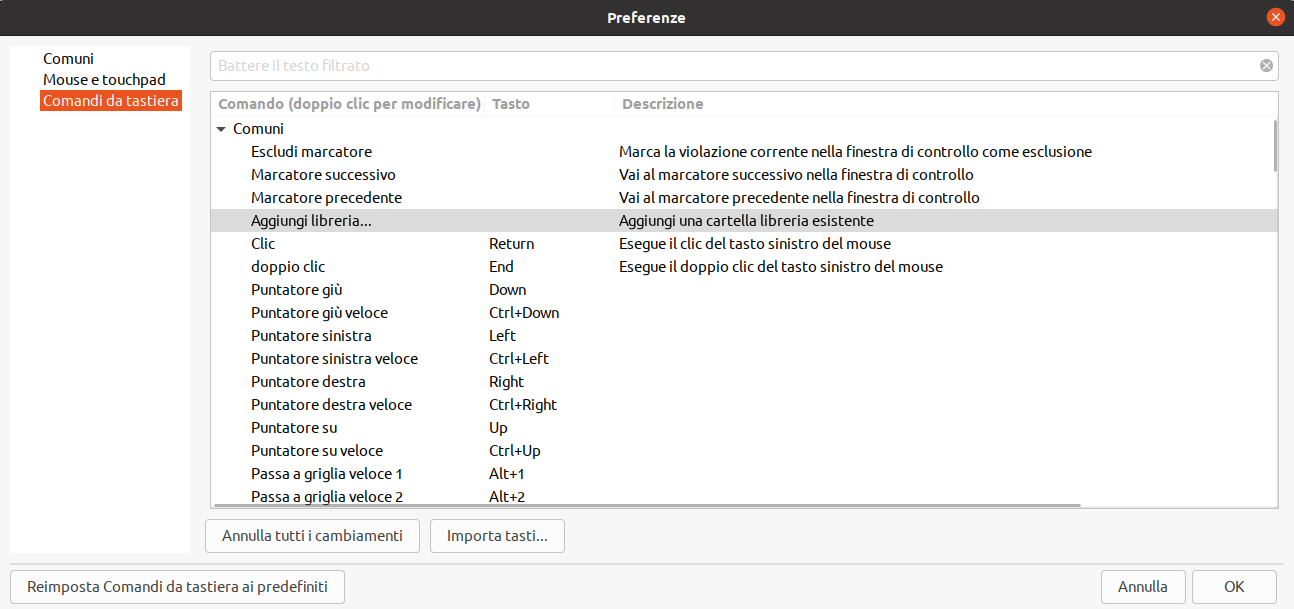
You can use this dialog to customize the hotkeys used to control KiCad. The hotkeys in the Common section are shared between every KiCad program. You can assign the same hotkey to a different action in different KiCad programs (for example, the schematic editor and the board editor), but you cannot assign a hotkey to more than one action in the same program.
Ci sono molti comandi disponibili e quindi non tutti hanno un tasto assegnato per impostazione predefinita. È possibile assegnare un tasto a un qualsiasi comando facendo doppio clic sul comando nell’elenco. Se si sceglie un tasto già assegnato a un comando diverso, si può scegliere di continuare a usare quel tasto sul comando scelto, rimuovendo l’assegnazione del tasto dal comando in conflitto.
Le modifiche apportate alle assegnazioni dei tasti vengono visualizzate con un carattere * alla fine del nome del comando. Si può annullare le modifiche a un comando specifico facendo clic con il pulsante destro del mouse su quel comando e selezionando Annulla cambiamenti, oppure si può annullare tutte le modifiche con il pulsante sotto l’elenco dei comandi.
Importing hotkeys
Le preferenze dei comandi da tastiera sono memorizzate in file .hotkeys nella cartella delle impostazioni di KiCad (consultare la sezione Impostazioni per informazioni su dove si trova la cartella delle impostazioni sul proprio sistema operativo). Se si ha personalizzato i comandi da tastiera di KiCad come si preferisce su un computer, si può trasferire questa configurazione su un altro computer importando i file .hotkeys appropriati.
Version control preferences
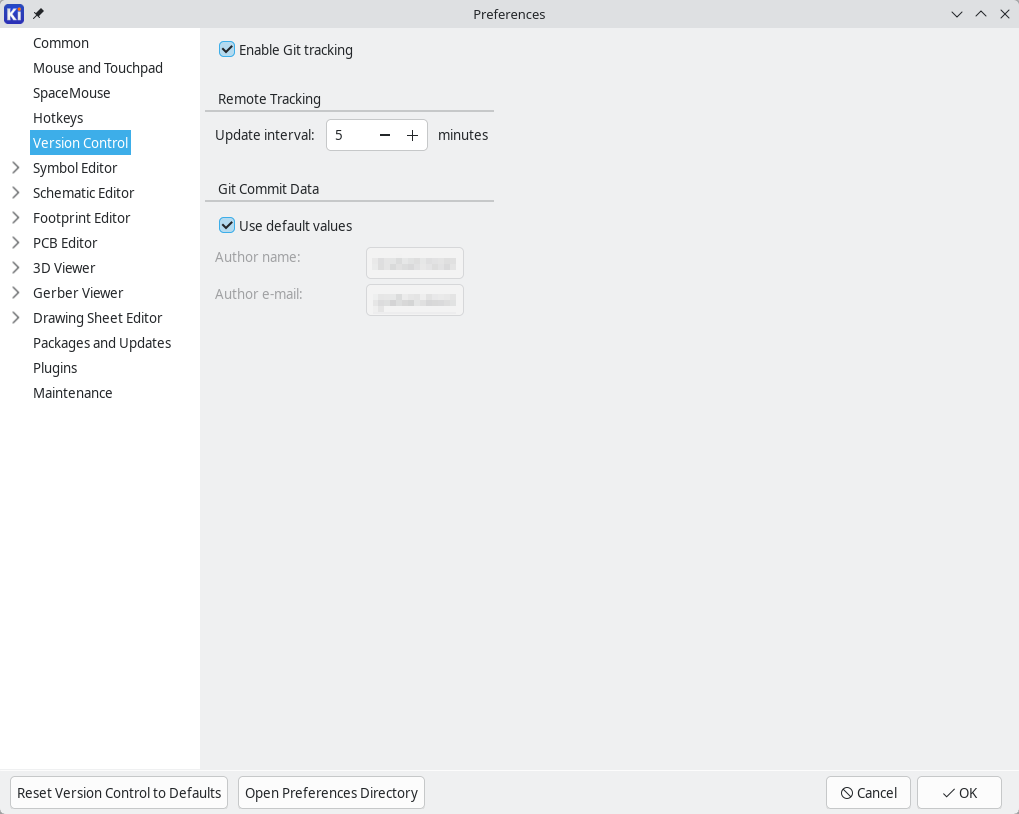
This page contains settings for KiCad’s integration with the Git version control tool.
Enable Git tracking: When enabled, you can use the Git tools in KiCad’s project manager with your projects.
Update interval: Controls how frequently KiCad checks for updates on the remote. Available remote updates are indicated using the status icons in the project files tree. When set to 0, KiCad will not check for remote updates.
Git commit data: This section controls the author information used for new commits. If Use default values is enabled, the commit author and email address are taken from your system’s Git configuration. If not, you can specify custom values for author name and email address.
Data collection preferences
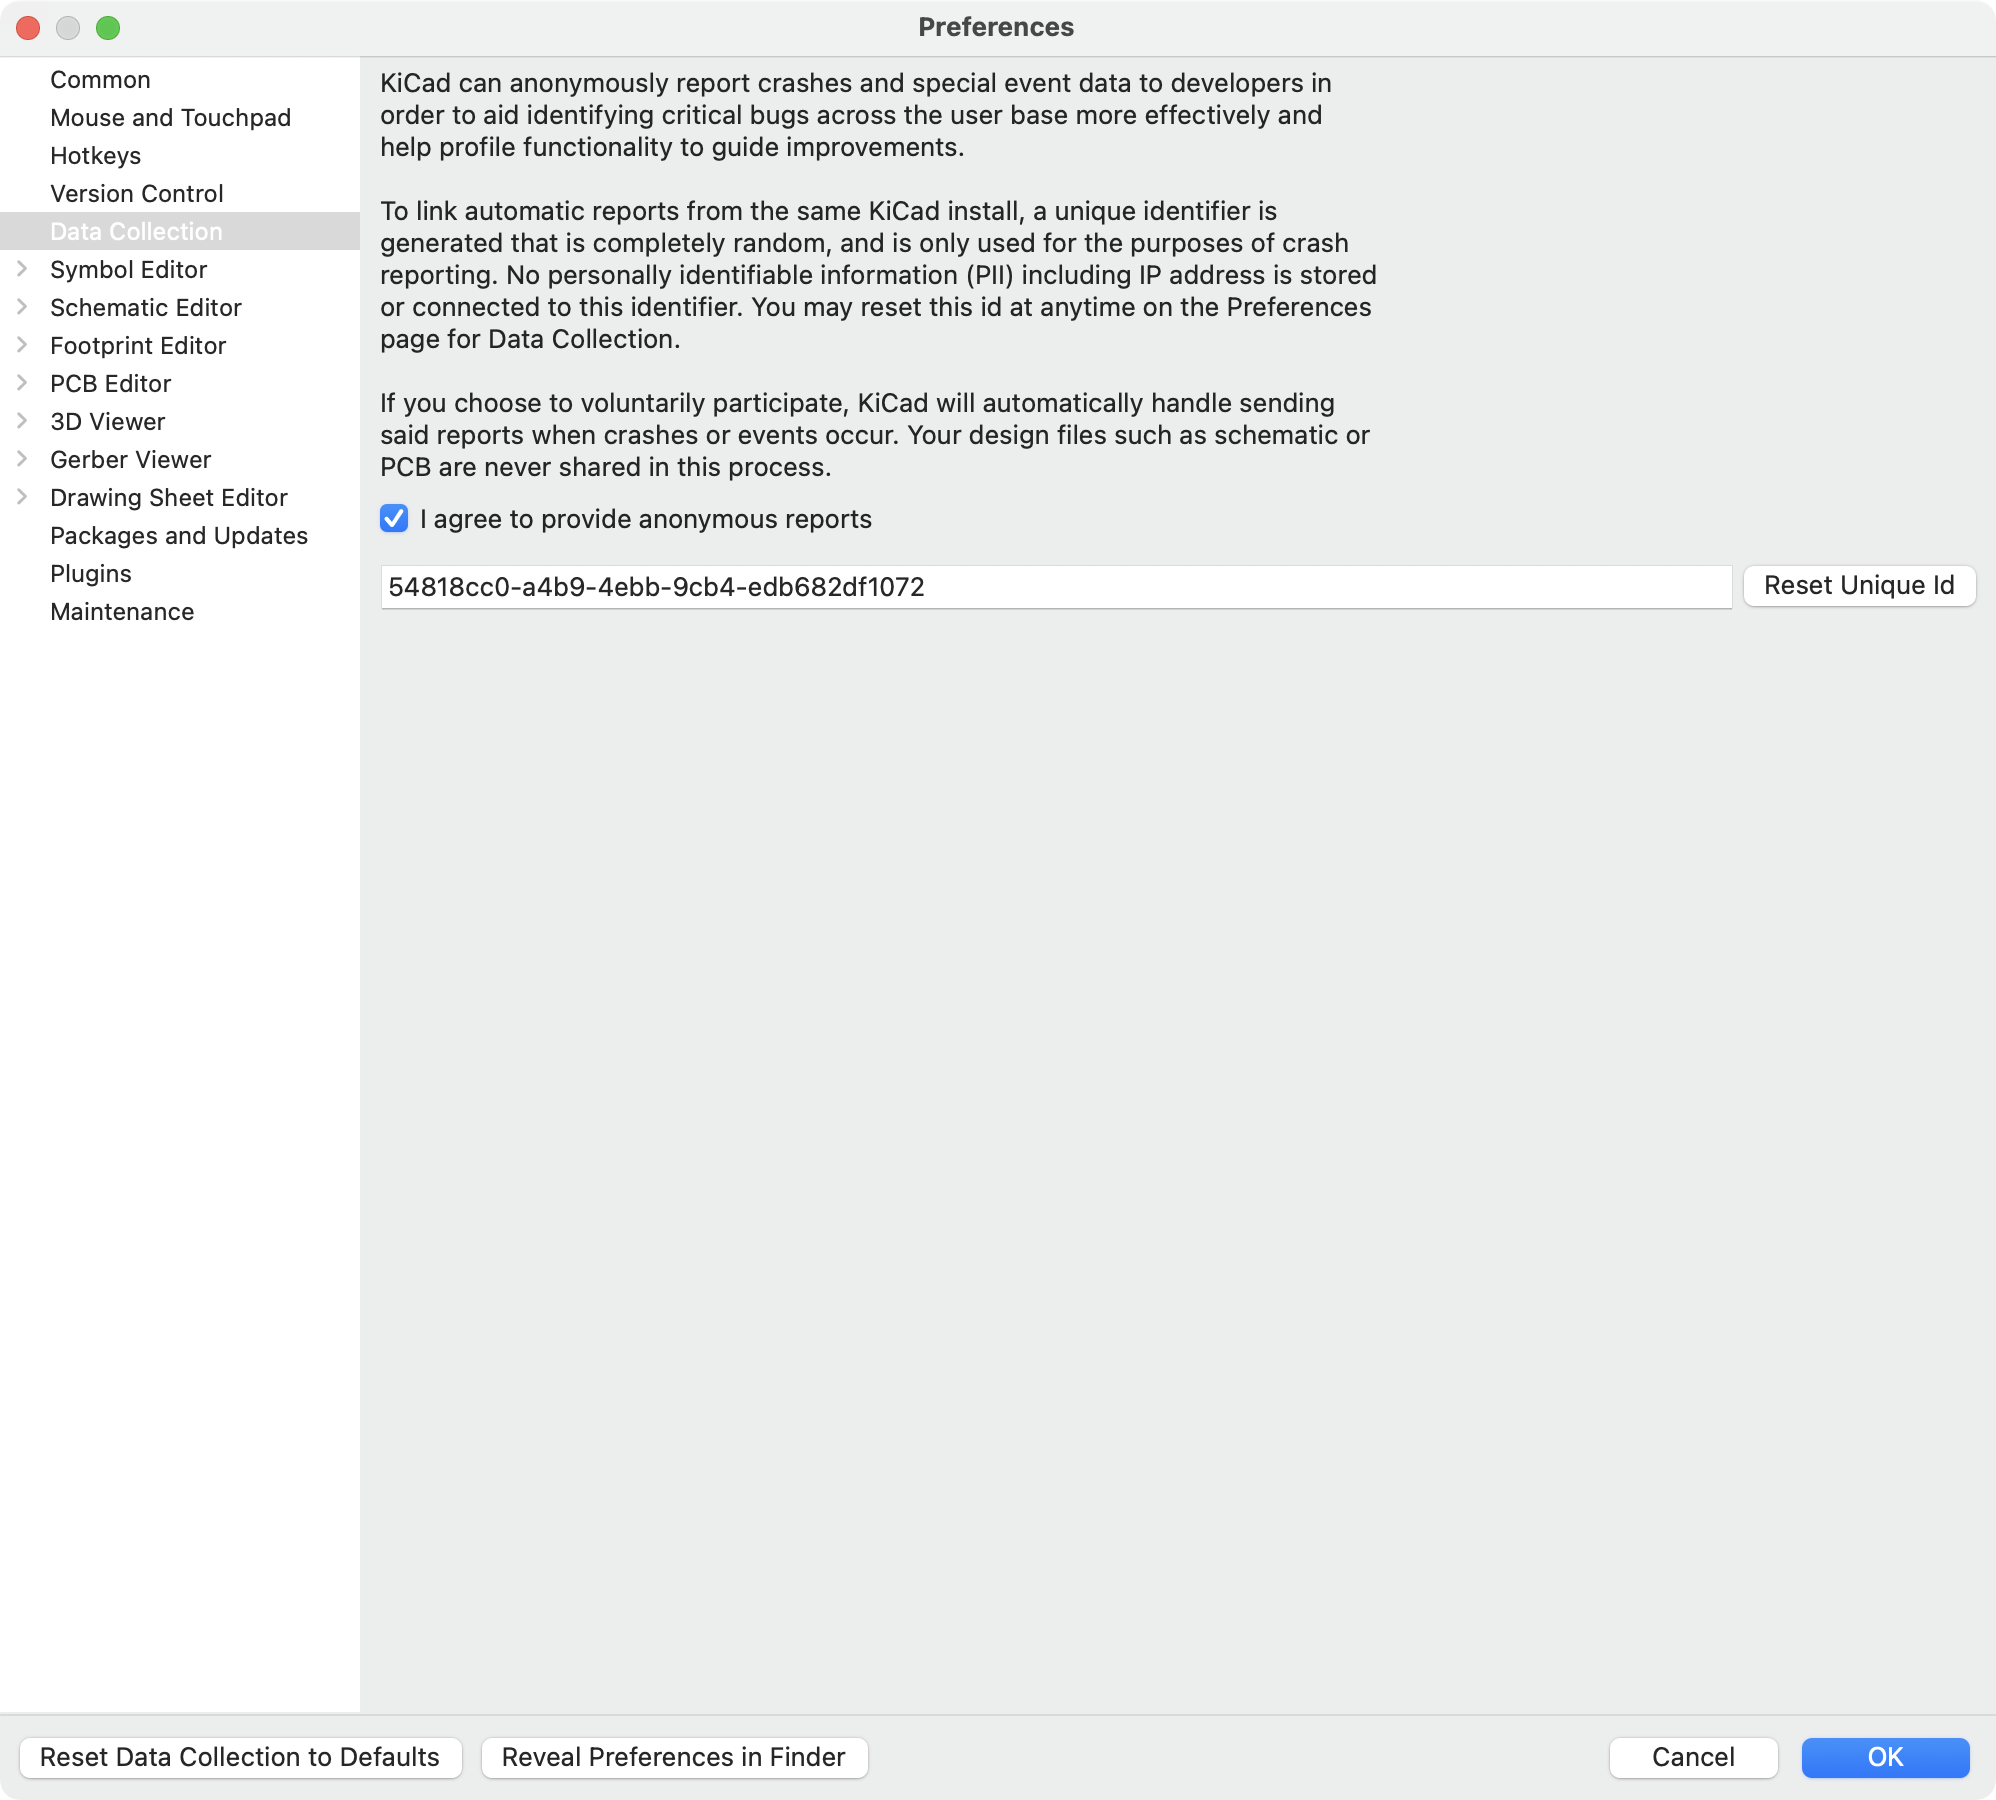
This page contains settings that control how KiCad collects usage and crash data from users. Data collection is disabled by default.
| Crash reporting is only supported on Windows and macOS platforms. |
When I agree to provide anonymous reports is enabled, KiCad will send anonymous reports to the KiCad development team when KiCad crashes and in certain other situations. These reports help the KiCad development team fix crashes and other bugs. The reports do not contain your design files, such as schematics or PCBs.
Reports are linked to a random, unique identifier that is shown on this page. This identifier is used to connect reports from the same computer. No personally identifiable information (PII), including IP address, is stored or connected to this identifier. You can reset this identifier at any time by pressing the Reset Unique Id button.
Packages and updates preferences
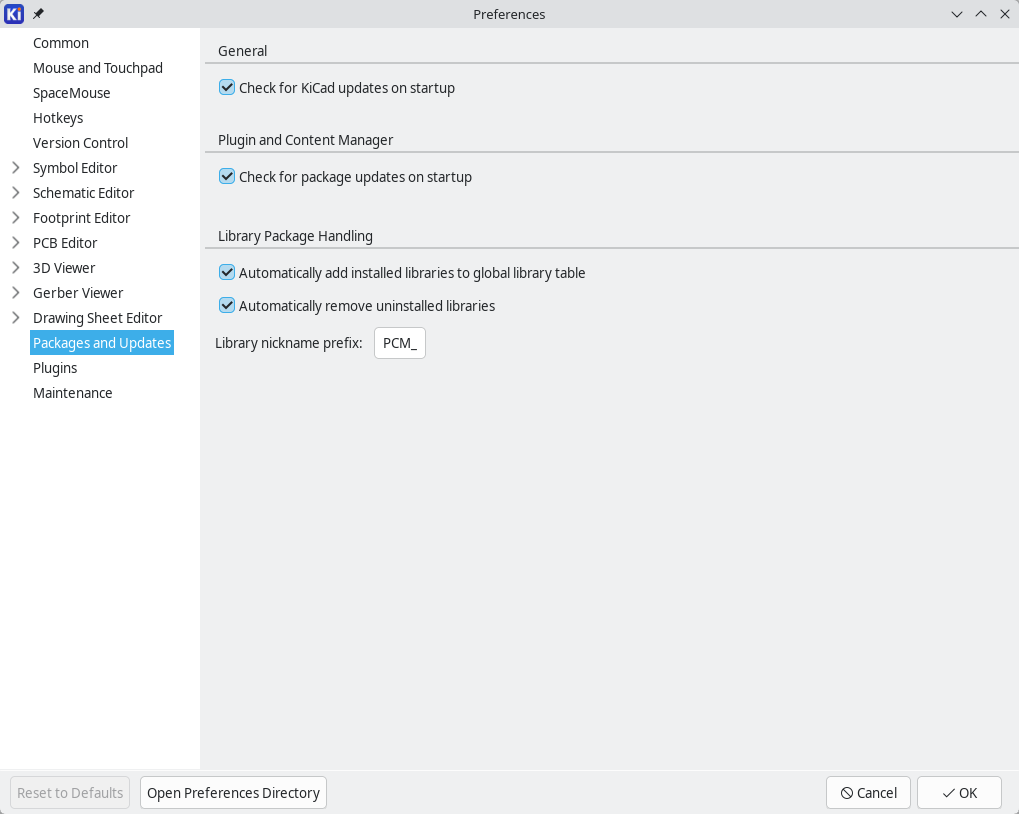
Check for KiCad updates on startup: If enabled, on startup KiCad will check for updates to the KiCad application. If an update is available, you will be prompted to install it.
Check for package updates on startup: If enabled, on startup KiCad will check for updates to any packages installed through the Plugin and Content Manager. Available updates are shown as a notification in the bottom right of the Project Manager window.
Automatically add installed libraries to global library table: If enabled, libraries that are installed through the Plugin and Content Manager will be automatically added to your library table. The library nickname will use the prefix configured on this page. If not enabled, you will need to manually add them to your library table after they are installed.
Automatically remove uninstalled libraries: If enabled, libraries that are installed through the Plugin and Content Manager will be automatically removed from your library table when they are uninstalled. If not enabled, you will need to manually remove them from your library table after they are uninstalled.
Plugins preferences
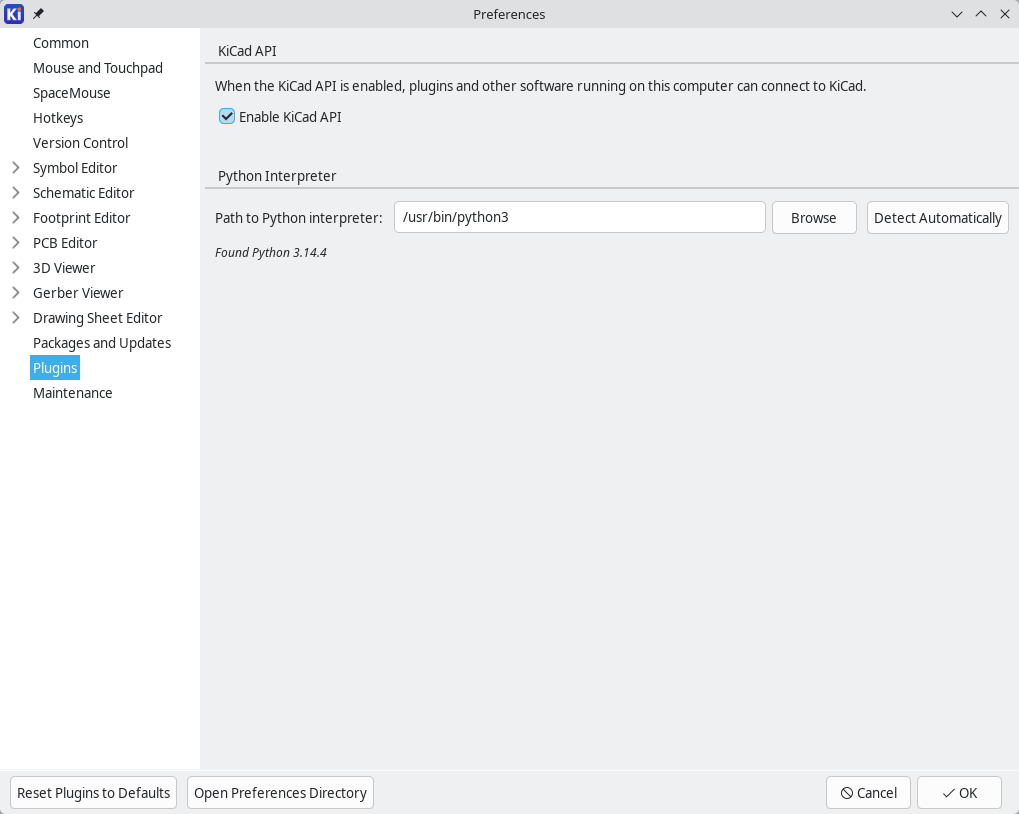
Enable KiCad API: When enabled, you can use plugins that interact with KiCad’s IPC API. If this option is not enabled, such plugins will not function.
Path to Python interpreter: This is the location of the Python interpreter that KiCad will use to run Python-based IPC plugins. You can automatically detect a Python interpreter or manually specify a path.
Maintenance preferences
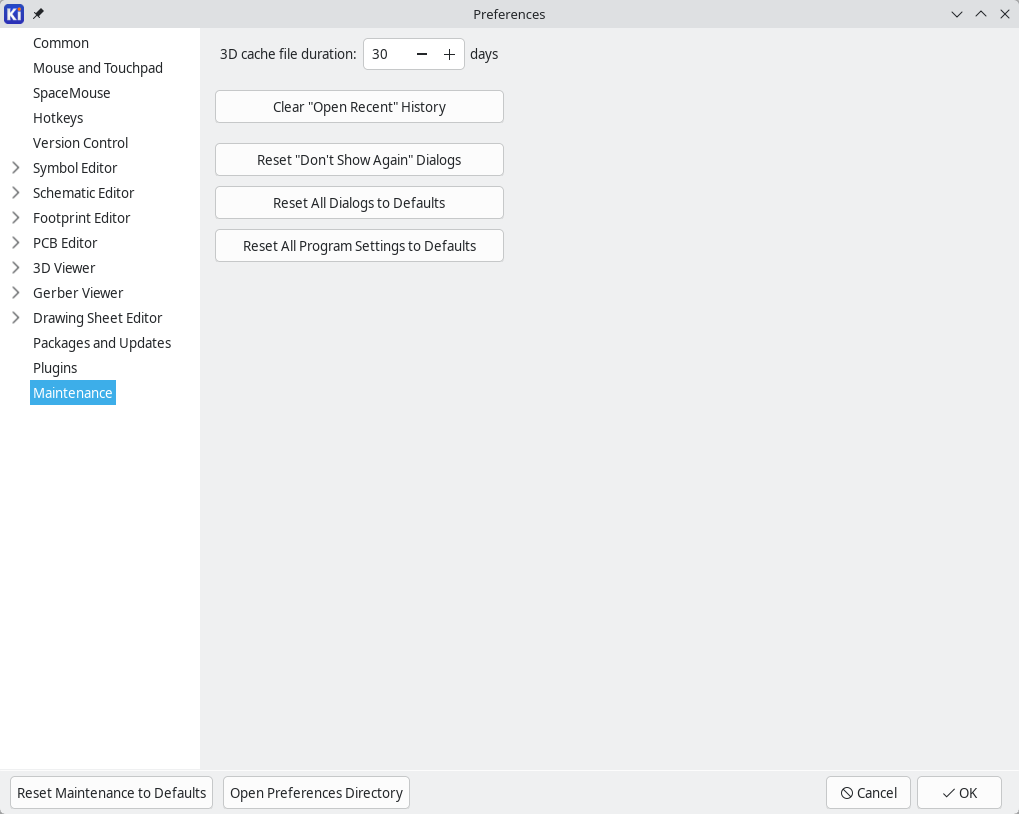
Durata file cache 3D: KiCad crea una cache di modelli 3D per velocizzare il visualizzatore 3D. Si può configurare per quanto tempo conservare questa cache prima di eliminare i vecchi file.
Clear "Open Recent" History: Clears the project entries in the File → Open Recent menu.
Reset "Don’t Show Again" Dialogs: Causes dialogs that have been dismissed with the Don’t Show Again setting to be shown again in the next situation where they would otherwise be hidden.
Reset All Dialogs to Defaults: Resets changed settings in all KiCad dialogs.
Reset All Program Settings to Defaults: Resets all KiCad preferences to their defaults.
Elenco di riferimento azioni
Di seguito è riportato un elenco di tutte le azioni disponibili nella Gestione progetti di KiCad: un comando che può essere assegnato a un tasto comando.
Gestore progetti di KiCad
Le azioni seguenti sono disponibili nella Gestione progetti di KiCad. I tasti comando possono essere assegnati a una qualsiasi di queste azioni nella sezione Tasti comando delle preferenze.
| Action | Default Hotkey | Description |
|---|---|---|
Browse Project Files |
Open project directory in file explorer |
|
Archive Project… |
Archive all project files |
|
Close Project |
||
Image Converter |
Ctrl+B |
Convert bitmap images to schematic or PCB components |
Drawing Sheet Editor |
Ctrl+Y |
Edit drawing sheet borders and title block |
Footprint Editor |
Ctrl+F |
Create, delete and edit PCB footprints |
PCB Editor |
Ctrl+P |
Edit PCB in PCB editor |
Schematic Editor |
Ctrl+E |
Edit schematic in schematic editor |
Symbol Editor |
Ctrl+L |
Create, delete and edit schematic symbols |
Clone Project from Repository… |
||
New Jobset File… |
||
New Project… |
Ctrl+N |
Create a new project based on an existing project |
Open Demo Project… |
||
Open Jobset File… |
||
Open Project… |
Ctrl+O |
|
Open Text Editor |
Launch preferred text editor |
|
Plugin e gestore contenuti |
Ctrl+M |
Run Plugin and Content Manager |
Restore Project from Local History… |
Restore project files from local history |
|
Calculator Tools |
Run component calculations, track width calculations, etc. |
|
Local History |
Show or hide local history panel |
|
Unarchive Project… |
Unarchive project files from zip archive |
|
Gerber Viewer |
Ctrl+G |
Preview Gerber output files |