
KiCad Nightly Referenzhandbuch
Copyright
This document is Copyright The KiCad Documentation Contributors. You may distribute it and/or modify it under the terms of either the GNU General Public License (http://www.gnu.org/licenses/gpl.html), version 3 or later, or the Creative Commons Attribution License (http://creativecommons.org/licenses/by/3.0/), version 3.0 or later.
Alle in diesem Leitfaden genannten Marken sind Eigentum ihrer rechtmäßigen Inhaber.
Mitwirkende
Jean-Pierre Charras, Fabrizio Tappero, Jon Evans, Graham Keeth.
Übersetzung
Lorenz Bewig <[email protected]>, 2025; Carsten Schönert <[email protected]>, 2016
Feedback
Das KiCad-Projekt freut sich über Rückmeldungen, Fehlerberichte und Vorschläge in Bezug auf die Software oder ihre Dokumentation. Weitere Informationen zum Einreichen von Feedback oder zum Melden eines Problems finden Sie in den Anweisungen unter https://www.kicad.org/help/report-an-issue/
Software- und Dokumentationsversion
Dieses Benutzerhandbuch basiert auf KiCad 10.99. Funktionalität und Aussehen können in anderen Versionen von KiCad anders sein.
Revision der Dokumentation: 37fef10f.
Einleitung
KiCad ist ein Open-Source-Softwarepaket zur Erstellung von elektronischen Schaltplänen und Leiterplatten (PCBs). KiCad unterstützt einen integrierten Design-Workflow, bei dem ein Schaltplan und die dazugehörige Leiterplatte zusammen entworfen werden, sowie eigenständige Workflows für spezielle Anwendungen. KiCad enthält auch mehrere Dienstprogramme, die bei der Schaltungs- und PCB-Konstruktion helfen, einschließlich eines PCB-Rechners zur Bestimmung der elektrischen Eigenschaften von Schaltkreisstrukturen, eines Gerber-Viewers zur Prüfung von Fertigungsdateien und eines integrierten SPICE-Simulators zur Prüfung des Schaltungsverhaltens.
KiCad läuft auf allen gängigen Betriebssystemen und einer breiten Palette von Computerhardware. Es unterstützt Leiterplatten mit bis zu 32 Kupferebenen und eignet sich für die Erstellung von Designs aller Komplexitätsgrade. KiCad wird von einem freiwilligen Team von Software- und Elektroingenieuren auf der ganzen Welt entwickelt, die es sich zur Aufgabe gemacht haben, freie und quelloffene Elektronikdesignsoftware für professionelle Designer zu erstellen.
Die neueste Version dieser Dokumentation finden Sie unter https://docs.kicad.org.
Systemanforderungen
KiCad ist in der Lage, auf einer Vielzahl von Hardware und Betriebssystemen zu laufen, aber einige Aufgaben können auf weniger leistungsfähiger Hardware langsamer oder schwieriger sein. Für ein optimales Erlebnis wird eine eigene Grafikkarte und ein Bildschirm mit einer Auflösung von 1920x1080 oder höher empfohlen.
Die aktuellen Systemanforderungen finden Sie auf der KiCad-Website: https://kicad.org/help/system-requirements/
Installieren und Aktualisieren von KiCad
First time setup
The first time you run a new major version of KiCad, a Welcome window will appear to ask you how to initialize your settings. Each major release of KiCad has its own configuration, so that you may run multiple KiCad versions on the same computer without the configurations interfering.
Configuration setup
You always have the option to start with default settings for the new version. If a previous version of KiCad is detected, you will have the option to import the settings from that version. The location of the previous configuration files is detected automatically, but you may override it to choose another location if desired.
Hotkey configurations are not imported from previous versions.
You can manually import hotkey configurations by using the Import Hotkeys… button on the Hotkeys page of Preferences,
then browsing to the .hotkeys file from the old version’s configuration directory.
If you do so, please note that this will replace the current version’s hotkey settings.
|
KiCad stores the settings files in a folder inside your user directory. Each KiCad version will use a different versioned subfolder. For KiCad 10, those folders are:
Windows |
|
Linux |
|
macOS |
|
Libraries setup
You also have options for how to initialize your symbol, footprint, and design block libraries.
If you are setting up KiCad for the very first time, you should select the first option, Start with the built-in KiCad libraries. This initializes your library tables to include all of the libraries that come with KiCad.
If you have used an older version of KiCad and are updating it to the newest version, and therefore already have a library setup that worked in the old version, you can instead the select the second option, Import tables from the previous version. In this case, it is recommended to also select the option Migrate built-in libraries to the latest version, which replaces references to the old-version built-in libraries with references to the updated libraries.
You also have the option to start with no libraries and do all of the configuration yourself. Refer to the Schematic Editor and PCB Editor documentation for details on how to manually configure libraries.
Depending on your system and how KiCad was installed, some options may not be available. KiCad may also not be able to locate any libraries installed on your system. In this case, you should ensure you have installed the libraries, or you can manually configure the libraries after completing setup.
| On some systems the KiCad libraries are installed as a separate package. |
The location of the default library table files depends on operating system and may vary based on installation location. Below are the defaults for each operating system:
Windows |
|
Linux |
|
macOS |
|
Updates & Privacy setup
You can also choose whether to be notified about updates to the KiCad application and to third party packages you may have installed through KiCad’s Plugin and Content Manager (plugins, themes, libraries, etc.). On Windows, you also have the option to enable anonymous crash reporting, which helps the KiCad team diagnose and fix critical issues in the application.
Migrating design files from previous versions
Moderne Versionen von KiCad können Dateien öffnen, die in früheren Versionen erstellt wurden. Sie können aber nur Dateien in den neuesten Formaten schreiben. Das bedeutet, dass es grundsätzlich keine weiteren Schritte gibt, um Dateien aus einer früheren Version zu migrieren, außer die Dateien zu öffnen. In einigen Fällen hat sich die Dateierweiterung für eine Datei von einer KiCad-Version zur nächsten geändert. Nach dem Öffnen dieser Dateien werden sie in dem neuen Format mit der neuen Dateierweiterung gespeichert. Die alten Dateien werden nicht automatisch gelöscht.
In der Dokumentation des Schaltplaneditors werden einige besondere Aspekte beim Öffnen von Legacy-Schaltplänen beschrieben.
Im Allgemeinen können Dateien, die mit einer Version von KiCad erstellt oder geändert wurden, nicht mit älteren Versionen von KiCad geöffnet werden. Aus diesem Grund ist es wichtig, beim Testen einer neuen KiCad-Version Sicherungskopien Ihrer Projekte aufzubewahren, bis Sie sicher sind, dass Sie die ältere KiCad-Version nicht mehr verwenden müssen.
Benutzung der KiCad-Projektverwaltung
The KiCad project manager is the window that opens when you start KiCad. The project manager creates and opens KiCad projects and launches the other KiCad tools:
-
the Schematic Editor
-
the Symbol Editor
-
the PCB Editor
-
the Footprint Editor
-
the Gerber Viewer
-
the Image Converter
-
the Calculator Tools
Das Fenster der KiCad-Projektverwaltung besteht aus einer Baumansicht auf der linken Seite, in der die Dateien angezeigt werden, die mit dem geöffneten Projekt verbunden sind, und einem Startmenü auf der rechten Seite, das Verknüpfungen zu den verschiedenen Editoren und Werkzeugen enthält.

The tree view shows a list of the files inside the project folder. This includes the KiCad schematic and board design files as well as other files and folders in the project folder. If the project contains multiple schematic sheets, only the root sheet is shown in the tree view.
| Nur Dateien, die KiCad lesen kann, werden in der Projektstrukturansicht angezeigt. |
Double-clicking on a file in the tree view will open it in the associated editor. Right-clicking on a file will open a context menu with some file manipulation commands.
If the project is part of a Git repository, the tree shows the version control status of each file. It also shows the current branch after the project name. Usually, the tree shows only the root sheet of the schematic. In a Git repository, the tree shows all the sheets, so that you can see the status of each sheet.

KiCad-Projekte enthalten mindestens eine Projektdatei, einen Schaltplan und einen Platinenentwurf. Schaltpläne können aus mehreren Blättern bestehen, jedes in seiner eigenen Datei, aber ein Projekt kann nur eine einzige Platine enthalten. KiCad erwartet, dass die Projektdatei, die Schaltplan-Stammblattdatei und die Leiterplattendatei denselben Namen haben.
Die Symbolleiste am linken Rand des Fensters bietet Kurzbefehle für die gängigen Projektfunktionen:
|
Create a new project. |
|
Open an existing project. |
|
Create a zip archive of the whole project. This includes schematic files, libraries, PCB, etc. |
|
Extract a project zip archive into a directory. Files in the destination directory will be overwritten. |
|
Refresh the tree view, to detect changes made on the filesystem. |
|
Open the project working directory in a file explorer. |


Standalone-Modus
Sie können die KiCad-Editor-Tools auch im Standalone-Modus ausführen, indem Sie sie direkt aus dem Anwendungsprogramm Ihres Betriebssystems und nicht aus dem Projektmanager starten. Es wird gewöhnlich nicht empfohlen, die Werkzeuge im Standalone-Modus auszuführen, außer in einigen speziellen Situationen, in denen dies notwendig ist, z. B. beim Importieren von Projekten aus anderen EDA-Werkzeugen. Bei der Ausführung im Standalone-Modus sind einige Projektfunktionen nicht verfügbar, darunter:
-
Cross-Probing zwischen dem Schaltplan-Editor und dem Platinen-Editor
-
Entwurfssynchronisierung zwischen dem Schaltplan und der Leiterplatte
Erstellen eines neuen Projektes
Most KiCad designs start with the creation of a project. When you create a new project, you always begin by choosing a project template, even if that template is the default, blank project template.
To create a new project, use the New Project… command in the File menu, click the New Project button in the top toolbar, or use the keyboard shortcut (Ctrl+N by default).

The right side of this dialog shows a list of all installed project templates. The Default template is always available for you to create an empty project. Clicking one of these templates will show the template’s description in a new panel. The left side of the dialog shows a list of your recently used project templates.
| Creating new project templates is covered in the Project Templates section. |
| Creating your own project templates is a good way to easily create new projects that are preconfigured with your preferred drawing sheets, design rules, PCB outlines, logos, etc. |
When you have chosen a template, click the OK button to create a new project from that template.
Sie werden aufgefordert, einen Namen für Ihr Projekt zu vergeben. Standardmäßig wird für Ihr Projekt ein Verzeichnis mit demselben Namen erstellt. Wenn Sie z. B. den Namen Mein Projekt eingeben, erstellt KiCad das Verzeichnis Mein Projekt und darin die Projektdatei Mein Projekt/Mein Projekt.kicad_pro.
If you already have a directory to store your project files in, you can uncheck the Create a new directory for the project checkbox in the New Project dialog.
| Es wird dringend empfohlen, jedes KiCad-Projekt in seinem eigenen Verzeichnis zu speichern. |
Sobald Sie den Namen Ihres Projekts ausgewählt haben, erstellt KiCad die folgenden Dateien im Projektverzeichnis:
|
KiCad project file. |
|
Main schematic file. |
|
Printed circuit board file. |
Other files may also be created, depending on the contents of the template.
Importieren eines Projekts aus einem anderen EDA-Programm
KiCad is able to import files created by some other software packages. Some software formats can be imported as complete projects. Others can only be imported as standalone schematics or boards, and must be manually linked together into a KiCad project. The following types of projects are supported:
| Source EDA Tool | File Extension(s) |
|---|---|
Altium Designer |
|
CADSTAR archive format |
|
Eagle 6.x or newer (XML format) |
|
EasyEDA (JLCEDA) Standard Backup |
|
EasyEDA (JLCEDA) Pro Project |
|
PADS ASCII Project |
|
gEDA / Lepton EDA Project |
|
Um ein Projekt aus einem dieser Tools zu importieren, wählen Sie die entsprechende Option aus dem Untermenü Nicht-KiCad-Projekt importieren… des Menüs Datei.
Depending on the format, you will be prompted to select either a project, schematic, or a board file in the import file browser dialog. The imported schematic and board files should have the same base file name (e.g. project.sch and project.brd). Once the requested files are selected, you will be asked to select a directory to store the resulting KiCad project.
A greater number of formats can be imported as either schematics or boards, rather than complete projects. The following schematic formats can be imported into the Schematic Editor:
| Source EDA Tool | File Extension(s) |
|---|---|
Altium Designer |
|
Eagle (Autodesk) |
|
LTspice |
|
PADS Logic |
|
CADSTAR Schematic Archive |
|
gEDA / Lepton EDA |
|
EasyEDA (JLCEDA) Standard |
|
EasyEDA (JLCEDA) Professional |
|
Importing these schematic formats is explained in more detail in the Schematic Editor documentation.
The following PCB formats can be imported into the PCB Editor:
| Source EDA Tool | File Extension(s) |
|---|---|
Altium Designer |
|
Altium Circuit Maker |
|
Altium Circuit Studio |
|
Cadence Allegro |
|
CADSTAR PCB Archive |
|
Eagle (Autodesk) |
|
EasyEDA / JLCEDA Standard |
|
EasyEDA / JLCEDA Professional |
|
Fabmaster |
|
gEDA / Lepton EDA |
|
P-CAD 200x |
|
PADS (ASCII) |
|
Solidworks PCB |
|
Importing these PCB formats is explained in more detail in the PCB Editor documentation.
Project backups and autosave
KiCad can automatically create backups of your projects. When enabled, KiCad will automatically create backups of the entire current project in two situations:
-
When you manually save in any editor.
-
When there are unsaved changes after a few seconds of inactivity (an autosave).
You can enable and configure project backups in KiCad’s Project Backup preferences.
KiCad can create project backups in two ways: incremental backups or Zip archives.
Incremental backups
When configured for incremental backups, project backups are saved as incremental snapshots of project files.
You can view each of these snapshots in the Local History panel (View → Panels → Local History).

The Local History panel shows each snapshot event and when the snapshot was taken. If you hover over an event, a tooltip shows the files that changed in the snapshot.
To restore from a snapshot, right click the snapshot in the Local History panel and choose Restore Commit.
Behind the scenes, the incremental backup system uses a Git repository in a hidden .history folder. KiCad manages this Git repository automatically.
If you use a version control system to track your project’s changes, you may want to exclude the .history folder.
|
Zip archives
When configured for Zip archives, project backups are saved as a Zip archives of the project directory and its contents. Each backup is a separate Zip file.
You can restore from these archives by using the Unarchive tool or by manually extracting the archive and loading the project.
Speichern und Laden von Projektarchiven
Sie können die Dateien Ihres Projekts mit dem Archivierungstool (Datei → Projektdateien archivieren…) in einem Zip-Archiv speichern.
Sie können ein Projekt auch aus einem Archiv entpacken (Datei → Projektdateien aus Archiv entpacken…). Wenn Sie ein Projekt in das aktuell geladene Projektverzeichnis entpacken, wird das Projekt automatisch neu geladen, um alle Änderungen in der archivierten Version des Projekts zu berücksichtigen.
Das Archivierungswerkzeug speichert die folgenden Dateien aus Ihrem Projektordner in das Archiv:
|
KiCad design files |
|
Legacy KiCad design files |
|
3D models |
|
Gerber files |
|
Manufacturing files |
|
Netlists |
|
Python scripts |
|
Documentation files |
|
SPICE models |
|
IBIS models |
Version control with Git
KiCad has a built-in interface to the Git version control system. You can use it to record the history of a project, share the project with other designers, and get their changes. The Version Control panel gives access to the most frequent tasks: commit, push and get changes. The Advanced Git window gives access to history, branches, remotes, stashes and tags.
You do not need a separate Git program to use these tools. If you also use other Git programs, KiCad uses the same repository and settings.
Version control concepts
A Git repository holds the files of a project and a history of all the changes to them. The repository is a hidden .git folder in the project folder or in one of its parent folders. The project folder that you edit is the working folder.
When you save a schematic or a board, KiCad writes the file to the working folder. A save does not record a version. When you commit, Git records the saved state of the files that you select as a new version in the repository. Each commit has a summary, an author and a date. You can compare commits and return to a commit later.
A commit is local to your computer. A remote is a copy of the repository on a server or in a shared folder. Usually, the remote has the name origin. When you push, KiCad sends your commits to the remote. When you get changes, KiCad gets the commits of other designers from the remote and adds them to your project.
A branch is a separate line of commits. You can use a branch to try a design change without affecting the main line of the project. The current branch is the branch that your working folder shows.
A conflict occurs when you and another designer change the same file, and Git cannot combine the two changes. KiCad shows each conflict and lets you select the version to keep. For schematics and boards, KiCad can show the conflicts item by item. Refer to Resolving conflicts.
The Version Control panel commands correspond to these Git operations:
| KiCad command | Git operation |
|---|---|
Commit |
|
Commit and Push |
|
Get Changes |
|
Fetch (Advanced Git window) |
|
Undo Last Commit |
|
Discard Changes |
|
Stash Changes… |
|
The Git integration has these limits:
-
KiCad cannot read or write files that the repository keeps in Git LFS. If a project uses Git LFS, KiCad does not commit, get changes or switch branches. Use a different Git program for that repository.
-
KiCad does not push tags.
-
KiCad cannot rebase, cherry-pick, revert or bisect. If another program starts one of these operations, KiCad can only abandon it.
-
KiCad cannot rename branches or remotes, and it cannot delete a branch on the remote.
-
KiCad does not sign commits or tags.
-
KiCad cannot make a repository on a server. Make the repository with the tools of your server, then add it to the project as a remote.
Where to find the version control tools
The version control tools are in these locations:
-
The Version Control panel is in the project manager, the Schematic Editor and the PCB Editor. In the project manager, the panel is below the project files tree and is visible by default. In the editors, the panel is hidden by default. To show or hide the panel, click View → Panels → Version Control.
-
The project files tree shows the version control status of each file and the name of the current branch. Right click in the tree to show the Version Control menu. Use this menu to add version control, set the default remote and show the history. You can also switch branches and disable the integration for the project.
-
File → Clone Project from Repository… copies a project from a remote. Refer to Cloning a project from a repository.
-
The Advanced Git window has the tools for history, branches, remotes, stashes and tags.
-
Tools → Compare Project Branches… shows the files that are different between two branches. Refer to Comparing project branches.
-
The Version Control page of the Preferences dialog enables or disables the Git integration for all projects.
KiCad finds an existing repository automatically. If the project folder is in a Git repository, the tools are available when you open the project.
The Version Control panels in the project manager and in the editors use the same repository. A commit in one panel updates the other panels. For the tasks that are specific to each editor, refer to the Schematic Editor manual and the PCB Editor manual.
Putting a project under version control
You can put a project under version control in two ways:
-
If the project is on a server, clone it. Refer to Cloning a project from a repository.
-
If the project is on your computer, add version control to it. Refer to Versionskontrolle zu einem bestehenden Projekt hinzufügen.
Before your first commit, KiCad asks for your name and email address if Git does not have them. Refer to Setting the commit author.
Cloning a project from a repository
To make a copy of a project that is in a remote repository:
-
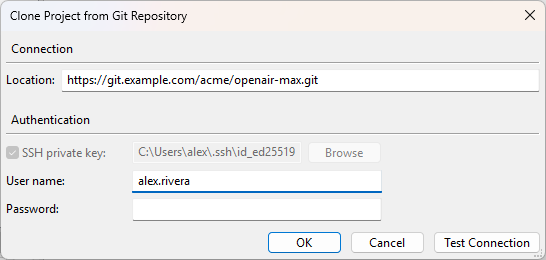
Click File → Clone Project from Repository…. The Clone Project from Git Repository dialog opens.
-
In Location, type or paste the address of the repository. If the clipboard holds a repository address, KiCad pastes it for you. The address determines the connection type:
-
An address that starts with
https://uses HTTPS. -
An address that starts with
ssh://, or that has the formuser@host:path, uses SSH. -
A folder path uses a local connection, which needs no authentication.
-
-
Type the authentication data that the server needs:
-
For HTTPS, type your User name and your Password. Many servers need a personal access token in place of a password.
-
For SSH, select SSH private key and select your private key file. If KiCad finds a key in your SSH configuration or
.sshfolder, it selects that key automatically. If the key has a passphrase, type it in SSH key password.
-
-
Optionally, click Test Connection to make sure that KiCad can connect to the repository.
-
Click OK.
-
Select the folder for the project, then click Save.
KiCad copies the repository and opens the first project that it finds in it. If the repository has no KiCad project, KiCad tells you where it put the files.
| The File → Clone Project from Repository… menu item is available only when Enable Git tracking is selected in the Version Control preferences. |
Versionskontrolle zu einem bestehenden Projekt hinzufügen
To make a new repository for a project that is not under version control:
-
In the project files tree, right click the project.
-
Click Version Control → Add Project to Version Control…. KiCad makes a repository in the project folder. The Set default remote dialog opens.
-
If you have a remote repository for the project, type its address and the authentication data. The fields are the same as in the clone dialog. Then click OK. KiCad connects to the remote and gets its branches.
-
If you do not have a remote repository yet, click Skip. You can add a remote later with Version Control → Configure Default Remote… or on the Remotes page.
KiCad does not make a commit. Your first commit starts the history of the project. If the remote has one branch with a different name, for example main, your first commit goes on that branch.
When KiCad makes a repository, it also adds these files to the project folder:
-
A
.gitignorefile that tells Git to ignore backups, autosave files, lock files, the footprint cache and the.kicad_prlfile. KiCad makes this file only if the project folder does not have one. -
A
.gitattributesfile that tells Git to use the KiCad merge tool for schematics, boards and libraries. Refer to Merging KiCad files with other Git programs.
Commit these files with your first commit.
The .kicad_prl file holds settings for your computer only, such as the visible layers.
Do not commit it.
|
Configuring the default remote
The default remote is the remote named origin. KiCad pushes to it and gets changes from it, unless the current branch tracks a different remote.
To change the address or the authentication data of the default remote:
-
In the project files tree, right click the project.
-
Click Version Control → Configure Default Remote….
-
Change the address or the authentication data, then click OK.
To add or remove other remotes, use the Remotes page of the Advanced Git window.
Credentials and SSH keys
If a server rejects your user name, password or key, the Git Authentication Required dialog opens. The dialog shows the address of the remote and the reason for the rejection.
-
For an HTTPS remote, type your Username and your Password / token.
-
For an SSH remote, select the SSH key and type the Key passphrase. If the key has no passphrase, leave the passphrase empty. If the address of the remote includes a user name, for example
git@, you cannot change the user name. -
To keep the password or the passphrase, select Save credentials. This option is selected by default.
-
Click OK. KiCad tries the operation again.
KiCad keeps saved credentials in the Windows Credential Manager, in the macOS Keychain, or in the secret storage of your Linux desktop. To remove saved credentials, use the tool of your operating system.
For an SSH remote, KiCad tries the keys in this order:
-
The keys in your SSH agent.
-
The key that you selected for the project.
-
The key that connected to this remote the last time.
-
The keys that your SSH configuration file sets with
IdentityFilefor the server. -
The keys with the standard names in your
.sshfolder, and up to four other keys in that folder.
You can select a .pub file in place of a private key. KiCad then uses the private key that is next to it.
Verifying a server
The first time that you connect to an SSH server, the Verify Server dialog opens. The dialog shows the key fingerprint of the server.
-
Compare the fingerprint with the fingerprint that your server administrator or your Git service publishes.
-
If the fingerprints are the same, click Connect. KiCad adds the key of the server to your
known_hostsfile. -
If the fingerprints are different, click Cancel.
If the key of a known server changes, KiCad does not connect and shows an error. A changed key can show that a different computer uses the address of the server.
Speak to your server administrator before you remove the old key from your known_hosts file.
KiCad does not remove or replace keys in this file.
|
Repositories that belong to a different user
Git does not open a repository that belongs to a different user account on your computer. For example, this occurs if you copied the project from a different computer, or if an administrator made the folder.
The Version Control panel reports that the repository belongs to another user. It also shows a git config --global --add safe.directory command.
-
Click Copy to copy the command.
-
Run the command in a terminal.
-
Close the project and open it again.
KiCad does not show this message for a repository that contains your home folder. It ignores that repository and shows that the project is not under version control.
Setting the commit author
Each commit records the name and email address of its author. KiCad uses the name and email address in the Git settings of the repository. If the repository has no name or email address, KiCad uses your global Git settings.
If Git has no name and email address for you, the Set Author dialog opens before your first commit. The dialog shows the author from the Version Control preferences if you set one there. Type or check your Name and Email, then click OK. KiCad saves them in the settings of the repository.
To change the author of a repository later, click the gear button in the Version Control panel. Then click Set Author….
Version control status in the project tree
When a project is in a Git repository, the project files tree shows the name of the current branch after the project name. The tree also shows all the schematic sheet files, so that you can see the status of each sheet. An icon next to each file shows its status:
| Icon | Status | Meaning |
|---|---|---|
|
Unchanged |
The file is the same as in the last commit, and the remote has no newer version. |
|
Modified |
The file has changes that are not committed. |
|
New |
The file is not in the repository yet. Commit it to add it. |
|
Deleted |
The file was deleted, and the deletion is not committed. |
|
Committed, not pushed |
The file has committed changes that are not on the remote. Push them to share them. |
|
Changed on the remote |
The remote has a newer version of the file. Use Get Changes to get it. |
|
Conflict |
The file has a conflict that is not resolved. |


KiCad checks the remote for new commits at an interval that you set in the Version Control preferences. This check does not change your files. If the check fails, KiCad shows a warning in the status bar of the project manager.
The Version Control panel
The Version Control panel shows the files that you changed and lets you commit, push and get changes.
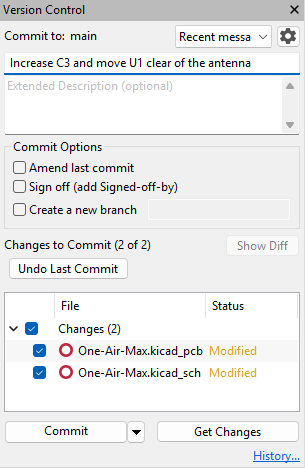
The panel has these areas, from top to bottom:
-
The name of the current branch, next to Commit to. To switch to a different branch, use the project files tree or the Branches page of the Advanced Git window.
-
The Recent messages list. Select a message to use it again.
-
The gear button. It opens a menu with Open Advanced Git Window… and Set Author….
-
The summary and the description of the commit. When 10 or fewer characters remain before the 72-character limit, a number shows how many you can add.
-
The commit options. Refer to Commit options.
-
The Show Diff button. It shows the changes to the selected file.
-
A status line. It tells you what the project needs next, or why a command is not available.
-
The Undo Last Commit button, if you can undo the last commit. Refer to Undoing the last commit.
-
The list of changed files, with a check box for each file and its status: Modified, New, Deleted or Conflict. The panel shows only the files in the project folder. It does not show untracked backups, autosave files, lock files and other temporary files. It shows these files if Git already tracks them.
-
The Commit button and the Get Changes button.
-
The History… link, which opens the History page of the Advanced Git window.
The Commit button changes to Amend when you amend the last commit. It changes to Push when you have commits that are not on the remote and no files to commit.
Committing changes
To commit changes:
-
In the list of changed files, select the check box of each file that you want to commit. KiCad selects new files automatically. Clear the check box of a file that you do not want to commit.
-
Type a summary of the changes. Optionally, type a longer description.
-
Click Commit. You can also press Ctrl+Enter while you type in the summary or the description.
If the Schematic Editor or the PCB Editor has unsaved changes, the Unsaved Changes dialog opens:
-
Click Save and Review to save the editors. KiCad updates the list of changed files and does not commit. Examine the list, then click Commit again.
-
Click Commit Anyway to commit the files as they are on disk now. The unsaved changes are not in the commit.
-
Click Cancel to stop.
After the commit, the Commit button changes to Push if the project has a remote.
Committing and pushing
To commit and push in one step, click the arrow on Commit, then click Commit and Push. You can also press Ctrl+Shift+Enter while you type in the summary or the description.
To push commits that you made before, click Push.
If another designer pushes changes first, KiCad asks whether to get their changes and push again. Click Yes to get the changes, resolve any conflicts, and push.
| On macOS, use Cmd+Return and Cmd+Shift+Return. |
Commit options
Amend last commit: Replaces the last commit with a new commit that includes the selected files and the new message. KiCad shows this option only if the last commit is not on the remote yet. When you select it, KiCad loads the message of the last commit if the summary is empty.
Sign off (add Signed-off-by): Adds a Signed-off-by line with your name and email address to the commit message.
Create a new branch: Makes a new branch, switches the project to it, and commits to it. Type the name of the branch in the field below the option. If the commit fails, KiCad deletes the new branch.
Undoing the last commit
You can undo the last commit if it is not on a remote yet. When this is possible, the Undo Last Commit button shows in the Version Control panel.
Click Undo Last Commit. KiCad removes the commit but keeps its changes in your files. The changed files reappear in the list. The panel also shows the commit message. You can then change the files or the message and commit again.
If the commit is already on a remote, KiCad does not undo it, because other designers can have it. Make a new commit that corrects the problem.
Getting changes from the remote
To get the commits of other designers:
-
Commit or stash your changes. KiCad does not get changes while you have uncommitted changes. This prevents the changes from the remote from replacing your work.
-
Save or close the editors that have unsaved changes.
-
Click Get Changes.
KiCad gets the commits from the remote and adds them to the current branch. If you have local commits that are not on the remote, KiCad merges the two lines of commits and makes a merge commit. If the Git setting pull.rebase is true, KiCad places your commits after the remote commits without a merge commit. If the open editors show files that changed, they load the new versions.
While the transfer runs, the Get Changes button changes to Cancel. Click Cancel to stop the transfer.
If the remote has new commits, the status line tells you to use Get Changes. The project files tree shows the  icon for the files that changed.
Resolving conflicts
A conflict occurs when you and another designer change the same file, and Git cannot combine the two changes. For example, you change the value of a resistor and commit. At the same time, a colleague changes the value of the same resistor and pushes. When you get changes, the two values are in conflict.
When you get changes, KiCad combines changes to a board item by item. For schematics, symbol libraries and footprints, a file that both of you changed is always a conflict. The merge tool can then combine the changes to a schematic item by item.
KiCad shows the Resolve Conflict dialog for each file that has a conflict. The dialog tells you what happened to the file on each side.
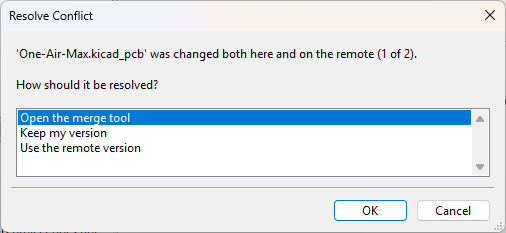
Select one of these choices, then click OK:
-
Open the merge tool: Shows each conflict in the file and lets you select the version to keep. The merge tool is available for schematics and boards.
-
Keep my version: Keeps your version of the file and discards the changes from the remote.
-
Use the remote version: Uses the version from the remote and discards your changes to the file.
If a file was deleted or added on one side, the dialog shows choices to keep the file or to delete it.
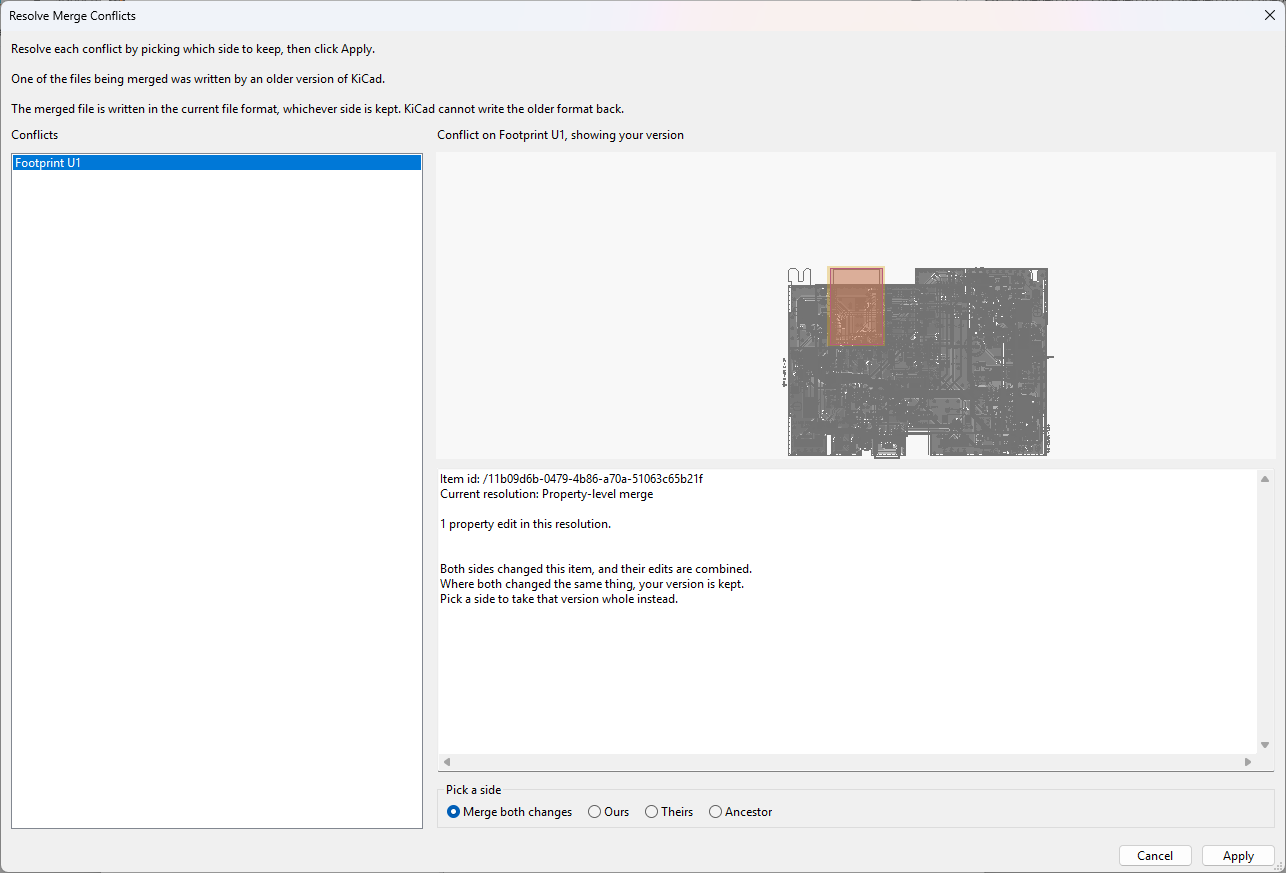
The Resolve Merge Conflicts dialog shows the conflicts in a schematic or a board:
-
In the Conflicts list, select a conflict. KiCad highlights the item.
-
Under Pick a side, select the version to keep:
-
Ours: your version.
-
Theirs: the version from the remote.
-
Ancestor: the version before the two changes.
-
Merge both changes: KiCad combines the two changes. If both sides changed the same property, KiCad keeps your value. When this choice is available, it is selected by default.
-
-
Do steps 1 and 2 for each conflict.
-
Click Apply.
If you click Cancel in the merge tool, the Resolve Conflict dialog opens again for that file.
After you resolve all the files, KiCad completes the merge. It copies each version it replaces to a merge-<date and time> folder in the project backup folder. The status line shows the name of this folder.
| If an older version of KiCad saved one of the files, the merged file uses the current file format. You cannot open the merged file in the older version of KiCad. |
If you click Cancel in the Resolve Conflict dialog, KiCad stops and your files do not change. If you already resolved a file in the merge tool, KiCad asks you to confirm, because it discards that result. Click No to go back to the Resolve Conflict dialog.
If the Git setting pull.rebase is true and a conflict occurs, KiCad asks if it can make a merge commit. KiCad can resolve conflicts only with a merge.
| A merge, rebase, cherry-pick or revert can start outside KiCad or stop before it completes. Then the Get Changes button changes to Abandon Merge, Abandon Rebase, Abandon Cherry-pick or Abandon Revert. Click it to go back to the last commit. This discards the changes that the operation made to your files. To complete the operation, use the program that started it. |
Examining and discarding the changes to a file
To see what changed in a file, select the file in the list and click Show Diff. You can also double click the file. For schematics and boards, the Compare Files dialog opens and shows the changed items. For text files, KiCad shows the changed lines.
Right click a file in the list to show these commands:
-
Show History for This File: Opens the History page of the Advanced Git window with only the commits that changed the file.
-
Discard Changes: Removes your changes to the file after you confirm. For a file that is in the repository, KiCad replaces it with the version of the last commit. For a new file, KiCad moves it to the trash. For a file with a conflict, KiCad keeps the version that the project had before you got changes.
Save or revert the changes in the open editors before you discard a file. If an editor has unsaved changes, KiCad does not discard the file.
The Advanced Git window
The Advanced Git window has all the version control tools for the project. Use one of these methods to open it:
-
Click the gear button in the Version Control panel and then click Open Advanced Git Window….
-
Click History… in the Version Control panel.
-
In the project files tree, right click and then click Version Control → Version History….
KiCad opens only one Advanced Git window at a time.
The top of the window shows the repository and the current branch. To switch branches, select a branch in the Branch list. The Fetch, Pull and Push buttons are also at the top:
-
Fetch gets the commits from the remote but does not change your files. After a fetch, the History and Branches pages show the commits on the remote.
-
Pull is the same as Get Changes in the Version Control panel.
-
Push sends your commits to the remote.
Use the list on the left to select a page: Changes, History, Branches, Remotes, Stashes, Tags or Repository.
Changes page
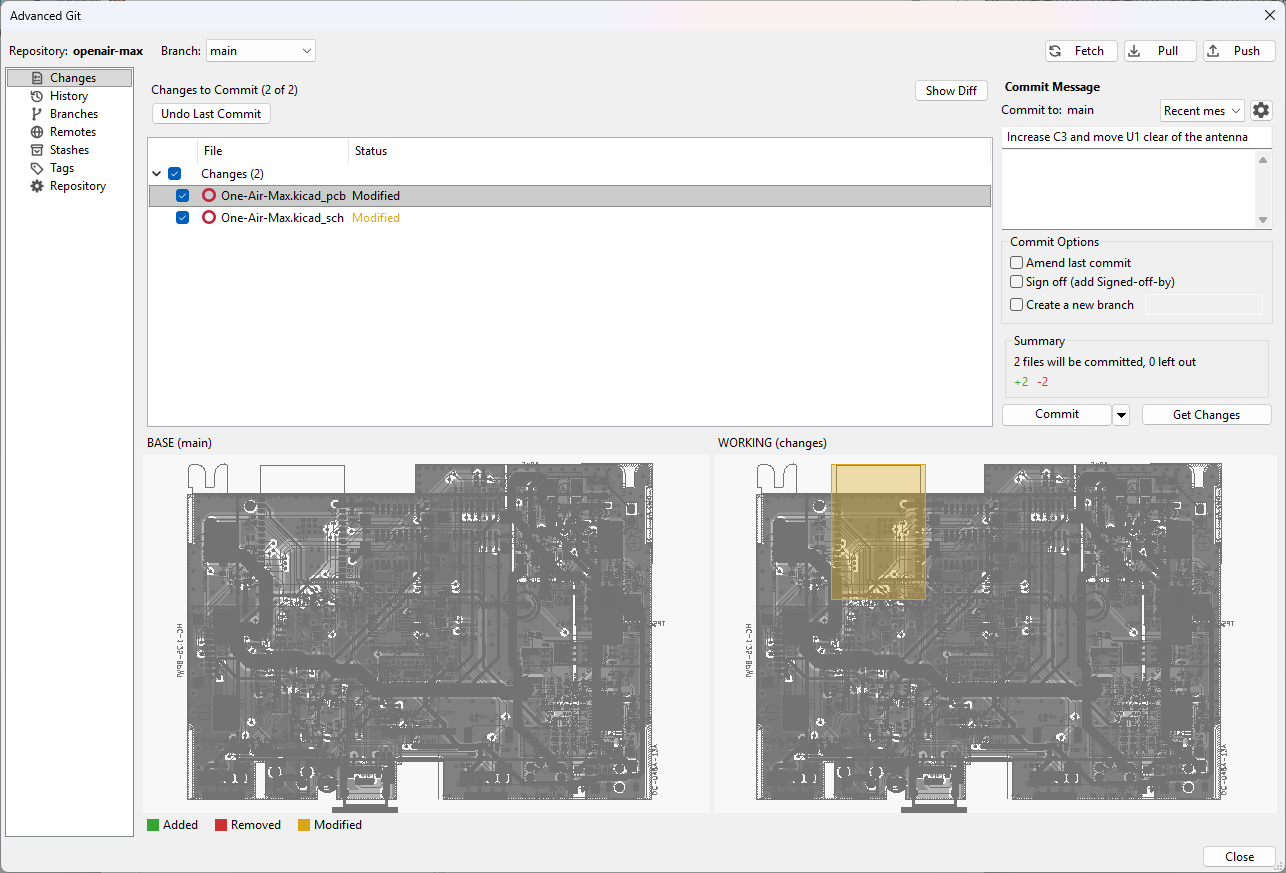
The Changes page has the same controls as the Version Control panel, in a larger layout. The commit message is the same in the panel and on this page. When you change it in one location, KiCad changes it in the other location.
The summary at the right tells you how many files the commit includes and how many lines change. When you select a file, KiCad shows its changes below the list:
-
For a schematic or a board, KiCad shows the version in the last commit and your version side by side. Colors show the added, removed and modified items. Turn the mouse wheel to zoom, and drag to move the view. The two sides move together.
-
For a text file, KiCad shows the changed lines.
-
For symbol libraries and footprints, double click the file to open the Compare Files dialog.
History page
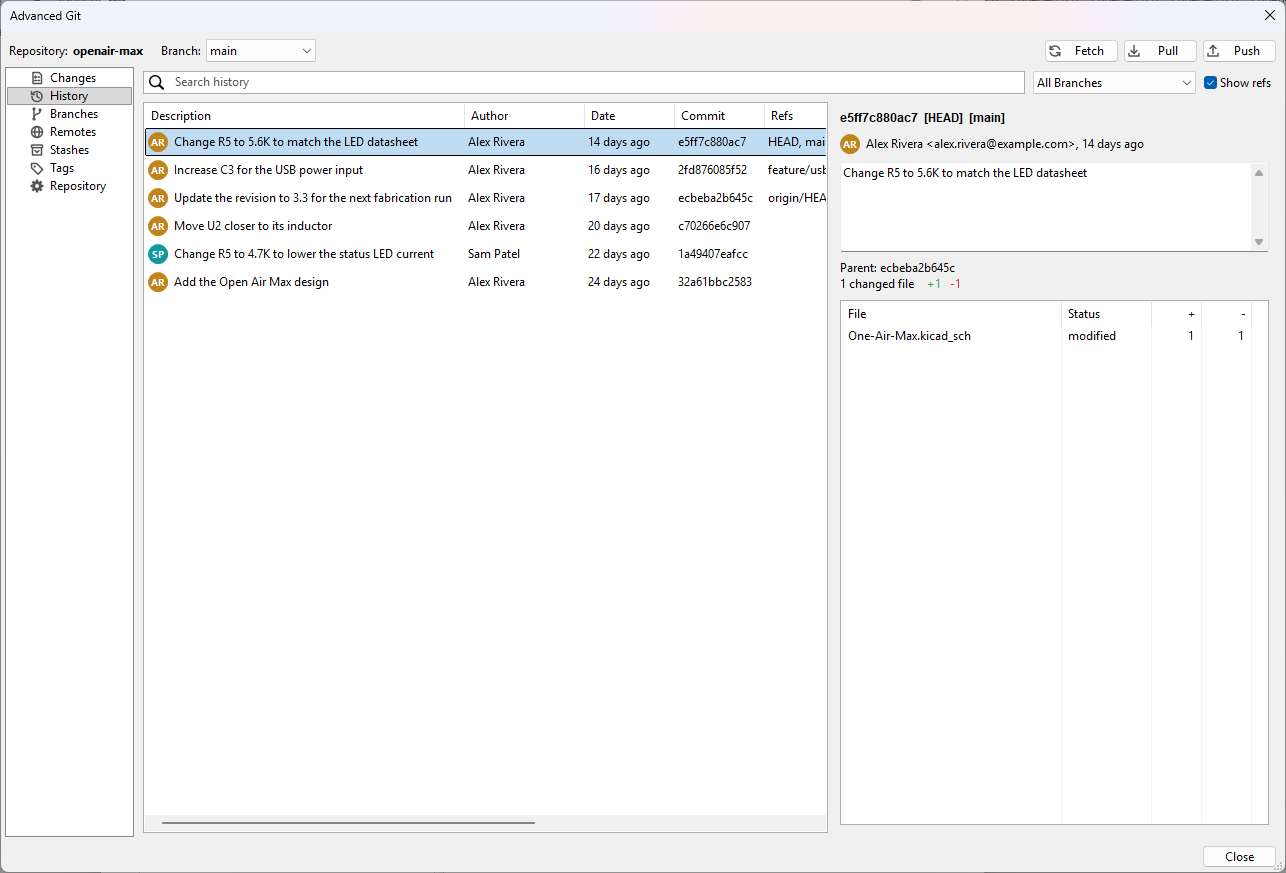
The History page shows the commits of the project, with the newest commit first.
-
Type in the search field to find commits by summary, author, email address or commit identifier.
-
Select a branch in the list to show only the commits of that branch. All Branches shows the commits of all branches.
-
Show refs shows the branches and tags of each commit in the Refs column.
Select a commit to see its message, its parent commits and the files that it changed. Select a file to see its changes, as on the Changes page. Double click a commit or a file to open the Compare Files dialog.
When you open the page with Show History for This File, it shows only the commits that changed that file. Click Show All Commits to show all the commits again.
Right click a commit to show these commands:
-
Restore This Version: Makes the project files the same as in the selected commit. KiCad records the restoration as a new commit to preserve the history. Files outside the project folder do not change. Commit or stash your changes before you restore a version.
-
Amend Last Commit…: Opens the Changes page in amend mode with the message of the last commit. This command is available only for the last commit of the current branch, and only if that commit is not on the remote.
Branches page
The Branches page shows the local branches and the branches on the remote. The Status column shows current for the current branch and remote for the branches on the remote. Type in the search field to find a branch by its name.
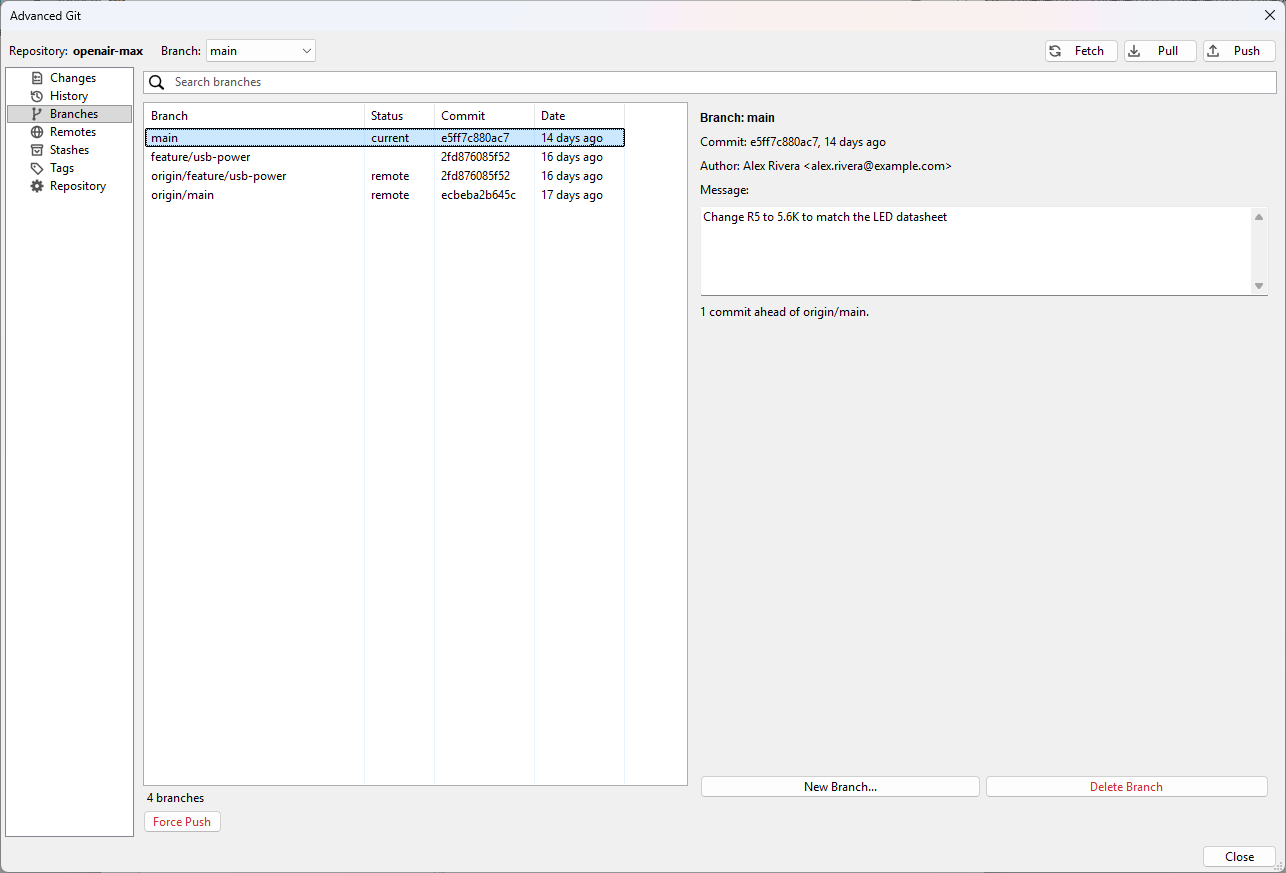
Select a branch to see its last commit. The details show how many commits it is ahead of or behind the branch it tracks.
To switch the project to a different branch, double click a local branch. KiCad asks you to confirm, then replaces the project files with the version on that branch. Commit or stash your changes before you switch.
To make a new branch:
-
Select the branch to start from. You can select a local branch or a branch on the remote.
-
Click New Branch….
-
Type the name of the new branch, then click OK.
KiCad makes the branch but does not switch to it. To switch to it, double click it. When you push the branch for the first time, KiCad makes it on the remote.
To delete a local branch, select it and click Delete Branch. If the branch has commits that are not on the current branch, KiCad tells you how many commits you lose.
Force Push replaces the current branch on the remote with your local branch.
| Force Push deletes the commits that are only on the remote. Other designers lose these commits. Use it only if you know that nobody needs those commits. |
Remotes page
The Remotes page shows the remotes of the repository and their addresses. Select a remote to see the time of the last fetch.
-
To add a remote, click Add Remote…, type a Name and a URL, then click OK.
-
To change the address of a remote, select it and click Edit URL….
-
To remove a remote, select it and click Remove Remote. This does not change the repository on the server.
Stashes page
A stash saves your uncommitted changes and removes them from the working folder. Use a stash when you must get changes or switch branches, but your work is not ready for a commit.
To stash your changes:
-
Click Stash Changes…. If the editors have unsaved changes, KiCad asks you to save them first.
-
Optionally, type a description.
-
Click OK.
A stash includes only the files that are already in the repository. New files that you never committed stay in the working folder.
To get your changes back, select the stash and click one of these buttons:
-
Apply Stash: Puts the changes back in the working folder and keeps the stash.
-
Pop Stash: Puts the changes back in the working folder and removes the stash.
Before you apply a stash, commit or discard your current changes. If the stash conflicts with the current files, KiCad keeps it and leaves your files unchanged.
Drop Stash deletes the stash. You cannot get a dropped stash back.
Tags page
A tag is a name for a commit, for example the commit that you sent to fabrication.
To make a tag on the current commit:
-
Click Create Tag….
-
Type a Tag name.
-
Optionally, type a Message. A tag with a message records the author and the date of the tag.
-
Click OK.
Tags are local. KiCad does not push them to the remote.
To see the project as it was at a tag, select the tag and click Check Out. The project then shows an old version and is not on a branch. You cannot commit or push in this state from the Version Control panel. To go back, double click a branch on the Branches page.
To delete a tag, select it and click Delete Tag.
Repository page
The Repository page shows the name and the email address that KiCad uses for your commits in this repository. To change them, click Edit Author…. The change applies only to this repository.
Comparing project branches
The Compare Branches dialog shows the files that are different between two branches, tags or commits. To open it, click Tools → Compare Project Branches….
When the dialog opens, Head ref shows the current branch. Base ref shows main or master if that branch is not the current branch. If it is the current branch, Base ref shows the remote branch that the current branch tracks.
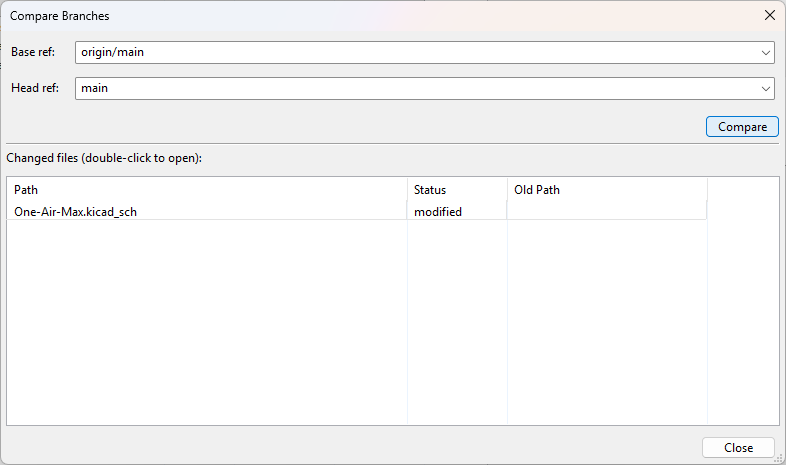
-
In Base ref, select or type the older branch, tag or commit.
-
In Head ref, select or type the newer branch, tag or commit. You can type any name that Git accepts, for example
origin/main,v3.3or a commit identifier. -
Click Compare.
The list shows each changed file’s repository path and status. It also shows the old path for renamed or copied files. The comparison uses only committed files. Changes in your working folder are not included.
Double click a schematic, board, symbol library or footprint to open the Compare Files dialog for that file.
| The Compare Branches dialog shows the files of the whole repository, not only the files of the project. |
Merging KiCad files with other Git programs
When KiCad adds version control to a project or clones a project, it configures the repository for other Git programs. Then these programs can merge KiCad files item by item. Without this configuration, Git merges schematics and boards line by line. A conflict can then produce a file that KiCad cannot open.
KiCad makes these changes:
-
It adds lines to the
.gitattributesfile of the project. These lines connect.kicad_sch,.kicad_pcb,.kicad_symand.kicad_modfiles to the KiCad merge drivers. KiCad does not change lines that are already in the file. -
It adds the KiCad merge drivers and the KiCad merge tool to the Git settings of the repository. These settings point to the
kicad-cliprogram of the KiCad installation that made them. KiCad does not change settings that are already present.
With this configuration, git merge and git pull merge KiCad files item by item. If items are in conflict, Git keeps your version of those items and marks the file as conflicted. Git does not write conflict markers into the file. You can still open the file in KiCad.
To resolve the conflicts, run git mergetool. For schematics and boards, the Resolve Merge Conflicts dialog opens. Select a side for each conflict as described in Resolving conflicts, then click Apply. Git then marks the file as resolved, and you can commit the merge.
The configuration is in the repository on your computer only.
Other clones of the repository need the same configuration.
KiCad cannot add this configuration to a clone that another program made.
For such a clone, copy the merge.kicad-, mergetool.kicad. and merge.tool settings from a clone that KiCad made.
|
If you move or update KiCad, the merge driver settings can point to an old kicad-cli program.
Correct the merge.kicad-*.driver and mergetool.kicad.cmd settings in the repository configuration.
|
Disabling the Git integration
To disable the Git integration for one project:
-
In the project files tree, right click the project.
-
Click Version Control → Disable Git Integration.
KiCad then does not show the status of files and does not use the repository for this project. The repository and its history do not change, so you can continue to use other Git programs with the project. To enable the integration again, click Version Control → Enable Git Integration.
To disable the Git integration for all projects, clear Enable Git tracking in the Version Control preferences.
KiCad Dateien und Ordner
KiCad erstellt und verwendet Dateien mit den folgenden spezifischen Dateierweiterungen (und Ordnern) für die Schaltplan- und Leiterplattenbearbeitung.
Viele dieser Dateien enthalten wichtige Designinformationen, insbesondere die Projektdatei (.kicad_pro), die Schaltplandatei(en) (.kicad_sch) und die Platinen-Datei (.kicad_pcb). Andere Dateien können ebenfalls notwendig sein. Solche Dateien sollten immer enthalten sein, wenn das Projekt weitergereicht wird. Einige Dateien müssen nicht mit dem Projekt weitergereicht werden, wie z.B. die projektlokale Einstellungsdatei (.kicad_prl) oder die Datei fp-info-cache. Dateien, die nicht weitergereicht werden müssen, sind in der folgenden Tabelle aufgeführt.
Projektdateien
|
Project file, containing settings that are shared between the schematic and PCB |
|
Legacy (KiCad 5.x and earlier) project file.
Can be read and will be converted to a |
Schematic editor files and folders
|
Schematic files, containing all symbol and connection information. |
|
Schematic symbol library file, containing the symbol descriptions: graphic shape, pins, fields. This is a packed library, i.e. all of the symbols in the library are in a single file. This can also be an individual symbol in an unpacked library,
where the library is a folder containing individual |
|
Schematic symbol library folder.
The folder itself is the library, and contains individual |
|
Simulator workbook file containing SPICE simulation setup information. |
|
Legacy (KiCad 5.x and earlier) schematic file.
Can be read and will be converted to a |
|
Legacy (KiCad 5.x and earlier) schematic library file. Can be read but not written. |
|
Legacy (KiCad 5.x and earlier) schematic library documentation. Can be read but not written. |
|
Legacy (KiCad 5.x and earlier) schematic component library cache file.
Required for proper loading of a legacy schematic ( |
|
Symbol library table: list of symbol libraries available in the schematic editor. |
|
Design block library table: list of design block libraries available in the schematic editor. |
Leiterplatteneditor Dateien und Ordner
|
Board file containing all info but the page layout. |
|
Footprint library folders. The folder itself is the library. |
|
Footprint files, containing one footprint description each. |
|
Design rules file, containing custom design rules for a certain |
|
Legacy (KiCad 4.x and earlier) board file. Can be read, but not written, by the current board editor. |
|
Legacy (KiCad 4.x and earlier) footprint library file. Can be read by the footprint or the board editor, but not written. |
|
Footprint library table: list of footprint libraries available in the board editor. |
|
Cache to speed up loading of footprint libraries. Does not need to be distributed with the project or put under version control. |
Gemeinsame Dateien
|
Local settings for the current project; helps KiCad remember the last used settings such as layer visibility or selection filter. Does not need to be distributed with the project or put under version control. |
|
Page layout (drawing border and title block) description file. |
|
Jobset definition file containing output jobsets. |
|
Design block library folders. The folder itself is the library. Design blocks can contain both schematic and layout fragments. |
|
Design block folder for defining a reusable design.
The folder is the design block,
and contains a |
|
Netlist file created from the schematic, and read by the board editor. Note that the recommended workflow for transferring information from the schematic to the board does not require the use of netlist files. |
|
Association between components used in the schematic and their footprints.
It can be created by the Board Editor and imported by the Schematic Editor.
Its purpose is to import changes from the board to the schematic, for users
who change footprints in the Board Editor (for instance using Exchange
Footprints command) and want to import these changes back to the schematic.
Note that the
recommended
workflow for transferring information from the board to the schematic does not
require the use of |
Fertigungs- und Dokumentationsdateien
|
Gerber files, for fabrication. |
|
Drill files (Excellon format), for fabrication. |
|
Position files (ASCII format), for automatic insertion machines. |
|
Report files (ASCII format), for documentation. |
|
Plot files (Postscript), for documentation. |
|
Plot files (PDF format), for documentation. |
|
Plot files (SVG format), for documentation. |
|
Plot files (DXF format), for documentation. |
Speichern und Senden von KiCad-Dateien
KiCad-Schaltplan- und Plattendateien enthalten alle im Entwurf verwendeten Schaltplansymbole und Footprints, so dass Sie diese Dateien problemlos selbst sichern oder versenden können. Einige wichtige Entwurfsinformationen sind in der Projektdatei (.kicad_pro) gespeichert. Wenn Sie also einen vollständigen Entwurf senden, sollten Sie diese Datei unbedingt mitsenden.
Einige Dateien, wie die projektlokale Einstellungsdatei (.kicad_prl) und die fp-info-cache Datei, müssen nicht mit Ihrem Projekt gesendet werden. Wenn Sie ein Versionskontrollsystem wie Git verwenden, um Ihre KiCad-Projekte zu verwalten, können Sie diese Dateien zu der Liste der ignorierten Dateien hinzufügen, damit sie nicht berücksichtigt werden.
Paths and libraries configuration
In KiCad können manche Pfade durch Umgebungsvariablen definiert werden. Einige der Umgebungsvariablen werden intern durch KiCad definiert und können verwendet werden, um Pfade für Bibliotheken, 3D-Formen usw. zu definieren.
Dies ist nützlich, wenn die absoluten Pfade nicht bekannt sind oder sich ändern können (z. B. wenn Sie ein Projekt auf einen anderen Computer übertragen), und auch, wenn ein Basispfad von vielen ähnlichen Elementen gemeinsam genutzt wird. Beachten Sie die folgenden Objekte, die an unterschiedlichen Orten installiert sein können:
-
Schaltplan Symbolbibliotheken
-
Footprint Bibliotheken
-
3D-Modelldateien, die in Footprint-Definitionen verwendet werden
For instance, the path to the connect.pretty footprint library, when using the KICAD10_FOOTPRINT_DIR path variable, would be defined as ${KICAD10_FOOTPRINT_DIR}/connect.pretty.
Das Menü Einstellungen → Pfade konfigurieren… ermöglicht es Ihnen, Pfade für einige eingebaute KiCad-Pfadvariablen zu definieren und Ihre eigenen Pfadvariablen hinzuzufügen, um bei Bedarf persönliche Pfade zu definieren.
KiCad will automatically resolve versioned path variables from
older versions of KiCad to the value of the corresponding variable from
the current KiCad version, as long as the old variable is not explicitly
defined itself. For example, ${KICAD9_FOOTPRINT_DIR} will
automatically resolve to the value of ${KICAD10_FOOTPRINT_DIR} if there
is no KICAD9_FOOTPRINT_DIR variable defined.
|
KiCad Umgebungsvariablen
|
Base path of KiCad’s standard 3D footprint model library files. |
|
Location for plugins, libraries, and color themes installed by the Plugin and Content Manager. |
|
Base path of KiCad’s standard footprint library files. |
|
Base path of KiCad’s standard symbol library files. |
|
Location of KiCad’s standard project template library files. |
|
Location of personal project templates. |
|
Location of personal simulation model libraries. This variable is not defined by default. |
|
Absolute path to the current project directory. This variable is set automatically and cannot be redefined. |

Pfade, die im Pfade konfigurieren-Dialog festgelegt werden, sind KiCad-intern und nicht als Umgebungsvariablen außerhalb von KiCad sichtbar. Sie werden in den KiCad Benutzer-Konfigurationsdateien gespeichert.
Pfade können auch als Systemumgebungsvariablen außerhalb von KiCad festgelegt werden, die alle Einstellungen in der Benutzerkonfiguration außer Kraft setzen.
| Sie können über den Dialogfeld 'Pfade konfigurieren' keine Umgebungsvariable überschreiben, die außerhalb von KiCad festgelegt wurde. Jede Variable, die die extern gesetzt wurde, wird im Dialogfeld als schreibgeschützt angezeigt. |
Beachten Sie auch, dass die Pfadvariable KIPRJMOD immer intern von KiCad definiert wird und sich auf den absoluten Pfad des aktuellen Projekts ausdehnt. Zum Beispiel ist ${KIPRJMOD}/connect.pretty immer der Ordner connect.pretty (die Footprint-Bibliothek) innerhalb des aktuellen Projektordners. Die Variable KIPRJMOD kann nicht im Dialogfeld 'Pfade konfigurieren' geändert oder durch eine externe Umgebungsvariable überschrieben werden.
Erweiterte Umgebungsvariablen
Einige erweiterte Umgebungsvariablen können eingestellt werden, um festzulegen, wo KiCad bestimmte Dateien erwartet. Standardmäßig werden diese Orte auf der Grundlage Ihrer Plattform festgelegt, aber sie können durch Systemumgebungsvariablen überschrieben werden. Diese Variablen werden im Dialogfeld 'Pfade konfigurieren' nicht angezeigt und können nicht in Pfadsubstitutionen verwendet werden.
Das Ändern dieser Variablen führt nicht dazu, dass KiCad Dateien vom Standardspeicherort an den neuen Speicherort verschiebt. Wenn Sie also diese Variablen ändern, müssen Sie alle gewünschten Einstellungen oder Dateien manuell kopieren.
|
Base path of KiCad configuration files. Subdirectories will be created within this directory for each KiCad minor version. |
|
Base path of KiCad user-modifiable documents, such as projects, templates, Python scripts, libraries, etc. Subdirectories will be created within this directory for each KiCad minor version. This directory is provided as a suggested user data location, but does not need to be used. |
|
Base path of KiCad stock data, including default libraries. The data in this directory is managed by the KiCad installer or system package manager, and is not intended for user-writeable data. |
| Wenn Sie die Konfiguration der Pfade ändern, beenden Sie bitte KiCad und starten Sie es neu, um Probleme bei der Pfadbehandlung zu vermeiden. |
Konfiguration der Bibliotheken
Über das Menü Einstellungen → Symbolbibliotheken verwalten… können Sie die Liste der Symbolbibliotheken verwalten (Symbolbibliotheken verwalten).
Verwenden Sie ebenfalls das Menü Einstellungen → Footprintbibliotheken verwalten…, um die Liste der Footprintbibliotheken zu verwalten (Footprintbibliotheken verwalten).
Für jede Art von Bibliothek (Symbol und Footprint) gibt es 2 Bibliothekstabellen: eine globale und eine projektspezifische. Die globale Bibliothekstabelle befindet sich im Benutzer-Konfigurationsverzeichnis und enthält eine Liste der für alle Projekte verfügbaren Bibliotheken. Die projektspezifische Bibliothekstabelle ist optional und enthält eine Liste der projektspezifischen Bibliotheken. Sie befindet sich im Projektverzeichnis.
Auftragssätze
Mit KiCad können Sie eine Liste von Ausgaben konfigurieren, die alle mit einem einzigen Klick erzeugt werden. Die Liste der Ausgabeaufträge und die Ausgaben, an denen sie gespeichert werden, wird als Auftragssatz bezeichnet. Ein Auftragssatz könnte zum Beispiel Aufträge zur Erzeugung von Gerber-Dateien, Bestückungsdaten, einer Stückliste, PDF-Plots des Schaltplans und der Leiterplatte enthalten, während außerdem ERC- und DRC-Prüfungen durchgeführt werden, wobei alle Ausgaben in einem komprimierten Archiv gespeichert werden. Die vollständige Liste der verfügbaren Aufträge finden Sie unten.
Jeder Auftrag in einem Auftragssatz definiert einen bestimmten Typ Ausgabe, z. B. eine Stückliste oder eine Reihe von Gerbern. Ein Job kann auf die gleiche Weise konfiguriert werden, wie wenn die Ausgabe manuell aus dem Schaltplan- oder Platineneditor erzeugt würde. Die Konfiguration für jeden Auftrag wird im Auftragssatz gespeichert und beim späteren Laden des Auftragssatzes wiederhergestellt. Aufträge werden individuell konfiguriert, d. h. wenn Sie denselben Auftragstyp mehrfach in einen Auftragssatz aufnehmen, hat jeder Auftrag seine eigene, unabhängige Konfiguration. So können Sie beispielsweise PDF-Ausgaben sowohl in Farbe als auch in Schwarzweiß erzeugen.
Zusätzlich zu den Aufträgen enthalten Auftragssätze auch Ausgaben, die eine Liste der auszuführenden Aufträge und die Speicherung ihrer Ausgaben festlegen. Eine Ausgabe eines Auftragssatzes kann die Ausgabedateien der ausgewählten Aufträge einfach an einem bestimmten Ort speichern oder die Ausgabedateien in ein komprimiertes Archiv aufnehmen. Jede Ausgabe eines Auftragssatzes kann eine andere Teilmenge von Aufträgen aus der vollständigen Liste der Aufträge im Auftragssatz auswählen. Sie können jede Ausgabe des Auftragssatzes einzeln ausführen oder alle auf einmal. So können Sie beispielsweise eine Ausgabe für einen Auftragssatz einrichten, das PDF-Dateien der Leiterplatte und des Schaltplans erzeugt und sie an einen externen Speicherort kopiert, während eine andere Ausgabe die Fertigungsdateien erzeugt und sie in einem Zip-Archiv komprimiert, um sie an den Leiterplattenhersteller zu senden.
Projekte können mehrere Auftragssätze haben, wobei jeder Auftragssatz eine andere Liste von Aufträgen und Ausgabekonfigurationen definiert. Jeder Auftragssatz wird in einer .kicad_jobset-Datei gespeichert, die für ein einzelnes Projekt bestimmt sein kann, zwischen Projekten kopiert werden kann oder sogar an einem zentralen Ort gespeichert und zwischen Projekten gemeinsam genutzt werden kann.
Um einen Auftragssatz zu verwenden, erstellen Sie zunächst eine neue Auftragssatzdatei im KiCad-Projektmanager (Datei → Neue Auftragssatzdatei…) und wählen Sie einen Namen und einen Speicherort dafür. Alternativ können Sie eine vorhandene Auftragssatzdatei öffnen mit Datei → Auftragssatzdatei öffnen…. Auftragssatzdateien, die im Projektverzeichnis gespeichert sind, gelten als Teil des Projekts und werden im Projektdateibaum angezeigt. Sie können eine Auftragssatz-Datei im Projektdateibaum durch einen Doppelklick auf die Datei öffnen.

Sobald Sie einen Auftragssatz erstellen oder öffnen, wird er in einer neuen Registerkarte im Projektmanager angezeigt. Die Liste der Aufträge wird in der Mitte und die Liste der Ausgaben des Auftragssatzes auf der rechten Seite angezeigt. Neue Auftragssätze enthalten keine Aufträge, aber es wird automatisch eine Ausgabe definiert, um die Ausgaben in einem Ordner zu speichern. Wenn Sie Änderungen an einem Auftragssatz vornehmen, können Sie die Änderungen speichern durch Klicken auf die Schaltfläche Auftragssatz speichern.
Definition von Aufträgen
Um einen neuen Auftrag hinzuzufügen, klicken Sie auf die Schaltfläche  unter der Auftragsliste. Wählen Sie im daraufhin angezeigten Dialogfeld Auftrag hinzufügen den gewünschten Auftragstyp aus. Sie können filtern, welche Arten von Aufträgen in der Liste angezeigt werden, indem Sie in das Textfeld Filter am unteren Rand nutzen.
Wenn Sie einen Auftrag auswählen und OK drücken, wird der Einstellungsdialog für diese Art von Ausgabe angezeigt. Jeder Auftragseinstellungsdialog bietet dieselben Optionen, die Sie haben würden, wenn Sie diese Art von Ausgabe manuell aus dem Schaltplan- oder Platineneditor erzeugen würden.
Die in den Auftragseinstellungen angegebenen Ausgabedateinamen und -pfade sind relativ zum Ordner der Auftragssatzausgaben oder zum Archiv-Stammverzeichnis. Sie können bestimmte Textvariablen, wie ${PROJECTNAME}, ${CURRENT_DATE} und Projekttextvariablen verwenden.
|

Wenn Sie das Dialogfeld für die Auftragseinstellungen akzeptieren, wird der Auftrag zur Auftragsliste hinzugefügt, in der Sie falls gewünscht die Beschreibung ändern können. Wenn Sie die Beschreibung oder die Einstellungen eines Auftrags später ändern möchten, klicken Sie mit der rechten Maustaste auf den Auftrag in der Liste und wählen Sie Auftragsbeschreibung bearbeiten oder Auftragseinstellungen bearbeiten…. Mit einem Doppelklick auf einen Auftrag können Sie auch dessen Einstellungen bearbeiten. Um einen Auftrag zu entfernen, wählen Sie den Auftrag aus und klicken Sie auf die Schaltfläche  . Um die Liste neu zu ordnen, wählen Sie einen Auftrag aus und verschieben ihn mit den Schaltflächen
 oder
 nach oben oder unten.
Definition von Auftragssatzausgaben
Sie können keine Ausgaben aus einem Auftragssatz erzeugen, bevor Sie nicht eine Ausgabe für den Auftragssatz hinzugefügt haben. Bei der Erstellung eines Auftragssatzes wird automatisch eine Ausgabe erstellt, aber Sie können so viele Ausgaben hinzufügen, wie Sie benötigen.
Um eine Ausgabe für einen Auftragssatz hinzuzufügen, klicken Sie auf die Schaltfläche unter der Ausgabenliste. Wenn das Dialogfeld Auftrag hinzufügen angezeigt wird, wählen Sie eine Ausgabenkategorie aus:
-
Archiv speichert die von den Aufträgen erzeugten Ausgaben in einem komprimierten Zip-Archiv.
-
Verzeichnis speichert die von den Aufträgen erzeugten Ausgaben unkomprimiert in einem Ordner.
Sobald Sie eine Ausgabeart ausgewählt haben, wird das Dialogfeld Ausgabeoptionen angezeigt.

Hier können Sie auswählen, welche Aufträge als Teil dieses Auftragssatzes ausgeführt werden sollen, sowie das Verzeichnis oder Archivnamen, in dem sie gespeichert werden sollen. Standardmäßig sind alle Aufträge aktiviert. Sie können auch eine Beschreibung für die Ausgabe festlegen, die in der Ausgabenliste angezeigt wird. Der Ausgabepfad steuert, wo die von den Aufträgen erzeugten Dateien gespeichert werden. Der Pfad kann absolut oder relativ zum Projektverzeichnis sein, und er kann Pfadvariablen oder bestimmte Textvariablen (${PROJECTNAME}, ${CURRENT_DATE}, und Projekttextvariablen) verwenden. In Auftragskonfigurationen definierte Dateinamen sind relativ zum Zielverzeichnis des Auftragssatzes oder zum Stammverzeichnis des Archivs.
Wenn Sie in diesem Dialogfeld auf OK klicken, wird die neue Auftragssatzausgabe der Ausgabenliste hinzugefügt. Sie können die Ausgabe eines bestehenden Auftragssatzes ändern, indem Sie auf die Schaltfläche  klicken, oder es entfernen, indem Sie auf die Schaltfläche klicken.
Nachdem Sie Ihre Aufträge und Ausgaben konfiguriert haben, können Sie einen individuellen Satz von Ausgaben generieren, indem Sie auf die Schaltfläche Erstellen für die gewünschte Ausgabe klicken. Sie können alle Ausgaben auf einmal ausführen, indem Sie auf die Schaltfläche Alle Ausgaben generieren klicken.
Wenn ein Auftragssatz erfolgreich ausgeführt wird und seine Ausgaben generiert, wird ein blaues Häkchen angezeigt, das besagt, dass der letzte Lauf erfolgreich war. Wenn ein Auftragssatz nicht erfolgreich abgeschlossen werden kann, wird ein rotes Ausrufezeichen angezeigt, um darauf hinzuweisen, dass der Lauf nicht erfolgreich war. Wenn Sie auf den Erfolgs-/Fehlerindikator klicken, wird der Protokolldialog für den Auftragssatz angezeigt, in dem der Status jedes Auftrags im Auftragssatz angezeigt wird. Wenn Sie auf einen bestimmten Auftrag klicken, wird das Protokoll dieses Auftrags angezeigt, sofern vorhanden.

After a jobset destination runs successfully, you can click the destination’s Open Output button to open a file browser in the destination location. This button is disabled if the jobset destination has not run or hasn’t successfully finished.
Jobset destination details
When jobs run, output files are initially generated in a temporary folder. After all jobs in a jobset destination are completed, the output files are moved from the temporary folder to the folder or archive specified by the jobset destination. None of the outputs are moved until all of the jobs finish. Therefore, if a job needs to access files that are generated by another job in the same jobset destination, these files will be located in the temporary folder, not the final jobset destination.
KiCad defines the ${JOBSET_OUTPUT_WORK_PATH} environment variable while jobs are running and sets it to the temporary path for the current jobset destination. You can use this environment variable if a job needs to be aware of the temporary folder’s actual location. For example, if an Execute Command job runs a script that renames the outputs of another job, the script needs to know the temporary location of the outputs being renamed, before they are moved to the jobset destination. ${JOBSET_OUTPUT_WORK_PATH} provides this location.
Verfügbare Auftragstypen
Die folgenden Auftragstypen sind verfügbar:
Job |
Description |
PCB: Export 3D Model |
Exports a 3D model of the board. The model format can be STEP, GLB (binary glTF), XAO, BREP (OCCT), PLY, STL, STPZ, U3D, or PDF. |
PCB: Export Board Statistics |
Generates a Board Statistics report in either JSON or text report format. |
PCB: Export Drill Data |
Exports a drill file from the board. |
PCB: Export DXF |
Exports the board design to a DXF file. |
PCB: Export Gencad |
Exports the board design in GenCAD format. |
PCB: Export Gerbers |
Exports the board design to Gerber files, with one file per selected layer. |
PCB: Export IPC-2581 |
Exports the board design in IPC-2581 format. |
PCB: Export ODB++ |
Exports the board design in ODB++ format. |
PCB: Export PDF |
Exports the board design to PDF files, with one file per selected board layer. You can also generate a single PDF with multiple layers depending on the plot configuration. |
PCB: Export PNG |
Exports the board design to PNG files, with one file per selected board layer. |
PCB: Export Position Data |
Exports a position (component placement) file from the board. |
PCB: Export PostScript |
Exports the board design to a PostScript file. |
PCB: Export SVG |
Exports the board design to a SVG file. |
PCB: Perform DRC |
Performs a Design Rule Check on the board and generates a report. If DRC violations are found, this job can optionally report a job failure. |
PCB: Render |
Generates a raytraced rendering of the 3D model of the board as a PNG or JPG file. |
Schematic: Export DXF |
Exports the schematic to a DXF file. |
Schematic: Export Netlist |
Exports a netlist from the schematic, with various formats available. |
Schematic: Export PDF |
Exports the schematic to a PDF file. |
Schematic: Export PNG |
Exports the schematic to a PNG file. |
Schematic: Export Postscript |
Exports the schematic to a PostScript file. |
Schematic: Export SVG |
Exports the schematic to a SVG file. |
Schematic: Generate Bill of Materials |
Exports a bill of materials from the schematic. |
Schematic: Perform ERC |
Performs an Electrical Rule Check on the schematic and generates a report. If ERC violations are found, this job can optionally report a job failure. |
Special: Copy Files |
Copies the specified file to the specified location. A failure to copy the files can optionally cause the output job to fail. You can control whether files in the output location should be overwritten or not. |
Special: Execute Command |
Executes an arbitrary command.
Output from the command can optionally be logged to a file.
You can either ignore non-zero output codes or cause them to fail the output job.
The command is executed in the platform’s shell ( Note: Job output files are generated in a temporary folder, then moved to the location specified by the jobset destination after all jobs for that destination are executed. In other words, when an Execute Command job runs, the output from other jobs in the same jobset destination are still in a temporary location and not yet in the ultimate destination folder or archive. You can use the |
Projektvorlagen
Using a project template facilitates setting up a new project with predefined settings. Templates may contain pre-defined sheet sizes, drawing sheets, board outlines, connector positions, schematic elements, design rules, logos, etc. Complete schematics and/or PCBs used as seed files for the new project may even be included.
Verwendung von Vorlagen
Creating a new project (File → New Project…) opens the Project Template Selector dialog. By default, all installed templates are shown in the list of templates, but you can limit the list to system templates or user templates using the dropdown menu above the list.
-
System templates are installed with KiCad and include templates for designs in some common form factors.
-
User templates are any templates created by you. The default, blank KiCad template is also considered a user template.
When you click on a template, information about the template is shown in the right panel.

A further click on the OK button creates a new project based on the selected template. You can pick the name of the new project and where to create it. The template files will be copied to the new project location and renamed to reflect the new project’s name.
Speicherorte von Vorlagen
When you create a new project, the Project Template Selector dialog shows templates from two locations:
-
System Templates are templates in the path defined by the
KICAD10_TEMPLATE_DIRpath variable. These templates are installed with KiCad’s default libraries and generally should not be modified by users. -
User templates are templates in the path defined by the
KICAD_USER_TEMPLATE_DIRpath variable. When you create your own project templates, store them in this location so you can use them when you create a new project.
To change the location of the user template folder, edit the KICAD_USER_TEMPLATE_DIR path variable in your paths configuration.
Template contents
A KiCad template is a directory containing the template project files, as well as some required metadata for the template in a subdirectory named meta. The name of the directory containing the template files determines the name of the template. This means that a KiCad template folder is simply a KiCad project folder with an additional meta subdirectory.
When you create a project from a template, KiCad copies the template files to the new project directory, renaming them to match the new project name as described below. All files in the template are copied, with three exceptions:
-
Dateien, deren Namen mit dem Zeichen
.beginnen (Punktdateien), werden nicht kopiert mit Ausnahme von Dateien mit dem Namen.gitignoreoder.gitattributes. Diese werden kopiert, wenn sie existieren. -
If there is a
.gitignorefile, any files that are ignored in it are not copied. -
The
metadirectory is not copied.
Other than the exceptions above, all files in the template are copied, even if they are not KiCad design files.
This means you can use templates to create projects that are already set up with non-KiCad files you need to include, such as documentation templates, license files, logos, .gitignore files, etc.
|
Template metadata
A template’s meta directory must contain an HTML file named info.html, which is displayed in the KiCad template browser and should contain basic information describing the template. Basic HTML features are supported, including images. Any images referenced by info.html should also be stored in the meta directory.
Der <title>-Tag bestimmt den Namen der Vorlage, der bei der Vorlagenauswahl angezeigt wird. Beachten Sie, dass der Name der Projektvorlage abgeschnitten wird, wenn er zu lang ist. Dieser Anzeigename muss nicht mit dem Namen des Vorlagenverzeichnisses übereinstimmen.
Hier ist ein Beispiel für die Datei info.html:
<!DOCTYPE HTML PUBLIC "-//W3C//DTD HTML 4.0 Transitional//DE">
<HTML>
<HEAD>
<META HTTP-EQUIV="CONTENT-TYPE" CONTENT="text/html;
charset=utf-8">
<TITLE>Raspberry Pi - Erweiterungsplatine</TITLE>
</HEAD>
<BODY LANG="fr-FR" DIR="LTR">
<P>Diese Projektvorlage ist die Basis für eine Erweiterungsplatine für das <A HREF="http://www.raspberrypi.org/" TARGET="blank">Raspberry Pi $25 ARM board.</A> <BR><BR>Dieses Basisprojekt enthält die Form einer Leiterplatte, die die gleiche Größe hat wie die Raspberry-Pi-Platine, wobei die Anschlüsse entsprechend richtig platziert sind, um die beiden Platinen aufeinander abzustimmen. Alle IOs, die auf der Raspberry-Pi-Platine vorhanden sind, werden mit dem Projekt über die 0.1" expansion headers angeschlossen <BR><BR>Die Platine sieht wie folgt aus:</P>
<P><IMG SRC="brd.png" NAME="brd" ALIGN=BOTTOM WIDTH=680 HEIGHT=378
BORDER=0><BR><BR><BR><BR>
</P>
<P>(c)2012 Brian Sidebotham<BR>(c)2012 KiCad Developers</P>
</BODY>
</HTML>Schließlich kann meta optional ein Bild mit dem Namen icon.png enthalten, das als Symbol für die Vorlage im Auswahldialog verwendet wird. Das Symbol sollte ein 64 x 64 Pixel großes PNG-Bild sein.
Umbenennen von Vorlagen
All files and directories in a template are copied to the new project path when a project is created using a template, except meta and dotfiles. Files and directories containing the template directory name will be renamed with the new project file name. Files and directories that don’t contain the template name keep their original name.
Beispiel: Verwendung einer Vorlage mit dem Namen example (links) zur Erstellung eines Projekts mit dem Namen newproject (rechts), wobei die umbenannten Dateien in fett angezeigt werden:
Files in template example directory |
Files created in project newproject directory |
|---|---|
|
|
Eine Vorlage muss nicht unbedingt ein komplettes Projekt enthalten. Wenn eine erforderliche Projektdatei fehlt, erstellt KiCad die Datei mit dem Standardverhalten für das Erstellen von Projekten:
Files in template example directory |
Files created in newproject directory |
|---|---|
|
|
Wenn die Vorlage eine Projektdatei (.kicad_pro) enthält und deren Name nicht mit dem Vorlagennamen übereinstimmt, führt KiCad die Umbenennung stattdessen mit dem Namen der Projektdatei durch:
Files in template example directory |
Files created in newproject directory |
|---|---|
|
|
| Es wird nicht empfohlen, eine Vorlage mit mehreren Projektdateien zu erstellen. |
Creating new templates
Because a KiCad template is just a Kicad project with an additional metadata folder, the easiest way to create a new template is to start from a project. If you save a project in your user template folder and add a meta folder to it, you can use it as a template.
To find out where your user template folder is, check the value of the KICAD_USER_TEMPLATE_DIR path variable in the Configure Paths dialog (Preferences → Configure Paths…).
|
If you are creating a template from scratch, you can create a new project in the user template folder, then edit the project until you have created your desired template. This new project will be your template, so when you create it you should choose the name based on what you want the template to be called.
If you have an existing project that you want to turn into a template, you can save a copy of that project into your user template folder (File → Save As… from the Project Manager). The name you choose for the re-saved project will be the template name. After saving in the template folder, you can edit the template project so that it exactly matches your desired template.
In either case, templates are required to have a metadata directory, so you must add a meta folder inside the template folder. The metadata folder must also contain an info.html file, which is intended to contain a description of the template. You can copy the sample info.html above as a starting point.
In general, you will also want to remove any files and folders that you don’t want to include each time you use the template. Some examples of things to remove include the *-backups folder, the .history snapshot folder, any unneeded version control files (.git, etc.), and anything else you don’t want to include in new projects.
Plugin- und Content-Verwaltung
KiCad verfügt über einen Plugin- und Content-Manager, mit dem Sie Pakete, die von anderen Benutzern und Organisationen bereitgestellt wurden, durchsuchen, installieren und verwalten können. Bei den Paketen kann es sich um Plugins handeln, die spezielle Funktionen, Werkzeuge zur Bestellung von Leiterplatten bei bestimmten Herstellern, Bibliotheken mit Symbolen und Footprints oder neue Farbschemata für den Editor bieten. Sie können auf das PCM zugreifen, indem Sie es über das Hauptfenster des KiCad-Projektmanagers aufrufen.
Das PCM lädt Pakete von Repositories aus dem Internet herunter. Jedes Repository ist eine Sammlung von Paketen, die von einer Person oder einer Organisation verwaltet wird. Standardmäßig verwendet das PCM ein einziges Repository, das von der KiCad-Organisation verwaltet wird. Benutzern und Organisationen steht es frei, ihre eigenen Repositorys zu erstellen, die andere Benutzer dann als zusätzliche Repositorys in ihre eigene KiCad-Installation aufnehmen können. Repositorys von Drittanbietern können öffentlich oder privat sein.
| Pakete können Code installieren, der auf Ihrem Computer ausgeführt wird. Die Pakete werden nicht von den KiCad-Entwicklern entwickelt. Die KiCad-Organisation übernimmt keine Garantie für die Qualität oder Sicherheit der über das PCM installierten Pakete. Stellen Sie sicher, dass Sie nur Pakete installieren, denen Sie vertrauen. |
| Wenn Sie Feedback zu einem Paket haben, senden Sie es bitte an den Entwickler des Pakets, nicht an das KiCad-Team. Die Kontaktinformationen für jedes Paket sind in der Beschreibung des Pakets angegeben. |
Um ein von Ihnen entwickeltes Paket freizugeben, können Sie es an das offizielle KiCad-Repository senden. Wenn es akzeptiert wird, ist es dann für andere Benutzer verfügbar, die das KiCad-Repository durchsuchen. Sie können auch Ihr eigenes Repository erstellen oder Ihr Paket an ein Repository übermitteln, das von einer anderen Person oder Gruppe verwaltet wird, aber in diesem Fall sehen die Benutzer Ihr Paket nicht, es sei denn, sie haben dieses Repository in ihrer eigenen Installation konfiguriert. Weitere Informationen zum Erstellen eigener Pakete und Repositories finden Sie unten.
Pakete durchsuchen
Alle Pakete in einem Repository werden auf der Registerkarte Repository des PCM angezeigt. Sie können wählen, welches Repository Sie durchsuchen möchten, indem Sie das Repository in der Dropdown-Liste oben auf der Registerkarte auswählen. Standardmäßig ist nur das offizielle KiCad-Repository aktiviert.

Die Pakete sind in vier Kategorien unterteilt, die jeweils eine eigene Registerkarte auf der Registerkarte Repository haben:
-
Plugins sind zusätzliche Werkzeuge, die vom PCB-Editor aus gestartet werden können. Plugins können viele Zwecke erfüllen, z.B. die Modifizierung eines Leiterplattenentwurfs oder die Erzeugung bestimmter Ausgaben. Footprint-Assistenten können auch als Plugins bereitgestellt werden.
-
Fertigungsplugins sind eine Unterkategorie von Plugins für die Bestellung Ihrer Leiterplatten bei bestimmten Herstellern. Diese Plugins können eine komfortable Möglichkeit sein, bei einem Hersteller zu bestellen, sind aber in der Regel nicht erforderlich. Sie können den Herstellern stattdessen normale Fertigungsausgaben zur Verfügung stellen. Wenden Sie sich an Ihren Hersteller, um herauszufinden, wie Sie am besten bei ihm bestellen können.
-
Bibliotheken enthalten Symbole, Footprints und/oder 3D-Modelle. Standardmäßig werden die von einem Bibliothekspaket installierten Bibliotheken automatisch zu den entsprechenden Symbol- und/oder Footprint-Bibliothekstabellen hinzugefügt, wenn das Paket installiert wird, und aus der Tabelle entfernt, wenn das Paket deinstalliert wird. Von einem Paket installierte Bibliotheken haben ein konfigurierbares Bibliotheksnamenspräfix (standardmäßig
PCM_). Diese Einstellungen sind im Abschnitt Pakete und Aktualisierungen der Voreinstellungen konfigurierbar. -
Farbthemen sind Farbthemen für die Schaltplan-, Symbol-, Platinen- und Footprint-Editoren. Sie können ein installiertes Thema im Abschnitt Farben der Voreinstellungen für jeden Editor auswählen.
Die Liste auf der linken Seite des Fensters zeigt die Pakete innerhalb jeder Kategorie an. Sie können die Liste der Pakete filtern, indem Sie in das Filterfeld am oberen Rand der Paketliste schreiben. Drücken Sie die Schaltfläche Ansicht aktualisieren, um die Liste der Pakete aus dem Online-Repository neu zu laden.
Wenn Sie ein Paket in der Liste auswählen, werden auf der rechten Seite Informationen zu diesem Paket angezeigt. Dazu gehören eine Beschreibung des Pakets, die Lizenz des Pakets und Kontaktinformationen für den Entwickler des Pakets, einschließlich einer Stelle, an der Sie Fehler melden und sonstiges Feedback zu dem Paket geben können.
Die Paketinformationen enthalten auch eine Tabelle mit den derzeit verfügbaren Versionen des Pakets. Für jede Version zeigt die Tabelle die Paketgröße, den Status und die Kompatibilität mit Ihrer Version von KiCad an.
Der Status eines Pakets kann gemäß den Angaben des Paketentwicklers einer der folgenden sein:
-
Stable: Die Paketversion ist für die allgemeine Nutzung geeignet.
-
Testing: Die Version des Pakets befindet sich in einer Testphase. Die Benutzer sollten vorsichtig sein und den Entwicklern des Pakets alle Probleme melden, die sie feststellen.
-
Development: Die Paketversion befindet sich in der Entwicklungsphase. Die Nutzer sollten nicht damit rechnen, dass sie vollständig funktioniert.
-
Deprecated: Das Paket wird nicht mehr gepflegt.
Standardmäßig zeigt die Versionstabelle nur Versionen des Pakets an, die mit Ihrer KiCad-Version kompatibel sind. Sie können alle Versionen des Pakets anzeigen, auch die, die nicht mit Ihrer KiCad-Version funktionieren, indem Sie das Kästchen Alle Versionen zeigen aktivieren. Wenn mehrere Versionen eines Pakets verfügbar sind, können Sie wählen, welche Sie installieren möchten.
Installieren von Paketen
Wenn Sie sich für die Installation eines Pakets entscheiden, klicken Sie auf die Schaltfläche Installieren auf der Beschreibungsseite des Pakets. Wenn mehrere Versionen des Pakets verfügbar sind, wählen Sie die gewünschte Version in der Versionstabelle aus, bevor Sie es installieren. Sie können die neueste Version auch installieren, indem Sie auf die Schaltfläche Installieren in der Liste der Pakete klicken. Dadurch wird das Paket nicht sofort installiert, sondern für eine spätere Installation in die Warteschlange gestellt und auf der Registerkarte Ausstehend angezeigt. Das Paket wird erst dann installiert, wenn Sie auf die Schaltfläche Änderungen anwenden klicken, wodurch alle ausstehenden Pakete auf einmal installiert werden.

Um ein einzelnes Paket aus der Liste der ausstehenden Installationen zu entfernen, wählen Sie es auf der Registerkarte Ausstehend aus und klicken Sie auf die Schaltfläche . Um die Installation aller ausstehenden Pakete abzubrechen, klicken Sie auf die Schaltfläche Änderungen verwerfen.
Sobald ein Paket installiert ist, wird es auf der Registerkarte Installiert aufgeführt. Auf dieser Registerkarte können Sie die Liste der installierten Pakete einsehen und jedes einzelne aktualisieren oder deinstallieren.

Wenn für ein Paket neue Versionen verfügbar sind, zeigt das PCM-Symbol im Projektmanager die Anzahl der verfügbaren Updates an.

Um auf eine andere Version eines Pakets zu aktualisieren, wählen Sie die neue Version in der Versionstabelle aus und klicken Sie auf die Schaltfläche Aktualisieren. Sie können ein Paket auch auf die neueste Version aktualisieren, indem Sie im Dropdown-Menü neben der Schaltfläche Deinstallieren in der Liste der installierten Pakete auf Aktualisieren klicken. Um alle installierten Pakete zu aktualisieren, klicken Sie auf die Schaltfläche Alles aktualisieren am oberen Rand der Liste der installierten Pakete. Ein Paket wird nicht aktualisiert, wenn in seinem Dropdown-Menü Paketversion halten ausgewählt ist.
Um ein Paket zu deinstallieren, klicken Sie auf die Schaltfläche Deinstallieren in der Liste der installierten Pakete oder auf der Beschreibungsseite des Pakets.
Wie bei der Installation werden die Pakete nicht sofort aktualisiert oder deinstalliert, wenn Sie auf die Schaltfläche Aktualisieren oder Deinstallieren klicken. Stattdessen wird der Vorgang auf der Registerkarte Ausstehend in eine Warteschlange gestellt, bis Sie jede Änderung einzeln anwenden oder auf die Schaltfläche Änderungen anwenden klicken.
Schließlich können Sie ein Paket herunterladen, ohne es zu installieren, indem Sie auf die Schaltfläche Herunterladen am Ende der Paketbeschreibung klicken und einen Speicherort für das Paket auswählen. Auf diese Weise können Sie die Dateien des Pakets prüfen, bevor Sie es installieren. Um ein Paket zu installieren, das heruntergeladen, aber noch nicht installiert wurde, klicken Sie auf die Schaltfläche Von Datei installieren… und wählen Sie das Paket aus. Die Schaltfläche Paketverzeichnis öffnen öffnet einen Dateibrowser in dem Ordner, in dem KiCad die Pakete installiert.
Managing repositories
Standardmäßig wird nur das offizielle KiCad-Repository vom PCM verwendet. Sie können ein Repository eines Drittanbieters hinzufügen oder vorhandene Repositories entfernen, indem Sie auf die Schaltfläche Verwalten… oben auf der Registerkarte Repository klicken.

Um ein Repository hinzuzufügen, klicken Sie auf die Schaltfläche und geben Sie die vollständige URL des Repositorys an. Um ein Repository zu entfernen, wählen Sie es aus und klicken Sie auf die Schaltfläche . Verwenden Sie die Schaltflächen und , um die Repositories in der Liste neu zu ordnen.
Wenn Sie das offizielle KiCad-Standard-Repository entfernen, können Sie es einfach wieder hinzufügen, indem Sie auf Standard-Repository hinzufügen im Dropdown-Menü neben der Schaltfläche klicken.
Erstellen von Paketen und Repositories
Um ein Paket für das PCM zu erstellen, folgen Sie den englischen Anweisungen unter https://dev-docs.kicad.org/en/addons/index.html. Diese Anweisungen erklären, wie man PCM-Pakete für jedes Repository erstellt, inklusive aber nicht ausschließlich für das offizielle KiCad-Repository. Sie erklären auch die Regeln für Pakete, die im KiCad-Repository enthalten sind, und wie man Pakete in diesem Repository bereitstellt. Repositories von Drittanbietern verwenden das gleiche Paketformat, haben aber möglicherweise andere Regeln und Verfahren für das Bereitstellen von Paketen.
Um Ihr eigenes Repository zu erstellen, veröffentlichen Sie eine Repository-JSON-Datei nach dem Schema, das unter https://go.kicad.org/pcm/schemas/v1 veröffentlicht wurde.
KiCad preferences
The KiCad preferences can always be accessed from the Preferences menu, or by using the hotkey (default Ctrl+,).
| On macOS, the KiCad preferences are accessed via KiCad → Settings…. |
The Preferences dialog is shared between the KiCad tools. Some preferences apply to all tools, and some are specific to a certain tool (such as the schematic or board editor).
Allgemeine Einstellungen

Rendering engine
Beschleunigte Grafik: KiCad kann verschiedene Methoden verwenden, um Aliasing (gezackte Linien) beim Rendern mit einer Grafikkarte zu verhindern. Unterschiedliche Methoden können auf unterschiedlicher Hardware besser aussehen, daher sollten Sie experimentieren, um die Methode zu finden, die Ihnen am besten gefällt.
Rückfallmodus Grafik: KiCad kann auch Antialiasing anwenden, wenn der Rückfallmodus verwendet wird. Das Aktivieren dieser Funktion kann zu einer schlechten Leistung auf einiger Hardware führen.
Helper applications
Texteditor: Wählen Sie einen Texteditor aus, der beim Öffnen von Textdateien in der Projektstrukturansicht verwendet werden soll.
Standard PDF-Betrachter: Wählen Sie ein Programm, mit dem Sie PDF-Dateien öffnen können.
User interface
Symbole in Menüs anzeigen: Aktiviert Symbole in Dropdown-Menüs in der gesamten KiCad-Benutzeroberfläche.
| Auf einigen Betriebssystemen werden die Symbole in den Menüs nicht angezeigt. |
Bildlaufleisten in Editoren anzeigen: Wenn diese Option aktiviert ist, werden in jedem Werkzeug Bildlaufleisten neben den Bearbeitungsflächen angezeigt. Wenn sie deaktiviert sind, werden die Bildlaufleisten nicht angezeigt.
Fokus folgt der Maus zwischen Schaltplan- und Leiterplatteneditor: Ist diese Funktion aktiviert, wird das Fenster unter dem Mauszeiger automatisch fokussiert.
Show popup indicator when toggling settings with hotkeys: When enabled, certain hotkeys that cycle between settings will show a popup indicator briefly to indicate the change in settings.
Use alternating row colors in tables: When enabled, tables (such as the library tables and the Symbol Fields table) will use alternating colors for each row.
Disable custom cursors: When enabled, KiCad will use the system cursors instead of custom context-specific cursors.
Symbolstil: Legt fest, ob der Symbolstil für helle oder für dunkle Fensterhintergründe verwendet werden soll. Bei der Standardeinstellung Automatisch wird der Stil auf der Grundlage der Helligkeit des Fensterschemas des Betriebssystems festgelegt.
| The light icon theme has darker icons that are more visible against light window backgrounds. The dark icon theme has lighter icons designed for dark window backgrounds. |
Symbolgröße: Legt die Größe der Symbole fest, die in den Menüs und Schaltflächen in KiCad verwendet werden. Wählen Sie Automatisch, um automatisch einen geeigneten Symbolmaßstab basierend auf den Einstellungen Ihres Betriebssystems auszuwählen.
Potenzieller Abblendfaktor für inaktive Lagen: Legt fest, wie stark nicht fokussierte Elemente im Modus "Hoher Kontrast" abgeblendet werden.
Scaling
Display PPI: When set to the pixel density of your display, the editing canvas will be scaled so that objects are life sized at 100% zoom. You can press the Detect button to use the pixel density reported by your display, or manually adjust the density until the ruler is displayed at the correct size.
Editing
Maus zum Ursprung des verschobenen Objekts bewegen: Wenn diese Option aktiviert ist, wird der Mauszeiger zum Ursprung eines Objekts bewegt, wenn Sie einen Bewegungsbefehl für dieses Objekt starten.
Erster Tastaturbefehl wählt Werkzeug: Wenn deaktiviert, wird beim Drücken des Tastaturbefehls für einen Befehl wie z.B. Elektrische Verbindung hinzufügen der Befehl sofort an der aktuellen Cursorposition gestartet. Wenn aktiviert, wird durch das erste Drücken des Tastaturbefehls nur das Werkzeug Elektrische Verbindung hinzufügen ausgewählt, aber es wird nicht sofort eine Verbindung hergestellt.
Session
Offene Dateien beim nächsten Projektstart wiederherstellen: Wenn diese Option aktiviert ist, öffnet KiCad automatisch alle zuvor geöffneten Dateien, wenn ein Projekt erneut geöffnet wird.
Project backup
Automatically backup projects: When enabled, KiCad will automatically make backups and autosaves of the current project. A project autosave is automatically saved when there are unsaved changes after a few seconds of inactivity. Backups are also performed each time you manually save.
Format: Controls the backup format.
-
When set to Incremental, project backups are saved using an incremental backup system that stores snapshots of files as they change. These incremental snapshots are shown in the Local History panel (View → Panels → Local History). You can restore from an earlier snapshot by right clicking a snapshot in the Local History panel and choosing Restore Commit. Behind the scenes, the incremental backup system uses a Git repository in a hidden
.historyfolder. -
When sent to Zip archive, project backups are saved as a Zip archives of the project directory and its contents. You can restore from these archives by using the Unarchive tool or by manually extracting the archive and loading the project.
Location: Controls where backups are saved. Backups can be saved in the project directory or in your KiCad user data (configuration) directory.
Maximale Größe der Sicherungskopien: Bei der Erstellung einer neuen Sicherung werden die ältesten Sicherungsdateien gelöscht, um die Gesamtgröße des Verzeichnisses der Sicherungsdateien unter dieser Grenze zu halten.
Maus und Touchpad Einstellungen

Zeiger beim Zoomen zentrieren und positionieren: Wenn diese Funktion aktiviert ist, wird beim Zoomen mit den Tastenbefehlen oder dem Mausrad die Ansicht auf die Position des Mauszeigers zentriert.
Zoom-Beschleunigung verwenden: Wenn diese Funktion aktiviert ist, führt ein schnellerer Bildlauf mit dem Mausrad oder Touchpad zu einer schnelleren Änderung des Zooms.
Zoom-Geschwindigkeit: Steuert, wie stark sich der Zoom bei einem bestimmten Bildlauf mit dem Mausrad oder Touchpad ändert. Verwenden Sie Automatisch, um einen Standardwert abhängig von Ihrem Betriebssystem festzulegen.
Zeichenfläche mitziehen beim Verschieben von Objekten: Wenn diese Funktion aktiviert ist, kann die Ansicht beim Verschieben eines Objekts mitgezogen werden, indem es nahe an den Rand der Zeichenfläche bewegt wird.
Automatische Schwenkgeschwindigkeit: Steuert, wie schnell die Zeichenfläche beim Bewegen eines Objekts verschoben wird.
Mouse buttons: You can set the behavior of dragging the middle and right mouse buttons to zoom the view, pan the view, or have no effect. You can also set the behavior of dragging the left mouse button depending on whether or not any objects are already selected in the editing canvas. If a key is configured for Pan on mouse movement with key, you can pan the canvas by holding the configured key and moving the mouse.
| Die linke Maustaste wird immer zum Auswählen und Verändern von Objekten verwendet. |
Mausrad- und Touchpad-Bildlauf: Sie können das Verhalten des Mausrads oder der vertikalen Bewegung des Touchpads beim Drücken bestimmter Modifizierungstasten einstellen.
Links/rechts schwenken mit horizontaler Bewegung: Wenn diese Option aktiviert ist, können Sie die Ansicht mit dem Touchpad oder dem horizontalen Scrollrad (falls an Ihrer Maus vorhanden) schwenken.
SpaceMouse preferences

This page contains settings for KiCad’s integration with SpaceMouse peripherals.
Rotation speed and Pan speed control how quickly to rotate and pan in response to a SpaceMouse input.
Reverse rotation direction: When enabled, rotations will go in the opposite direction from the default.
Reverse vertical pan direction: When enabled, vertical pans will go in the opposite direction from the default.
Reverse horizontal pan direction: When enabled, horizontal pans will go in the opposite direction from the default.
Reverse zoom direction: When enabled, zooms will go in the opposite direction from the default.
Tastaturbefehle

You can use this dialog to customize the hotkeys used to control KiCad. The hotkeys in the Common section are shared between every KiCad program. You can assign the same hotkey to a different action in different KiCad programs (for example, the schematic editor and the board editor), but you cannot assign a hotkey to more than one action in the same program.
Es gibt viele verfügbare Befehle, so dass nicht allen standardmäßig ein Tastaturbefehl zugewiesen ist. Sie können jedem Befehl einen Tastaturbefehl hinzufügen, indem Sie in der Liste auf den Befehl doppelklicken. Wenn Sie einen Tastaturbefehl wählen, der bereits einem anderen Befehl zugewiesen ist, können Sie diesen Tastaturbefehl für den gewählten Befehl verwenden, wodurch die Zuweisung des Tastaturbefehls für den ursprünglichen Befehl aufgehoben wird.
Änderungen, die Sie an Tastaturbefehlen vorgenommen haben, werden mit einem *-Zeichen am Ende des Befehlsnamens angezeigt. Sie können Änderungen an einem bestimmten Befehl rückgängig machen, indem Sie mit der rechten Maustaste auf diesen Befehl klicken und Änderungen rückgängig machen wählen, oder Sie können alle Änderungen mit der Schaltfläche unterhalb der Befehlsliste rückgängig machen.
Importing hotkeys
Die Einstellungen für Tastaturbefehle werden in .hotkeys-Dateien im KiCad-Einstellungsverzeichnis gespeichert (siehe den Abschnitt Einstellungen für Informationen darüber, wo sich das Einstellungsverzeichnis auf Ihrem Betriebssystem befindet). Wenn Sie KiCad Tastaturbefehle auf einem Computer nach Ihren Wünschen konfiguriert haben, können Sie diese Konfiguration auf einen anderen Computer übertragen, indem Sie die entsprechende(n) .hotkeys-Datei(en) importieren.
Version control preferences

This page contains the settings for the Git integration.
Enable Git tracking: Enables the Git tools for all projects. When you clear this option, KiCad does not show the file status and does not check the remote. It also removes the File → Clone Project from Repository… menu item. The Version Control panels tell you that version control is turned off.
Update interval: Sets the number of minutes between checks for new commits on the remote. The range is 0 to 60 minutes. When you set it to 0, KiCad does not check the remote automatically. The project files tree and the Version Control panel show the result of the check.
Use default values: Shows the name and email address from your global Git settings. Clear this option to type a different Author name and Author e-mail. KiCad uses these values only when a repository has no author. Then the Set Author dialog shows them before your first commit in that repository.
Show contributor photos from the web (Gravatar): Shows a photo for each author on the History page of the Advanced Git window. To find the photos, KiCad sends a hash of each author’s email address to the Gravatar service. This option is off by default.
Data collection preferences

This page contains settings that control how KiCad collects usage and crash data from users. Data collection is disabled by default.
| Crash reporting is only supported on Windows and macOS platforms. |
When I agree to provide anonymous reports is enabled, KiCad will send anonymous reports to the KiCad development team when KiCad crashes and in certain other situations. These reports help the KiCad development team fix crashes and other bugs. The reports do not contain your design files, such as schematics or PCBs.
Reports are linked to a random, unique identifier that is shown on this page. This identifier is used to connect reports from the same computer. No personally identifiable information (PII), including IP address, is stored or connected to this identifier. You can reset this identifier at any time by pressing the Reset Unique Id button.
Packages and updates preferences

Check for KiCad updates on startup: If enabled, on startup KiCad will check for updates to the KiCad application. If an update is available, you will be prompted to install it.
Check for package updates on startup: If enabled, on startup KiCad will check for updates to any packages installed through the Plugin and Content Manager. Available updates are shown as a notification in the bottom right of the Project Manager window.
Automatically add installed libraries to global library table: If enabled, libraries that are installed through the Plugin and Content Manager will be automatically added to your library table. The library nickname will use the prefix configured on this page. If not enabled, you will need to manually add them to your library table after they are installed.
Automatically remove uninstalled libraries: If enabled, libraries that are installed through the Plugin and Content Manager will be automatically removed from your library table when they are uninstalled. If not enabled, you will need to manually remove them from your library table after they are uninstalled.
Plugins preferences

Enable KiCad API: When enabled, you can use plugins that interact with KiCad’s IPC API. If this option is not enabled, such plugins will not function.
Path to Python interpreter: This is the location of the Python interpreter that KiCad will use to run Python-based IPC plugins. You can automatically detect a Python interpreter or manually specify a path.
Maintenance preferences

Verweildauer von 3D-Cache-Dateien: KiCad erstellt einen Cache für 3D-Modelle, um den 3D-Viewer zu beschleunigen. Sie können konfigurieren, wie lange dieser Cache gehalten werden soll, bevor alte Dateien gelöscht werden.
Clear "Open Recent" History: Clears the project entries in the File → Open Recent menu.
Reset "Don’t Show Again" Dialogs: Causes dialogs that have been dismissed with the Don’t Show Again setting to be shown again in the next situation where they would otherwise be hidden.
Reset All Dialogs to Defaults: Resets changed settings in all KiCad dialogs.
Reset All Program Settings to Defaults: Resets all KiCad preferences to their defaults.
Aktionsliste
Im Folgenden finden Sie eine Liste aller verfügbaren Aktionen im KiCad-Projektmanager: ein Befehl, der einer Tastenkombination zugewiesen werden kann.
KiCad-Projektverwaltung
Die folgenden Aktionen sind im KiCad-Projektmanager verfügbar. Tastenkombinationen können jeder dieser Aktionen im Abschnitt Tastenkombinationen der Voreinstellungen zugewiesen werden.
| Action | Default Hotkey | Description |
|---|---|---|
Browse Project Files |
Open project directory in file explorer |
|
Archive Project… |
Archive all project files |
|
Close Project |
||
Image Converter |
Ctrl+B |
Convert bitmap images to schematic or PCB components |
Drawing Sheet Editor |
Ctrl+Y |
Edit drawing sheet borders and title block |
Footprint Editor |
Ctrl+F |
Create, delete and edit PCB footprints |
PCB Editor |
Ctrl+P |
Edit PCB in PCB editor |
Schematic Editor |
Ctrl+E |
Edit schematic in schematic editor |
Symbol Editor |
Ctrl+L |
Create, delete and edit schematic symbols |
Clone Project from Repository… |
||
New Jobset File… |
||
New Project… |
Ctrl+N |
Create a new project based on an existing project |
Open Demo Project… |
||
Open Jobset File… |
||
Open Project… |
Ctrl+O |
|
Open Text Editor |
Launch preferred text editor |
|
Plugin- und Content-Verwaltung |
Ctrl+M |
Run Plugin and Content Manager |
Restore Project from Local History… |
Restore project files from local history |
|
Calculator Tools |
Run component calculations, track width calculations, etc. |
|
Local History |
Show or hide local history panel |
|
Unarchive Project… |
Unarchive project files from zip archive |
|
Gerber Viewer |
Ctrl+G |
Preview Gerber output files |