Referenz Handbuch
Copyright
This document is Copyright © 2010-2018 by its contributors as listed below. You may distribute it and/or modify it under the terms of either the GNU General Public License (http://www.gnu.org/licenses/gpl.html), version 3 or later, or the Creative Commons Attribution License (http://creativecommons.org/licenses/by/3.0/), version 3.0 or later.
Alle Markenrechtsnamen in diesem Guide gehören den rechtmäßigen Eigentümern.
Beitragende
Jean-Pierre Charras, Fabrizio Tappero.
Übersetzung
Carsten Schönert <[email protected]>, 2016
Feedback
Bitte alle Bug Reports, Vorschläge oder neue Versionen an folgende Adressen richten:
-
KiCad Dokumentation: https://gitlab.com/kicad/services/kicad-doc/issues
-
KiCad Software: https://gitlab.com/kicad/code/kicad/issues
-
About KiCad translation: https://gitlab.com/kicad/code/kicad-i18n/issues
Datum der Veröffentlichung und Softwareversion
21.05.2015
Einleitung
KiCad
KiCad ist ein Open Source Softwaretool zum Erstellen von elektronischen Schaltplänen und PCB Layouts. Durch seine einheitliche Schnittstellentechnik verbindet KiCad elegant die einzelnen folgenden eigenständigen Software Tools:
-
KiCad : Projektmanager
-
Eeschema : Schaltplan- und Bauteileditor
-
Pcbnew : Designtool für gedruckte Leiterplatten und Footprints
-
GerbView : Betrachter für Gerberdateien
3 weitere Hilfetools:
-
Bitmap2Component: Bauteilerstellung für Logos. Erstellt aus einem Bitmap Bild ein Bauteil oder einen Footprint.
-
PcbCalculator: Ein Kalkulator, der hilfreich ist, wenn man Spannungsregler, Leiterbahnen, Übertragungsleitungen oder andere Elemente berechnen muss.
-
Pl Editor: Seiten Layout Editor.
Diese Tools werden üblicher Weise aus dem Projekt Manager heraus gestartet, können aber auch als eigenständige Programme gestartet werden.
KiCad besitzt keine Begrenzungen bei der Platinengröße, und es kann bis zu 32 Kupfer Lagen, 14 technische Lagen und 4 zusätzliche Lagen handhaben.
KiCad kann alle Dateien erstellen, die notwendig sind, um Platinen produzieren zu lassen:
-
Gerber Dateien für Foto-Plotter
-
Bohrdateien
-
Bauteilpositionsdateien
Durch die Open Source Ausrichtung (GPL Lizenz) repräsentiert KiCad sich als das ideale Tool für fortschrittlich ausgerichtete Projekte, die elektronische Hardware erstellen.
KiCad ist erhältlich für Linux, Windows und Apple Mac OS.
KiCad Dateien und Ordner
KiCad benutzt und erstellt folgende spezifischen Dateierweiterungen (und Ordner) für die Schaltplan und Leiterplattenbearbeitung.
Projektmanagerdatei:
*.pro |
Kleine Datei, die wenige Parameter für das aktuelle Projekt enthält, inklusive der Liste der Bauteilbibliotheken. |
Schaltplan Editor Dateien:
*.sch |
Schematic files, which do not contain the components themselves. |
*.lib |
Schematic component library files, containing the component descriptions: graphic shape, pins, fields. |
*.dcm |
Schematic component library documentation, containing some component descriptions: comments, keywords, reference to data sheets. |
*_cache.lib |
Schematic component library cache file, containing a copy of the components used in the schematic project. |
sym-lib-table |
Symbol library list (symbol library table): list of symbol libraries available in the schematic editor. |
Leiterplatteneditor Dateien und Ordner:
*.kicad_pcb |
Board file containing all info but the page layout. |
*.pretty |
Footprint library folders. The folder itself is the library. |
*.kicad_mod |
Footprint files, containing one footprint description each. |
*.brd |
Board file in the legacy format. Can be read, but not written, by the current board editor. |
*.mod |
Footprint library in the legacy format. Can be read by the footprint or the board editor, but not written. |
fp-lib-table |
Footprint library list (footprint library table): list of footprint libraries (various formats) which are loaded by the board or the footprint editor or CvPcb. |
Gemeinsam genutzte Dateien:
*.kicad_wks |
Die Seitenbeschreibungsdateien, für Benutzer, die ein Arbeitsblatt mit einem angepassten Aussehen benutzen wollen. |
*.net |
Netzliste, die vom Schaltplaneditor erstellt und vom Platinen Editor gelesen wird. Diese Datei ist mit der .cmp Datei verknüpft, wenn Benutzer eine separate Datei für die Bauteil Footprint Verknüpfung bevorzugen. |
Spezielle Dateien:
*.cmp |
Association between components used in the schematic and their footprints. It can be created by Pcbnew and imported by Eeschema. Its purpose is to import changes from Pcbnew to Eeschema, for users who change footprints inside Pcbnew (for instance using Exchange Footprints command) and want to import these changes in schematic. |
Andere Dateien:
Diese Dateien werden von KiCad erstellt für die Fabrikation oder auch Dokumentation.
*.gbr |
Gerber Dateien für die Produktion der Platine. |
*.drl |
Bohrdateien (Excellon Format) für die Produktion der Platine. |
*.pos |
Positionierungsdateien (ASCII Format), für Maschinen, die die automatische Bestückung der Platine durchführen. |
*.rpt |
Report Dateien (ASCII Format), für Dokumentation. |
*.ps |
Plot Dateien (Postscript), für Dokumentation. |
Plot Dateien (PDF Format), für Dokumentation. |
|
*.svg |
Plot Dateien (SVG Format), für Dokumentation. |
*.dxf |
Plot Dateien (DXF Format), für Dokumentation. |
*.plt |
Plot Dateien (HPGL Format), für Dokumentation. |
Installation und Konfiguration
Anzeige Optionen/Bedingungen
Hardware accelerated renderer in Pcbnew and Gerbview requires video card with support of OpenGL v2.1 or higher.
Vorbereitung der Standard Konfiguration
The default configuration file named kicad.pro is supplied in kicad/template. It serves as a template for any new project and is used to set the list of library files loaded by Eeschema. A few other parameters for Pcbnew (default text size, default line thickness, etc.) are also stored here.
Wenn eine andere Standard Konfigurationsdatei, fp-lib-table genannt existiert, dann wird die Datei einmalig benutzt, um die Liste mit den Footprint Bibliotheken zu erstellen. (Oder, wenn nicht vorhanden, wird diese Datei komplett neu erstellt.)
Vorbereitung der Standard Konfiguration
Wenn nötig, kann die Datei kicad.pro nach Bedarf und Anforderungen angepasst werden.
Stellen Sie sicher, dass Sie Schreibberechtigungen auf kicad/template/kicad.pro besitzen.
Starten und Laden Sie das Projekt kicad.pro.
Run Eeschema via KiCad manager. Modify and update the Eeschema configuration, to set the list of libraries you want to use each time you create new projects.
Run Pcbnew via KiCad manager. Modify and update the Pcbnew configuration, especially the footprint library list. Pcbnew will create or update a library list file called footprint library table. There are 2 library list files (named fp-lib-table): The first (located in the user home directory) is global for all projects and the second (located in the project directory) is optional and specific to the project.
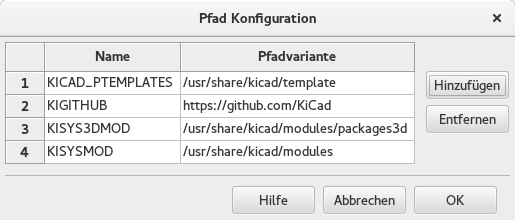
Paths configuration
In KiCad können manche Pfade durch Umgebungsvariablen definiert werden. Einige der Umgebungsvariablen werden intern durch KiCad gesetzt, und können benutzt werden, um Pfade zu definieren (für Bibliotheken, 3D-Formen, und mehr).
This is useful when absolute paths are not known or are subject to change (e.g. when you transfer a project to a different computer), and also when one base path is shared by many similar items. Consider the following which may be installed in varying locations:
-
Eeschema Bauteil Bibliotheken
-
Pcbnew Footprint Bibliotheken
-
3D-Formen die in den Footprint Definitionen benutzt werden
For instance, the path to the connect.pretty footprint library, when using the KISYSMOD environment variable, would be defined as ${KISYSMOD}/connect.pretty
This option allows you to define a path using an environment variable, and add your own environment variables to define personal paths, if needed.
KiCad Umgebungsvariablen:*
KICAD_PTEMPLATES |
Templates used during project creation (DEPRECATED as of version 5.0.0-rc2, use KICAD_TEMPLATE_DIR instead). If you are using this variable, it must be defined. |
KICAD_SYMBOL_DIR |
Base path of symbol library files. |
KIGITHUB |
Frequently used in example footprint lib tables. If you are using this variable, it must be defined. |
KISYS3DMOD |
Base path of 3D shapes files, and must be defined because an absolute path is not usually used. |
KISYSMOD |
Base path of footprint library folders, and must be defined if an absolute path is not used in footprint library names. |
KICAD_TEMPLATE_DIR |
Location of templates installed with KiCad. |
KICAD_USER_TEMPLATE_DIR |
Location of personal templates. |

Beachten Sie ebenso die Umgebungsvariable KIPRJMOD, die immer intern durch KiCad definiert ist und den aktuellen absoluten Projekt Pfad abbildet.
Zum Beispiel, ${KIPRJMOD}/connect.pretty ist immer der Ordner connect.pretty (die pretty Footprint Bibliothek) der innerhalb des aktuellen Projektes liegt.
Wenn Sie die Konfiguration von Pfaden verändern, beenden und starten Sie KiCad neu, um mögliche Fehler bei der Pfad Benutzung zu verhindern.
Vorbereitung einiger Optionen und Hilfsmittel
You may define your favorite text editor and PDF viewer. These settings are used whenever you want to open a text or PDF file.
Die Einstellungen sind erreichbar über das Menü Einstellungen:
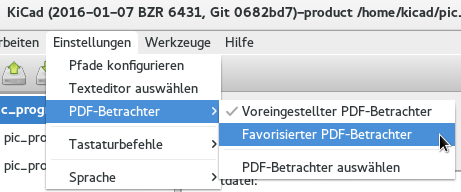
Voreinstellung des Texteditors
Bevor Sie einen Texteditor benutzen können, um im aktuellen Projekt Dateien betrachten oder auch ändern zu können, müssen Sie einen Editor auswählen.
Wählen Sie Einstellungen → Texteditor auswählen, um den gewünschten Texteditor festzulegen.
Voreinstellung des PDF-Betrachter
Sie können den vom System eingestellten PDF-Betrachter als Standard PDF-Betrachter einstellen.
Um den Standard PDF-Betrachter zu ändern, benutzen Sie Einstellungen → PDF-Betrachter → PDF-Betrachter auswählen, um einen anderen PDF-Betrachter auszuwählen, und aktivieren diese Auswahl durch Auswahl des Menüpunktes Einstellungen → PDF-Betrachter → Favorisierter PDF-Betrachter.
Sollte unter Linux der Standard PDF-Betrachter manchmal Schwierigkeiten bereiten, dann kann die Auswahl und Benutzung eines anderen PDF-Betrachters sinnvoll sein.
Creating a new project
In order to manage a KiCad project consisting of schematic files, printed circuit board files, supplementary libraries, manufacturing files for photo-tracing, drilling and automatic component placement files, it is recommended to create a project as follows:
-
Erstellen Sie ein Arbeitsverzeichnis für das Projekt (entweder durch KiCad selbst oder durch andere Tools).
-
Erstellen Sie eine Projektdatei durch KiCad in diesem Verzeichnis (Datei mit der Erweiterung .pro) durch "Neues Projekt → Neues Projekt" oder durch "Neues Projekt → Projekt aus einer Vorlage".
| Benutzen Sie einzelne eindeutige Verzeichnisse für jedes KiCad Projekt. Kombinieren Sie nicht mehrere Projekte innerhalb eines Verzeichnisses. |
KiCad erstellt eine Datei mit der Erweiterung .pro, welche eine Anzahl an Parametern für die Projektverwaltung, wie zum Beispiel die Liste der benutzen Bibliotheken enthält. Der Name der Schaltplandatei als auch der Platinendatei wird aus dem Projektnamen abgeleitet. Wenn also ein Projekt example.pro in einem Verzeichnis example erstellt worden ist, werden folgende Dateien durch KiCad erstellt:
example.pro |
Projekt Management Datei. |
example.sch |
Hauptschaltplan Datei. |
example.kicad_pcb |
Platinen Datei. |
example.net |
Netzlisten Datei. |
example.* |
Weitere verschiedene Dateien durch andere Tools erstellt. |
example-cache.lib |
Bibliotheksdatei, die automatisch erstellt und vom Schaltplaneditor benutzt wird. (Diese Datei enthält Backups der Bauteile, die im Schaltplan benutzt werden). |
Importing a foreign project
KiCad is able to import files created using other software packages. Currently only Eagle 6.x or newer (XML format) is supported.
To import a foreign project, you need to select either a schematic or a board file in the import file browser dialog. Imported schematic and board files should have the same base file name (e.g. project.sch and project.brd). Once the requested files are selected, you will be asked to select a directory to store the imported files, which are going to be saved as a KiCad project.
Using KiCad project manager
KiCad project manager (kicad or kicad.exe) is a tool which can easily run the other tools (schematic and PCB editors, Gerber viewer and utility tools) when creating a design.
Das Starten der jeweiligen Tools aus dem KiCad Projektmanager heraus hat einige Vorteile:
-
Quervergleiche zwischen Schaltplaneditor und Platineneditor
-
Quervergleiche zwischen Schaltplaneditor und der Footprint Auswahl (CvPcb)
Sie können nur die aktuellen Projektdateien bearbeiten. Wenn diese Tools als eigenständige Applikation aufgerufen werden, können Sie jede Datei aus unterschiedlichen Projekten öffnen, Quervergleiche zwischen diesen Tools können dann aber merkwürdige Ergebnisse entstehen lassen.
Project manager window

Das Hauptfenster im KiCad Projekt Manager zeigt die einzelnen Dateien des Projektes in einem Projektbaum dargestellt, ein Schnellstart-Panel mit den einzelnen Icons für die unterschiedlich Tools und ein Fenster für Meldungen. Das Menü als auch die Toolbar kann benutzt werden, um Projekte zu erstellen, zu öffnen oder zu speichern.
Schnellstart-Panel der Hilfstools
KiCad allows you to run all standalone software tools that come with it.
Das Schnellstart-Panel beinhaltet acht Buttons, welche folgende Kommandos ausführen (1 bis 8, von Links nach Rechts):

1 |
Eeschema |
Der Schaltplaneditor. |
2 |
Bauteileditor |
Der Editor für Bauteile und der Manager für die Bauteil Bibliotheken. |
3 |
Pcbnew |
Der Platineneditor. |
4 |
PCB Footprinteditor |
Der Footprinteditor und Footprint Bibliotheksmanager. |
5 |
GerbView |
Ein Betrachter für GERBER Daten. Kann ebenfalls Bohrdateien anzeigen. |
6 |
Bitmap2Component |
Ein Tool, um Footprints oder Bauteile von einem S&W Bitmap zu erstellen, oder auch Logos. |
7 |
Pcb Kalkulator |
Ein Kalkulationstool, um Leiterbahnbreiten oder viele andere Dinge berechnen zu können. |
8 |
Pl Editor |
Seiten Layout Editor, erstellt oder passt Layouts an. |
Die Projektübersicht
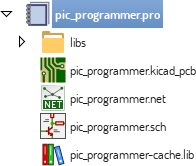
Double-clicking on the schematic file runs the schematic editor, in this case opening the file pic_programmer.sch.
Double-clicking on the board file runs the layout editor, in this case opening the file pic_programmer.kicad_pcb.
Ein Rechts-Klick auf irgendeine Datei in der Projektübersicht ermöglicht diverse generische Dateiveränderungen.
Obere Toolbar

Die obere Toolbar im Projektmanager erlaubt einige allgemeine Dateioperationen:
|
Create a new project. If the default template file (kicad.pro) is found in kicad/template, it is copied into the working directory. |
|
Create a new project from an existing template. |
|
Open an existing project. |
|
Update and save the current project tree. |
|
Create a zip archive of the whole project. This includes schematic files, libraries, PCB, etc. |
|
Refresh the tree view, sometimes needed after a tree change. |
Projekt Vorlagen:
Using a project template facilitates setting up a new project with predefined settings. Templates may contain pre-defined board outlines, connector positions, schematic elements, design rules, etc. Complete schematics and/or PCBs used as seed files for the new project may even be included.
Using templates
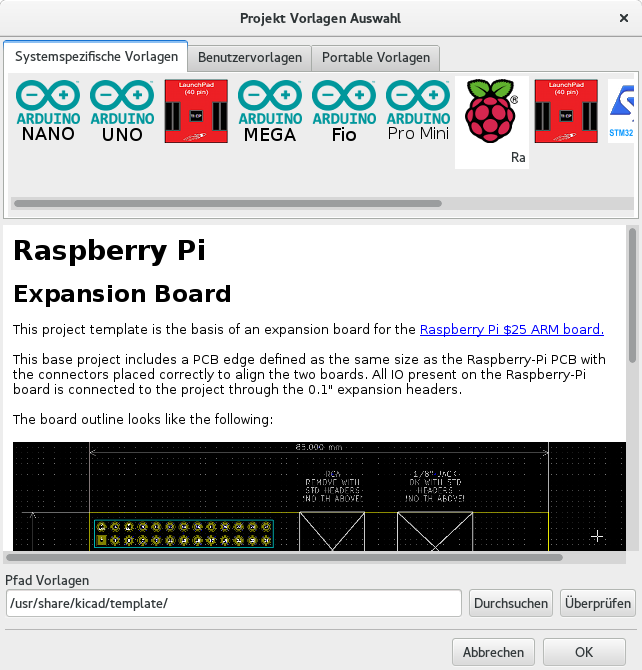
Das Menü Datei → Neues Projekt → Projekt aus einer Vorlage wird den Dialog zur Auswahl der Projektvorlage öffnen:
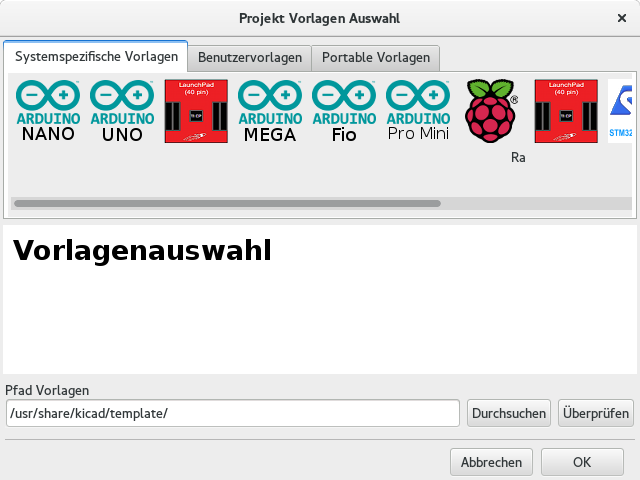
A single click on a template’s icon will display the template information, and a further click on the OK button creates the new project. The template files will be copied to the new project location and renamed to reflect the new project’s name.
Nach der Auswahl einer Vorlage:
Ablageorte von Vorlagen:
KiCad looks for template files in the following paths:
-
path defined in the environment variable KICAD_USER_TEMPLATE_DIR
-
path defined in the environment variable KICAD_TEMPLATE_DIR
-
Systemweite Vorlagen: <kicad bin dir>/../share/template/ oder auch /usr/share/kicad/template/
-
Benutzer definierte Vorlagen:
-
Unix: ~/kicad/templates/
-
Windows: C:\Documents and Settings\username\My Documents\kicad\templates
-
Mac: ~/Documents/kicad/templates/
-
-
When the environment variable KICAD_PTEMPLATES is defined there is a third tab, Portable Templates, which lists templates found at the KICAD_PTEMPLATES path (DEPRECATED).
Erstellen von Vorlagen
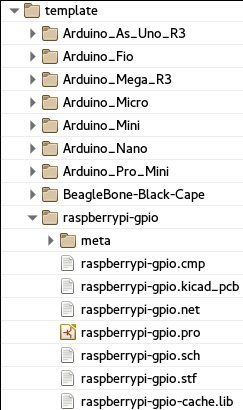
The template name is the directory name where the template files are stored. The metadata directory is a subdirectory named meta containing files describing the template.
Alle Dateien und Ordner in einer Vorlage werden in den neuen Projektordner kopiert, sofern ein neues Projekt unter Verwendung dieser Vorlage erstellt wird. Davon ausgenommen ist das Verzeichnis meta.
When a new project is created from a template, all files and directories starting with the template name will be renamed with the new project file name, excluding the file extension.
Die Metadaten bestehen aus minimal einer benötigten Datei, weitere optionale Dateien sind aber möglich. Alle Dateien müssen durch den Benutzer unter Verwendung eines Texteditor erstellt werden oder durch Abändern anderer vorhandener KiCad Projektdateien. Die Dateien müssen passend in der Verzeichnisstruktur abgelegt werden.
Here is an example showing project files for raspberrypi-gpio template:
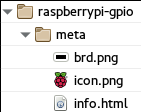
Und die Dateien mit den Metadaten:
Benötigte Dateien:
meta/info.html |
HTML formatierte Information, welche die Vorlage beschreibt. |
Der <title> Tag bestimmt den aktuellen Namen der Vorlage, die dem Benutzer in der Auswahl angezeigt wird. Beachten Sie, dass der Name der Projektvorlage abgeschnitten wird, sollte dieser zu lang sein. Durch die Eigenschaften des Schriftfonts können typischer Weise bis zu sieben oder acht Buchstaben angezeigt werden.
Durch die Benutzung von HTML ist es möglich, dass Bilder einfach eingebunden werden können, ohne das neue Schemata erstellt werden müssen. Es können nur Basis HTML Tags in diesem Dokument benutzt werden.
Und hier das Beispiel für eine Datei info.html:
<!DOCTYPE HTML PUBLIC "-//W3C//DTD HTML 4.0 Transitional//EN">
<HTML>
<HEAD>
<META HTTP-EQUIV="CONTENT-TYPE" CONTENT="text/html;
charset=windows-1252">
<TITLE>Raspberry Pi - Expansion Board</TITLE>
</HEAD>
<BODY LANG="fr-FR" DIR="LTR">
<P>This project template is the basis of an expansion board for the
<A HREF="http://www.raspberrypi.org/" TARGET="blank">Raspberry Pi $25
ARM board.</A> <BR><BR>This base project includes a PCB edge defined
as the same size as the Raspberry-Pi PCB with the connectors placed
correctly to align the two boards. All IO present on the Raspberry-Pi
board is connected to the project through the 0.1" expansion
headers. <BR><BR>The board outline looks like the following:
</P>
<P><IMG SRC="brd.png" NAME="brd" ALIGN=BOTTOM WIDTH=680 HEIGHT=378
BORDER=0><BR><BR><BR><BR>
</P>
<P>(c)2012 Brian Sidebotham<BR>(c)2012 KiCad Developers</P>
</BODY>
</HTML>Optionale Dateien:
meta/icon.png |
Eine PNG Grafik mit 64x64 Pixel, welche als anklickbares Icon im Auswahldialog der Vorlagen verwendet wird. |
Jede weitere Grafik, die in meta/info.html benutzt wird, wie zum Beispiel das Bild des Leiterplattendesign von oben, wird ebenfalls in diesem Ordner abgelegt.
Upgrading from Version 4 to Version 5
Changes were made to the behavior to KiCad during the version 5 development that can impact projects created with older versions of KiCad. This section serves as a guide to ensure the smoothest possible path when upgrading to version 5 of KiCad.
Schematic Symbol Libraries
Schematic symbol libraries are no longer accessed using a symbol (referred to as components in version 4) look up list. Symbol libraries are now managed by a symbol library table that behaves similarly to the footprint library table. This change is a significant improvement, but some schematics may need manual intervention when being converted to version 5.
In previous versions, KiCad used a list of library files to search when locating symbols in the Eeschema file. When locating a symbol, each path would be searched and the first library that held the symbol name would be used.
From v5, KiCad symbol names are prefixed with a nickname, and a lookup table matching nicknames to library paths is used to locate the library which holds the symbol. The table is called the 'symbol library table' and built from configuration files stored in the user’s KiCad configuration directory and the currently loaded project directory.
To upgrade a KiCad project from v4 to v5, nicknames for all of the library files need to be created and then schematic symbol names need to be prefixed with the correct nickname.
Global Symbol Library Table.
Eeschema v5 will automatically create a global symbol table when first started. You will be given a chance to skip this and create your own global symbol table by hand. You only need to do this if don’t use KiCad symbol libraries at all. Otherwise it is easier to modify the automatically generated global symbol table.
| If you track the symbol library repository, changes made to the default global symbol library table are not tracked by KiCad. You will have to manually keep the global symbol library table up to date. |
Symbol Library Table Mapping
Automatic remapping of symbols will be executed whenever a schematic is opened that has not been remapped. There are a few steps you should take ahead of time in order for the remapping to be the most effective.
| If you have been using a development build of KiCad, copy the full default global symbol library table file (sym-lib-table) from the template folder installed with the KiCad libraries or from the KiCad library repo to your KiCad user configuration folder. This will replace the empty one (most likely) created by Eeschema. If you do not do this, you will most likely end up with a bunch of broken symbol links. |
|
Remapped schematics will not be compatible with older versions of KiCad. The Remap Symbols dialog will make a backup of your schematic files and you should do the same if you remap manually. |
-
If possible, keep version 4 of KiCad installed on your system unless you have never used any of the symbol libraries distributed with KiCad.
-
If you get warning about missing libraries when you start version 4 of Eeschema, make sure to fix the missing libraries if they contain symbols that are in the schematic before you attempt to remap your schematic. Otherwise, the correct symbol will not be found and you will end up with broken symbol links in your schematic. You can test this by left clicking on a symbol in the schematic and verifying that the symbol is not being loaded from the cache library. If a symbol is being loaded from the cache library, Eeschema cannot find your part in the system or project symbol libraries. If you need a cached part to be available to other projects on your system, you will need to integrate it into a system or project library manually.
-
If symbol recovery is required during the remapping process, do not dismiss it. Failure to recover symbols will result in broken symbol links or the wrong symbol being linked in the schematic.
-
During the remapping process, symbol libraries not found in the global symbol library table will be used to create a project specific symbol library table. You can move them manually to the global symbol library table if that is your preference.
-
For the most accurate remapping, create a project library by copying the project cache file (project-name-cache.lib) to a different file and add it to the top of the symbol library list. You must use a version of KiCad prior to the symbol library table implementation in order to do this.
|
Fixing broken remapping:
A tool has been provided to attempt to fix remapping issues. If there are missing symbol library links in a schematic, they can be fixed by opening the "Tools→Edit Symbol Library References…" menu entry and clicking on the "Map Orphans" button.
|
Remapping Search Order
When remapping symbols, KiCad proceeds in the following order to assign the library to a symbol:
-
Global Symbol Library Table: Symbols are preferentially mapped to the global symbol library table, if one exists.
-
Project specific libraries: Libraries listed in the project library list that are not in the global symbol library table are searched next.
-
Project cache file: If a symbol doesn’t exist in the listed libraries above, it is first rescued — a copy is made from the cache and placed in the proj-rescue.lib — before the symbol is mapped to this new, rescue library.
Symbol Names and Symbol Library Nickname Limitations
Symbol names may not contain <SPACE>, ':', '/'.
Library nicknames may not contain <SPACE>, ':'.
Existing symbol names with these characters must be renamed by manually editing the relevant schematic and library files.
Symbol Cache Library Availability
The cache library is no longer shown in either the symbol library viewer or the symbol library editor. The cache should never be edited because any changes are overwritten by the next schematic save.
Board File Format Changes
Several new features have been added to Pcbnew which impact the board file format. Using these new features in board designs will prevent them from being opened with previous versions of Pcbnew.
-
Rounded rectangle footprint pads.
-
Custom shape footprint pads.
-
Footprint pad names longer than four characters.
-
Keep out zones on more than a single layer.
-
3D models offset saved as millimeters instead of inches.
-
Footprint text locking.
Global Footprint Library Table.
If you track the footprint library repository, changes made to the default global footprint library table are not tracked by KiCad. You will have to manually keep the global footprint library table up to date.