Manual de referencia
Copyright
This document is Copyright © 2010-2018 by it’s contributors as listed below. You may distribute it and/or modify it under the terms of either the GNU General Public License (https://www.gnu.org/licenses/gpl.html), version 3 or later, or the Creative Commons Attribution License (https://creativecommons.org/licenses/by/3.0/), version 3.0 or later.
Todas las marcas mencionadas en esta guía pertenecen a sus legítimos propietarios.
Contribuidores
El Equipo de KiCad.
Traducción
Antonio Morales <[email protected]>, 2015-2016
Realimentación
Por favor dirija cualquier reporte de fallo, sugerencia o nuevas versiones a:
-
Acerca de la documentación de KiCad: https://gitlab.com/kicad/services/kicad-doc/issues
-
Acerca del software KiCad: https://gitlab.com/kicad/code/kicad/issues
-
Acerca de la traducción de la interfaz del software KiCad: https://gitlab.com/kicad/code/kicad-i18n/issues
Fecha de publicación y versión del software
Published on February 24, 2018.
Introducción a GerbView
GerbView is a Gerber file (RS-274X format) and Excellon drill file viewer. Up to 32 files can be displayed at once.
For more information about the Gerber file format please read the Gerber File Format Specification. Details about drill file format can be found at the Excellon format description.
Interface
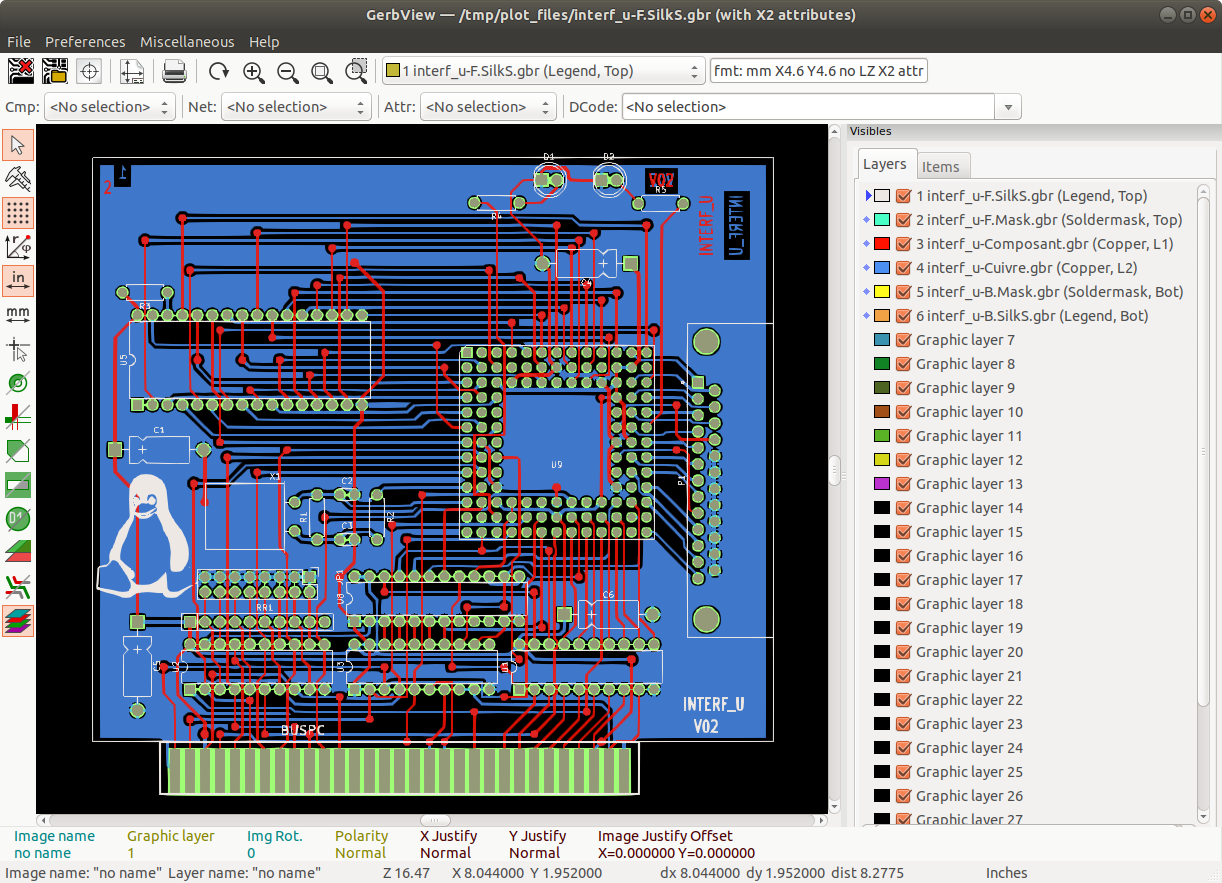
Main window
Barra de herramientas superior

|
Clear all layers |
|
Load Gerber files |
|
Load Excellon drill files |
|
Set page size |
|
|
|
Redraw view |
|
Zoom in or out |
|
Zoom auto (zoom fit) |
|
Zoom to selection |
|
Select active layer |
|
Display info about active layer |
|
Highlight items belonging to selected component (Gerber X2) |
|
Highlight items belonging to selected net (Gerber X2) |
|
Highlight items with the selected attribute (Gerber X2) |
|
Highlight items of selected D Code on the active layer |


Barra de herramientas izquierda
|
|
Select items |
|
Measure between two points |
|
|
Toggle grid visibility |
|
|
Toggle polar coordinates display |
|
|
Select inch or millimeter units |
|
|
Toggle full-screen cursor |
|
|
Display flashed items in sketch (outline) mode |
|
|
Display lines in sketch (outline) mode |
|
|
Display polygons in sketch (outline) mode |
|
|
Show negative objects in ghost color |
|
|
Show/hide D Codes |
|
|
Display layers in diff(compare) mode |
|
|
Display current layer in high-contrast mode |
|
|
Show/hide layer manager |

Layers Manager
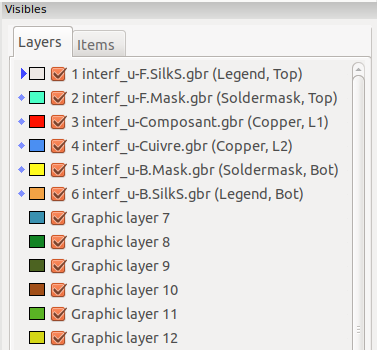
The Layers Manager controls and displays visibility of all layers. An arrow indicates the active layer, and each layer can be shown or hidden with the checkboxes.
Mouse button assignments:
-
Left click: select the active layer
-
Right click: show/hide/sort layers options
-
Middle click or double click (on color swatch): select the layer color
The Layers tab allows you to control the visibility and color of all loaded Gerber and drill layers. The Items tab allows you to control the color and display of the grid, D Codes, and negative objects.
Comandos de la barra de menús
Menú archivo
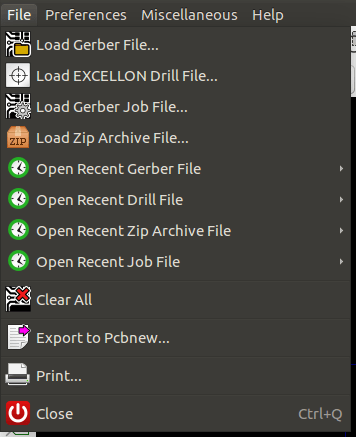
-
Export to Pcbnew is a limited capability to export Gerber files into Pcbnew. The final result depends on what features of the RS-274X format are used in the original Gerber files: rasterized items cannot be converted (typically negative objects), flashed items are converted to vias, lines are converted to track segments (or graphic lines for non-copper layers).
Menú preferencias
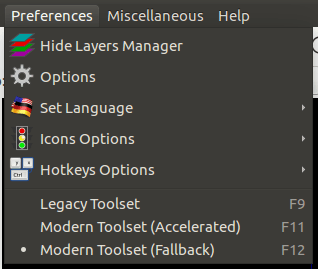
Toolsets
GerbView now supports the modern graphics toolset that is available in PcbNew. Enabling the modern toolset brings new features and better performance. You can select which toolset to use in the preferences menu. Using the Modern (Accelerated) toolset is recommended if your graphics card supports it (requires OpenGL 2.0). If your graphics card does not support the Accelerated toolset, you can still use the new features by selecting the Modern (Fallback) toolset.
Using the Legacy toolset is only recommended if you notice that the Modern toolset does not support a feature you need or if it does not render a Gerber file correctly. If you notice such a problem, please notify the KiCad developers so that it can be fixed in a future release.
The Legacy toolset will be removed in a future version of GerbView.
Menú otros
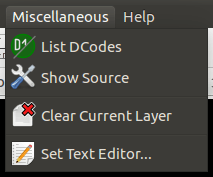
-
List DCodes shows the D Code information for all layers.
-
Show Source displays the Gerber file contents of the active layer in a text editor.
-
Clear Current Layer erases the contents of the active layer.
-
Set Text Editor… allows you to choose which program to show source with.
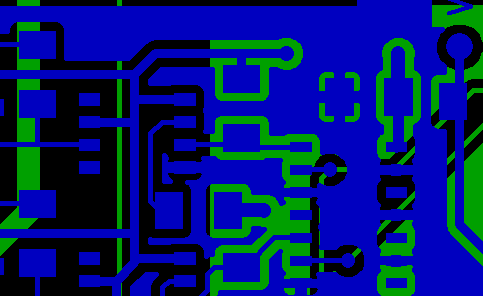
Display modes
GerbView has three display modes which are useful for different situations or requirements.
| Stacked mode and Transparency mode provide a better graphical experience, but may be slower then Raw mode on some computers. |
Raw mode
This mode is selected by ![]() . Each file and each item in the file are drawn in the order files are loaded. However, the active layer is drawn last.
. Each file and each item in the file are drawn in the order files are loaded. However, the active layer is drawn last.
When Gerber files have negative items (drawn in black), artifacts may be visible on already-drawn layers.
Stacked mode
Invoked by ![]() , each file is drawn in the order files are loaded. Again, the active layer is drawn last.
, each file is drawn in the order files are loaded. Again, the active layer is drawn last.
When Gerber files have negative items (drawn in black) there are no artifacts on already-drawn layers because this mode draws each file in a local buffer before it is shown on screen.
Transparency mode
Use ![]() to display in this mode, where no artifacts are present and layers are blended together with the active layer on top.
to display in this mode, where no artifacts are present and layers are blended together with the active layer on top.

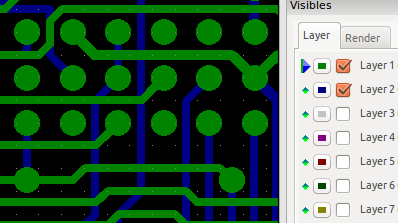
Layer occlusion
In raw or stacked mode, the active layer will be on top of other layers and hide items below it.
Here, layer 1 (green) is the active layer (note the triangle next to it) and so it is drawn on top of layer 2 (blue):
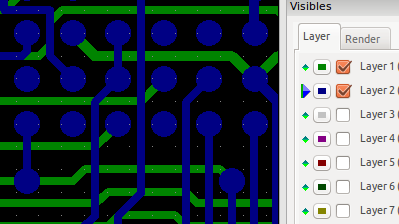
Making layer 2 (blue) the active layer brings it to the top:
Moving items
When using the legacy toolset, items may be selected by holding down the left mouse button and drawing a rectangle. Releasing the button picks up the items. A click of the left mouse button places the items.
This behavior is deprecated and not available in the modern toolsets.
Printing
To print layers, use the ![]() icon or the File → Print menu.
icon or the File → Print menu.
|
Be sure items are inside the printable area. Use Note that many photoplotters support a large plottable area, much bigger than the page sizes used by most printers. Moving the entire layer set may be required. |