{
    "meta": {
        "version": 0
    },
    "name": "My Database Library",
    "description": "A database of components",
    "source": {
        "type": "odbc",
        "dsn": "",
        "username": "",
        "password": "",
        "timeout_seconds": 2,
        "connection_string": ""
    },
    "libraries": [
        {
            "name": "Resistors",
            "table": "Resistors",
            "key": "Part ID",
            "symbols": "Symbols",
            "footprints": "Footprints",
            "fields": [
                {
                    "column": "MPN",
                    "name": "MPN",
                    "visible_on_add": false,
                    "visible_in_chooser": true,
                    "show_name": true,
                    "inherit_properties": true
                },
                {
                    "column": "Value",
                    "name": "Value",
                    "visible_on_add": true,
                    "visible_in_chooser": true,
                    "show_name": false
                }
            ],
            "properties": {
                "description": "Description",
                "footprint_filters": "Footprint Filters",
                "keywords": "Keywords",
                "exclude_from_bom": "No BOM",
                "exclude_from_board": "Schematic Only"
            }
        }
    ]
}Advanced Topics
Configuration and Customization
| This section of the KiCad documentation has not yet been written. We appreciate your patience as our small team of volunteer documentation writers work to update and expand the documentation. |
Text variables
KiCad supports text variables, which allow you to reference predefined variables by name in many kinds of text. KiCad will substitute the variable name with the text string assigned to the variable. Text variables can be used in schematic and PCB graphic text, symbol and footprint text, symbol and footprint fields, drawing sheet fields, label names, label fields, hierarchical sheet fields, and other text contexts. This substitution happens anywhere the variable name is used inside the variable replacement syntax of ${VARIABLENAME}.
For example, you could create a variable named VERSION and set the text substitution to 1.0. Now, in any text object in the schematic, you can enter ${VERSION} and KiCad will display this as 1.0. If you change the value to 2.0, every text object that includes ${VERSION} will be updated automatically. You can also mix regular text and variables. For example, you can create a text object with the text Version: ${VERSION} which will be displayed as Version: 1.0.
You can define project text variables in the schematic or board setup dialogs. These are referred to as project text variables because they are defined for the whole project, so a project text variable defined in the Schematic Editor can also be used in the Board Editor, and vice versa.
The Schematic Editor also has a number of built-in system text variables, which are listed in the table below. System text variables may be available in some contexts and not others. There is an equivalent list of variables for the PCB Editor.
Variables used in hierarchical sheet fields refer to the properties of the hierarchical sheet, not the parent, unless otherwise noted. For example, ${#} returns the subsheet’s page number when used in a hierarchical sheet field, but the parent sheet’s page number when used in graphic text in the parent sheet.
Variables can also be used for field names. A field with a variable as its name will automatically have its value set to the same variable. For example, in a project with a project variable MY_VAR set to MY_VALUE, a user-created symbol field named ${MY_VAR} will automatically have its value set to ${MY_VAR}, which will then resolve to MY_VALUE. If the field’s Show Name property is set, the variable’s name will be displayed as the field name, for example MY_VAR: MY_VALUE.
| Variable name | 概要 |
|---|---|
|
Sheet number. |
|
Total number of schematic sheets. |
|
Contents of drawing sheet’s |
|
Contents of drawing sheet’s |
|
Today’s date, in ISO format. |
|
Filename of the root schematic sheet, with a file extension. |
|
Full file path of the root schematic sheet, with a file extension. |
|
Contents of drawing sheet’s |
|
Current version of KiCad. This variable is only available in drawing sheet fields. |
|
Current sheet’s paper size. This variable is only available in drawing sheet fields. |
|
Project name, without a file extension. |
|
Contents of drawing sheet’s |
|
Filename of the current sheet, with a file extension. |
|
Sheet name of the current sheet. |
|
Sheet path of the current sheet. |
|
Contents of drawing sheet’s |
|
Full hash of the project’s current Git commit. If the project is not part of a Git repository, resolves to "no hash". |
|
Short (8 character) hash of the project’s current Git commit. If the project is not part of a Git repository, resolves to "no hash". |
|
Contents of project text variable
|
|
Contents of symbol field, symbol attribute, hierarchical sheet field, or
label field Both built-in and user-defined fields are available. Built-in fields use all
uppercase letters: for example, to access a symbol’s value, use Built-in symbol fields are Built-in symbol attributes are Built-in sheet fields are Built-in label fields are |
|
Contents of field or attribute Both built-in and user-defined fields are available. Built-in fields use all
uppercase letters: for example, to access the value of Built-in symbol fields are Built-in symbol attributes are Note: If the symbol referenced by |
|
Generates an ERC error named For example, a text item containing |
|
Generates an ERC warning named |
Text expressions
KiCad has a system for evaluating text expressions, which allows you to manipulate text, evaluate mathematical expressions in strings, and dynamically create strings based on other information. Text expressions can be used in schematic and PCB graphic text, symbol and footprint text, symbol and footprint fields, drawing sheet fields, and other text contexts.
Text expressions are evaluated when the @{expression} syntax is used. Everything inside the braces is evaluated, and the entire expression, including the surrounding @{}, is replaced by the evaluated results. If the expression cannot be evaluated, the expression is not replaced and the original text is retained.
As a basic example, a text object containing 1 plus 1 is @{1 + 1} will read 1 plus 1 is 2.
Many expression functions are provided to perform more complex operations. The available expression functions are detailed in the tables below. For example, the absolute value of a number can be calculated using the abs function: @{abs(-1)} evaluates to 1.
A single text item can contain multiple text evaluations, and evaluations can be nested. You can also combine text evaluations with text variables. For example, @{max(1, 2, 3)}, @{max(4, 5, 6)} evaluates to 3, 6. If the text variable var is defined as -10, a text item containing @{max(abs(${var}), 5)} evaluates to 10.
Text expressions support units. Results are always printed in SI units, and the unit is not printed. For example, @{1mm + 1in} evaluates to 26.4.
In addition to numbers, some expression functions operate on strings. A string is text that is enclosed with single or double quotes, like 'string 1' or "string 2". An example of an expression function that operates on strings is upper, which converts a string to uppercase. @{upper("string")} evaluates to STRING.
You can concatenate multiple strings or strings and numbers using the concat expression function or using the + operator: @{concat("hello ", "world")} and @{"hello " + "world"} both evaluate to hello world. @{concat("revision ", 1)} and @{"revision " + 1} both evaluate to revision 1.
Mathematical and logical expressions
The following arithmetic operations are available for operations between two numbers. The operators are all infix operators and obey order of operations. Parentheses can be used for grouping. For example, @{3 + 4 * 3} evaluates to 15, and @{(3 + 4) * 3} evaluates to 21.
| Arithmetic operator | 概要 | Example |
|---|---|---|
|
Addition Note: |
|
|
Subtraction |
|
|
Multiplication |
|
|
Division (the expression is not evaluated if the divisor is |
|
|
Modulo (the expression is not evaluated if the divisor is |
|
|
Exponentiation (right-associative) |
|
The following expression functions are available for performing mathematical functions. For example, @{abs(-1)} evaluates to 1.
| Expression function | 概要 | Example |
|---|---|---|
|
Evaluates to the absolute value of |
|
|
Evaluates to the square root of |
|
|
Evaluates to |
|
|
Evaluates to the greatest integer less than or equal to |
|
|
Evaluates to the smallest integer greater than or equal to |
|
|
Evaluates to |
|
|
Evaluates to the minimum of the given comma-separated values. |
|
|
Evaluates to the maximum of the given comma-separated values. |
|
|
Evaluates to the sum of the given comma-separated values. |
|
|
Evaluates to the average of the given comma-separated values. |
|
|
Evaluates to a random number between |
|
Boolean expressions
The following boolean operations are available. These operations evaluate to 1 if the expression is true or 0 if it is false.
| Arithmetic operator | 概要 | Example |
|---|---|---|
|
Less than |
|
|
Less than or equal to |
|
|
Greater than |
|
|
Greater than or equal to |
|
|
Equal to |
|
|
Not equal to |
|
The following expression functions are available for operating on the result of a boolean or mathematical expression.
| Expression function | 概要 | Example |
|---|---|---|
|
Evaluates to |
|
String manipulation
The following expression functions are available for manipulating strings.
Strings are text that is surrounded by single or double quotes.
For example, "this is a string" and 'this is also a string'.
|
| Expression function | 概要 | Example |
|---|---|---|
|
Evaluates to |
|
|
Evaluates to |
|
|
Evaluates to the given comma-separated strings or numbers concatenated together. Note: strings and numbers can also be concatenated using the |
|
|
Evaluates to the portion of |
|
|
Evaluates to the portion of |
|
|
Evaluates to the portion of |
|
|
Evaluates to the portion of |
|
|
Formats Note: |
|
|
Formats Note: |
|
|
Formats |
|
Date and time formatting
The following expression functions are available for manipulating dates and times.
| Expression function | 概要 | Example |
|---|---|---|
|
Evaluates to the current date, represented as the number of days since the Unix epoch (00:00:00 UTC on 1970-01-01). Note: this value can be formatted in various ways using the |
|
|
Evaluates to the current timestamp, represented as the number of seconds since the Unix epoch (00:00:00 UTC on 1970-01-01). Note: you can add or subtract numbers to this value to get timestamps relative to the current timestamp. |
|
|
Formats |
|
|
Evaluates to the day of the week of the date represented by |
|
Database Libraries
A database library is a type of KiCad symbol library that holds data about parts in an external SQL database. Database libraries do not contain any symbol or footprint definitions by themselves. Instead, they reference symbols and footprints found in other KiCad libraries. Each database library entry maps a KiCad symbol (from another library) to a set of properties (fields) and usually a KiCad footprint (from a footprint library).
Using database libraries allows you to create fully-defined parts (sometimes called atomic parts) out of KiCad symbols and footprints without needing to store all the part properties in a symbol library. The external database can be linked to third-party tools for managing part data and lifecycles. Database library workflows are generally more complex than the standard KiCad library workflows, and so this type of library is typically only used in situations where it makes managing a large library of fully-defined parts more efficient (such as in organization or team settings).
KiCad does not provide a GUI for editing a SQL database or defining a database library. It is up to the user to find the most appropriate workflow and toolchain for creating and updating the database itself. Some users may want to directly edit the database through a third-party database client, and some may use other third-party software such as a part lifecycle management (PLM) tool to create and edit data.
In a database library, there are one or more tables that generally represent a single type of part (such as Resistors or Capacitors). Each table can have an independent schema, meaning that different types of parts can have different properties that are translated into symbol fields in KiCad. Each table must have a unique ID column which is used as the identifier for a symbol placed from that table. This unique ID will typically be a part number (either a manufacturer’s part number, or an internal organization part number). Each table must also have a column that contains a mapping to a KiCad symbol, in the form LibraryNickname:SymbolName. The LibraryNickname must match a symbol library that is present in the KiCad library tables. Tables may also contain a column containing a KiCad footprint, in the form LibraryNickname:FootprintName. If this column is present, symbols placed from the table will include a footprint mapping.
Tables may also contain arbitrary additional columns that may optionally be mapped to symbol fields in KiCad. The KiCad database library configuration file controls how these fields should be named, whether or not to make the fields visible, and whether or not to include the fields in the data displayed in the Symbol Chooser.
Database Library Configuration Files
To create a database library, you must create a configuration file that contains the necessary information for KiCad to connect to your database and retrieve data from tables. Copy the template below into a new file and save it with a kicad_dbl extension. You can then add this file to your global symbol library table using the Configure Symbol Libraries dialog.
| Database library files are in JSON format. Standard JSON syntax rules apply. To check if your file contains syntax errors, you may use a JSON validator or linter (available online). |
Configuring the source
KiCad currently only supports ODBC connections to SQL databases. You can either connect with a DSN or a connection string. If a DSN name is supplied, the optional username and password fields will be used to connect to the DSN. If a connection string is supplied, the dsn, username, and password fields are ignored. The connection string will be passed directly to the ODBC driver, so you can include any parameters your ODBC driver supports.
When using a DSN connection, leave the connection_string property blank or omit it from the file. When using a connection string, leave the dsn, username, and password fields blank or omit them from the file. Connection strings must start with a Driver key indicating to the ODBC manager which driver should be used, and may include other keys that depend on the specific driver. Check the documentation for your ODBC driver for details. You may also find a reference site like connectionstrings.com useful when configuring a database connection.
KiCad does not recommend or endorse any particular ODBC driver or database server, but has been tested to work with Sqlite, MySQL, MariaDB, and PostgreSQL.
Windows users: the backslash character (\) must be escaped with a second backslash when included in a JSON quoted string. If including a file path in your connection string, make sure to use double backslashes (\\).
|
Flatpak users: You need to install the corresponding ODBC drivers as Flatpak extensions. You can do this via the "Add-ons" section for KiCad in your software manager (i.e. GNOME Software), or via the command line: Run flatpak install org.kicad.KiCad.ODBCDriver.sqliteodbc for SQLite, flatpak install org.kicad.KiCad.ODBCDriver.mariadb-connector-odbc for MariaDB or MySQL, or flatpak install org.kicad.KiCad.ODBCDriver.psqlodbc for PostgreSQL.
|
Flatpak users: Due to Flatpak sandboxing, a possible way to connect to database servers running on your local machine is via TCP/IP. Make sure that your database server allows TCP/IP connections, then add the required Port parameter to your connection string. For example, add Port=3306; for the default TCP port of MySQL/MariaDB, or Server=localhost;Port=5432; to force PostgreSQL to use a TCP connection to the local server. Using the default UNIX domain socket connections for MySQL, MariaDB, or PostgreSQL is only possible when overriding host file system permissions via flatpak override.
|
Configuring libraries
Each database library can contain "sub-libraries" mapped to a single database table. The libraries entry in the configuration file contains a list of objects that each define a single library. The following settings must exist for each library:
name: The name of the sub-library (table) that will be shown in the KiCad UI and included as a prefix in each symbol name placed from this sub-library. This name can include any valid characters for a symbol name except for a forward slash (/) because the slash character is used as a separator between the sub-library name and the symbol name. If this field is left blank, no prefix will be added to symbols in this sub-library.
table: The name of the table in the database.
key: The column name containing a unique key that will be used to identify parts from the table.
symbols: The column name containing KiCad symbol references.
footprints: The column name containing KiCad footprint references.
fields: A list of field definitions. Each field defined here will be added to the symbol when it is placed on the schematic. If a field with a matching name is already defined in the source symbol, the value from the database table will override whatever value was defined in the source symbol. Each field definition may contain:
column: The name of the database table column that should be mapped to a field.
name: The name of the KiCad field to populate from the database.
visible_on_add: If true, this field will be visible in the schematic when a symbol is added. If this setting is not specified, it will default to false.
visible_in_chooser: If true, this field will be shown in the Symbol Chooser as a column. If this setting is not specified, it will default to false.
show_name: If true, the field’s name will be shown in addition to its value in the schematic. If this setting is not specified, it will default to false.
inherit_properties: If true, and a field with the given name already exists on the source symbol, only the field contents will be updated from the database, and the other properties (visible_on_add, show_name, etc) will be kept as they were set in the source symbol. If the given field name does not exist in the source symbol, this setting is ignored. If this setting is not specified, it will default to false.
properties: A map of symbol properties to database columns. All properties are optional; any that are not specified in the database library configuration will be inherited from the values set for the source symbol. The following properties are supported:
description: The symbol’s Description property.
footprint_filters: Reserved for future expansion.
keywords: The symbol’s Keywords property.
exclude_from_bom: The symbol’s "Exclude from Bill of Materials" setting. The column named here must be a numeric type, and will be taken as a boolean (0 for false, 1 for true).
exclude_from_board: The symbol’s "Exclude from PCB" setting. The column named here must be a numeric type, and will be taken as a boolean (0 for false, 1 for true).
exclude_from_sim: The symbol’s "Exclude from simulation" setting. The column named here must be a numeric type, and will be taken as a boolean (0 for false, 1 for true).
Database columns may be mapped to custom (user-defined) fields, or to certain built-in KiCad fields, including Value and Datasheet.
| KiCad only supports text (string) fields. If you map a database column containing a numeric SQL data type, it will be converted to a string using a general-purpose conversion algorithm that will switch to scientific notation for very large or very small numbers. This format conversion cannot be fine-tuned by the user, so if explicit control over number-to-string conversion is needed, a new column or view should be used to do the conversion in the database. |
Using database libraries
After creating your configuration file and adding it to your symbol library table, you can place parts from the database tables using the Symbol Chooser. Parts placed from a database library can be updated using the Update Symbols from Library function, which will update any fields that were changed in the database as well as updating the underlying symbol if it was changed in the source library.
Note that any source library referenced by a database table must also be present in the symbol library table for the database library to function. If you want to use a library only as a source of symbols for a database library, you can hide it from the Symbol Chooser by clearing the "Visible" checkbox in the Manage Symbol Libraries dialog.
HTTP Libraries
HTTP libraries are a type of KiCad symbol library that sources data about parts for an external source such as an ERP system. They do not contain any symbol or footprint definitions as standard KiCad libraries do. Instead, they reference symbols and footprints found in other KiCad libraries.
HTTP libraries are read only and support REST or REST-like APIs.
HTTP Library Configuration Files
To create an HTTP library, you must create a configuration file that contains the necessary information for KiCad to connect to the providing library (API) and to retrieve data from it.
Copy the template below into a new file and save it using the .kicad_httplib file extension. You should then edit this file and replace root_url and token values with your own. Once saved, add this file to your global symbol library table using the Configure Symbol Libraries dialog which can be found under Preferences→Manage Symbol Libraries….
Users have the option to configure two timeout settings. The timeout_parts_seconds setting dictates the validity duration of a part’s information, while the timeout_categories_seconds setting determines how long categories remain valid. The default values are set to 60 seconds and 600 seconds respectively, but if the data for either setting is anticipated to remain unchanged, users can opt for higher values. This will significantly speed up the opening of the symbol chooser. It’s important to note that KiCad will re-cache the data on the initial startup regardless of these timeout settings.
{
    "meta": {
        "version": 1.0
    },
    "name": "KiCad HTTP Library",
    "description": "A KiCad library sourced from a REST API",
    "source": {
        "type": "REST_API",
        "api_version": "v1",
        "root_url": "http://localhost:8000/kicad-api",
        "token": "usertokendatastring",
        "timeout_parts_seconds": 60,
        "timeout_categories_seconds": 600
    }
}
Authentication
Authentication is done via an Access Token only. Users need to ask their administrators to get a valid token issued if the HTTP library is maintained externally.
Caching Behaviour for Categories
KiCad caches all available Categories once when opening the Symbol Chooser Dialog. Subsequently, any alterations made to the categories on the server side will remain undetected by KiCad until the user performs a program restart. This implementation is intentionally designed to conserve bandwidth resources, as it prevents KiCad from attempting to retrieve data from the API every time the user opens the Symbol Chooser Dialog. Such continuous data fetching, especially under constrained bandwidth conditions, would severely impede KiCad’s performance.
Server Response Codes
If KiCad receives an API error, it will display an error message to the user. For more information about API errors and server responses, see the APIs and Bindings section at dev-docs.kicad.org.
Custom Netlist and BOM Formats
KiCad can output netlists and BOMs in various formats, and users can define new formats if desired.
The process of exporting a netlist is described in the netlist export section. BOM output is described in the BOM export section.
The following section describes how to create an exporter for a new output format.
Adding new netlist generators
New netlist generators are added to the Export Netlist dialog by clicking the Add Generator… button.

New generators require a name and a command. The name is shown in the tab label, and the command is run whenever the Export Netlist button is clicked.
When the netlist is generated, KiCad creates an intermediate XML file which contains all of the netlist information from the schematic. The generator command is then run in order to transform the intermediate netlist into the desired netlist format.
The netlist command must be set up properly so that the netlist generator script takes the intermediate netlist file as input and outputs the desired netlist file. The exact netlist command will depend on the generator script used. The command format is described below.
Python and XSLT are commonly used tools to create custom netlist generators.
Adding a new BOM generator
KiCad also uses the intermediate netlist file to generate BOMs with the Generate BOM tool.
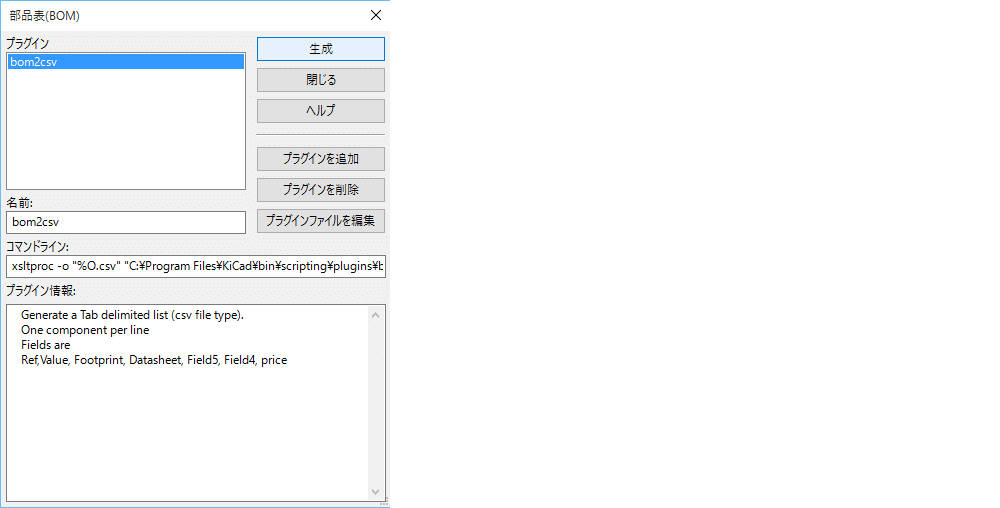
Additional scripts can be added to the list of BOM generator scripts by clicking the ![]() button. Scripts can be removed by clicking the
button. Scripts can be removed by clicking the ![]() button. The
button. The ![]() button opens the selected script in a text editor.
button opens the selected script in a text editor.
Generator scripts written in Python and XSLT can contain a header comment that describes the generator’s functionality and usage. This header comment is displayed in the BOM dialog as the description for each generator. The header comment must contain the string @package. Everything following that string until the end of the comment is used as the description for the generator.
KiCad automatically fills the command line field when a new generator script is added, but the command line might need to be adjusted by hand depending on the generator script. KiCad attempts to automatically determine the output file extension from the example command line in the generator script’s header.
Generator command line format
The command line for a netlist or BOM exporter defines the command that KiCad will run to generate the selected output file.
For a netlist exporter using xsltproc, an example is:
xsltproc -o %O.net /usr/share/kicad/plugins/netlist_form_pads-pcb.asc.xsl %I
For a BOM exporter using Python, an example is:
/usr/bin/python3 /usr/share/kicad/plugins/bom_csv_grouped_by_value.py "%I" "%O.csv"
It is recommended to surround arguments in the command line with quotes (") in case they contain spaces or other special characters.
|
Some character sequences like %I and %O have a special meaning in the command line, because KiCad replaces them with a filename or path before executing the command.
| Parameter | Replaced with… | 概要 |
|---|---|---|
|
|
Absolute path and filename of the intermediate netlist file, which is the input to the BOM or netlist generator plugin |
|
|
Absolute path and filename of the output BOM or netlist file (without file
extension). An appropriate file extension may need to be specified after the
|
|
|
Base filename of the output BOM or netlist file (without path or file
extension). An appropriate file extension may need to be specified after the
|
|
|
Absolute path of the project directory, without trailing slash. |
中間ネットリスト
When exporting BOM files and netlists, KiCad creates an intermediate netlist file and then runs a separate tool which post-processes the intermediate netlist into the desired netlist or BOM format.
The intermediate netlist uses XML syntax. It contains a large amount of data about the design. Depending on the output (BOM or netlist), different subsets of the complete intermediate netlist file will be included in the final output file.
The structure of the intermediate netlist file is described in detail below.
Because the conversion from intermediate netlist file to output netlist or BOM is a text-to-text transformation, the post-processing filter can be written using Python, XSLT, or any other tool capable of taking XML as input.
XSLT is not recommended for new netlist or BOM exporters; Python or another tool should be used instead. Beginning with KiCad 7, xsltproc is no longer installed with KiCad, although it can be installed separately. Nevertheless, several examples of netlist exporters using XSLT are included below.
|
中間ネットリストファイルの構造
ネットリストファイルの例を次に示します。
<?xml version="1.0" encoding="utf-8"?>
<export version="D">
  <design>
    <source>F:\kicad_aux\netlist_test\netlist_test.sch</source>
    <date>29/08/2010 21:07:51</date>
    <tool>eeschema (2010-08-28 BZR 2458)-unstable</tool>
  </design>
  <components>
    <comp ref="P1">
      <value>CONN_4</value>
      <libsource lib="conn" part="CONN_4"/>
      <sheetpath names="/" tstamps="/"/>
      <tstamps>4C6E2141</tstamps>
    </comp>
    <comp ref="U2">
      <value>74LS74</value>
      <libsource lib="74xx" part="74LS74"/>
      <sheetpath names="/" tstamps="/"/>
      <tstamps>4C6E20BA</tstamps>
    </comp>
    <comp ref="U1">
      <value>74LS04</value>
      <libsource lib="74xx" part="74LS04"/>
      <sheetpath names="/" tstamps="/"/>
      <tstamps>4C6E20A6</tstamps>
    </comp>
    <comp ref="C1">
      <value>CP</value>
      <libsource lib="device" part="CP"/>
      <sheetpath names="/" tstamps="/"/>
      <tstamps>4C6E2094</tstamps>
    <comp ref="R1">
      <value>R</value>
      <libsource lib="device" part="R"/>
      <sheetpath names="/" tstamps="/"/>
      <tstamps>4C6E208A</tstamps>
    </comp>
  </components>
  <libparts/>
  <libraries/>
  <nets>
    <net code="1" name="GND">
      <node ref="U1" pin="7"/>
      <node ref="C1" pin="2"/>
      <node ref="U2" pin="7"/>
      <node ref="P1" pin="4"/>
    </net>
    <net code="2" name="VCC">
      <node ref="R1" pin="1"/>
      <node ref="U1" pin="14"/>
      <node ref="U2" pin="4"/>
      <node ref="U2" pin="1"/>
      <node ref="U2" pin="14"/>
      <node ref="P1" pin="1"/>
    </net>
    <net code="3" name="">
      <node ref="U2" pin="6"/>
    </net>
    <net code="4" name="">
      <node ref="U1" pin="2"/>
      <node ref="U2" pin="3"/>
    </net>
    <net code="5" name="/SIG_OUT">
      <node ref="P1" pin="2"/>
      <node ref="U2" pin="5"/>
      <node ref="U2" pin="2"/>
    </net>
    <net code="6" name="/CLOCK_IN">
      <node ref="R1" pin="2"/>
      <node ref="C1" pin="1"/>
      <node ref="U1" pin="1"/>
      <node ref="P1" pin="3"/>
    </net>
  </nets>
</export>
一般的なネットリストファイルの構造
中間ネットリストファイルは、次の5つのセクションで構成されています。
-
ヘッダーセクション
-
コンポーネントセクション
-
ライブラリーパーツセクション
-
ライブラリーセクション
-
ネットセクション
The file content has the delimiter <export>
<export version="D">
...
</export>
ヘッダーセクション
The header has the delimiter <design>
<design>
<source>F:\kicad_aux\netlist_test\netlist_test.sch</source>
<date>21/08/2010 08:12:08</date>
<tool>eeschema (2010-08-09 BZR 2439)-unstable</tool>
</design>
このセクションはコメントセクションとして捉えることができます。
コンポーネントセクション
The component section has the delimiter <components>
<components>
<comp ref="P1">
<value>CONN_4</value>
<libsource lib="conn" part="CONN_4"/>
<sheetpath names="/" tstamps="/"/>
<tstamps>4C6E2141</tstamps>
</comp>
</components>
このセクションには、回路図中で使用されているコンポーネントの一覧が含まれます。それぞれのコンポーネントは、次のように記載されます。:
<comp ref="P1">
<value>CONN_4</value>
<libsource lib="conn" part="CONN_4"/>
<sheetpath names="/" tstamps="/"/>
<tstamps>4C6E2141</tstamps>
</comp>| Element name | Element description |
|---|---|
|
name of the lib where this component was found. |
|
component name inside this library. |
|
path of the sheet inside the hierarchy: identify the sheet within the full schematic hierarchy. |
|
timestamp of the component. |
Note about time stamps for components
To identify a component in a netlist and therefore on a board, the timestamp reference is used as unique for each component. However KiCad provides an auxiliary way to identify a component which is the corresponding footprint on the board. This allows the re-annotation of components in a schematic project and does not lose the link between the component and its footprint.
タイムスタンプは、それぞれのコンポーネントや回路図プロジェクト内のシートにおいて固有の識別子です。しかしながら、複雑な階層構造内で同じシートが複数回参照される場合、同じタイムスタンプを持つコンポーネントが存在することになってしまいます。
A given sheet inside a complex hierarchy has an unique identifier: its sheetpath. A given component (inside a complex hierarchy) has a unique identifier: the sheetpath and its timestamp.
ライブラリーパーツ・セクション
The libparts section has the delimiter <libparts>, and the content of this section is defined in the schematic libraries.
<libparts>
<libpart lib="device" part="CP">
  <description>Condensateur polarise</description>
  <footprints>
    <fp>CP*</fp>
    <fp>SM*</fp>
  </footprints>
  <fields>
    <field name="Reference">C</field>
    <field name="Valeur">CP</field>
  </fields>
  <pins>
    <pin num="1" name="1" type="passive"/>
    <pin num="2" name="2" type="passive"/>
  </pins>
</libpart>
</libparts>| Element name | Element description |
|---|---|
|
The symbol’s footprint filters. Each footprint filter is in a separate |
|
The symbol’s fields. Each field’s name and value is given in a separate `<field name="fieldname">…</field> tag. |
|
The symbol’s pins. Each pin is given in a separate |
Possible electrical pin types are:
| Pintype | 概要 |
|---|---|
Input |
Usual input pin |
Output |
Usual output |
Bidirectional |
Input or Output |
Tri-state |
Bus input/output |
パッシブ |
Usual ends of passive components |
Unspecified |
Unknown electrical type |
Power input |
Power input of a component |
Power output |
Power output like a regulator output |
Open collector |
Open collector often found in analog comparators |
Open emitter |
Open emitter sometimes found in logic |
Not connected |
Must be left open in schematic |
ライブラリー・セクション
The libraries section has the delimiter <libraries>. This section contains the list of schematic libraries used in the project.
<libraries>
  <library logical="device">
    <uri>F:\kicad\share\library\device.lib</uri>
  </library>
  <library logical="conn">
    <uri>F:\kicad\share\library\conn.lib</uri>
  </library>
</libraries>
ネット・セクション
The nets section has the delimiter <nets>. This section describes the connectivity of the schematic by listing all nets and the pins connected to each net.
<nets>
  <net code="1" name="GND">
    <node ref="U1" pin="7"/>
    <node ref="C1" pin="2"/>
    <node ref="U2" pin="7"/>
    <node ref="P1" pin="4"/>
  </net>
  <net code="2" name="VCC">
    <node ref="R1" pin="1"/>
    <node ref="U1" pin="14"/>
    <node ref="U2" pin="4"/>
    <node ref="U2" pin="1"/>
    <node ref="U2" pin="14"/>
    <node ref="P1" pin="1"/>
  </net>
</nets>
ネット情報の例を次に示します。
<net code="1" name="GND">
  <node ref="U1" pin="7"/>
  <node ref="C1" pin="2"/>
  <node ref="U2" pin="7"/>
  <node ref="P1" pin="4"/>
</net>| Element name | Element Description |
|---|---|
|
an internal identifier for this net |
|
the net name |
|
the pin (identified by |
Example netlist exporters
Some example netlist exporters using XSLT are included below.
XSLT itself is an XML language very suitable for XML transformations. The xsltproc program can be used to read the Intermediate XML netlist input file, apply a style-sheet to transform the input, and save the results in an output file. Use of xsltproc requires a style-sheet file using XSLT conventions. The full conversion process is handled by KiCad, after it is configured once to run xsltproc in a specific way.
The document that describes XSL Transformations (XSLT) is available here: http://www.w3.org/TR/xslt
| When writing a new netlist exporter, consider using Python or another tool rather than XSLT. |
PADS netlist example using XSLT
The following example shows how to create an exporter for the PADS netlist format using xlstproc.
The PADS netlist format is comprised of two sections:
-
A list of footprints
-
A list of nets, together with the pads connected to each net.
Below is an XSL style-sheet which converts the intermediate netlist file to the PADS netlist format.
<?xml version="1.0" encoding="ISO-8859-1"?>
<!--XSL style sheet to Eeschema Generic Netlist Format to PADS netlist format
Copyright (C) 2010, SoftPLC Corporation.
GPL v2.
How to use:
https://lists.launchpad.net/kicad-developers/msg05157.html
-->
<!DOCTYPE xsl:stylesheet [
<!ENTITY nl "
"> <!--new line CR, LF -->
]>
<xsl:stylesheet version="1.0" xmlns:xsl="http://www.w3.org/1999/XSL/Transform">
<xsl:output method="text" omit-xml-declaration="yes" indent="no"/>
<xsl:template match="/export">
<xsl:text>*PADS-PCB*&nl;*PART*&nl;</xsl:text>
<xsl:apply-templates select="components/comp"/>
<xsl:text>&nl;*NET*&nl;</xsl:text>
<xsl:apply-templates select="nets/net"/>
<xsl:text>*END*&nl;</xsl:text>
</xsl:template>
<!-- for each component -->
<xsl:template match="comp">
<xsl:text> </xsl:text>
<xsl:value-of select="@ref"/>
<xsl:text> </xsl:text>
<xsl:choose>
<xsl:when test = "footprint != '' ">
<xsl:apply-templates select="footprint"/>
</xsl:when>
<xsl:otherwise>
<xsl:text>unknown</xsl:text>
</xsl:otherwise>
</xsl:choose>
<xsl:text>&nl;</xsl:text>
</xsl:template>
<!-- for each net -->
<xsl:template match="net">
<!-- nets are output only if there is more than one pin in net -->
<xsl:if test="count(node)>1">
<xsl:text>*SIGNAL* </xsl:text>
<xsl:choose>
<xsl:when test = "@name != '' ">
<xsl:value-of select="@name"/>
</xsl:when>
<xsl:otherwise>
<xsl:text>N-</xsl:text>
<xsl:value-of select="@code"/>
</xsl:otherwise>
</xsl:choose>
<xsl:text>&nl;</xsl:text>
<xsl:apply-templates select="node"/>
</xsl:if>
</xsl:template>
<!-- for each node -->
<xsl:template match="node">
<xsl:text> </xsl:text>
<xsl:value-of select="@ref"/>
<xsl:text>.</xsl:text>
<xsl:value-of select="@pin"/>
<xsl:text>&nl;</xsl:text>
</xsl:template>
</xsl:stylesheet>And here is the PADS netlist output file after running xsltproc:
*PADS-PCB*
*PART*
P1 unknown
U2 unknown
U1 unknown
C1 unknown
R1 unknown
*NET*
*SIGNAL* GND
U1.7
C1.2
U2.7
P1.4
*SIGNAL* VCC
R1.1
U1.14
U2.4
U2.1
U2.14
P1.1
*SIGNAL* N-4
U1.2
U2.3
*SIGNAL* /SIG_OUT
P1.2
U2.5
U2.2
*SIGNAL* /CLOCK_IN
R1.2
C1.1
U1.1
P1.3

*END*
この変換は、次のコマンドラインにより実行することができます:
kicad\\bin\\xsltproc.exe -o test.net kicad\\bin\\plugins\\netlist_form_pads-pcb.xsl test.tmp
Cadstar netlist example using XSLT
The following example shows how to create an exporter for the Cadstar netlist format using xlstproc.
The Cadstar format is comprised of two sections:
-
The footprint list
-
The Nets list: grouping pads references by nets
Below is an XSL style-sheet which converts the intermediate netlist file to the Cadstar netlist format.
<?xml version="1.0" encoding="ISO-8859-1"?>
<!--XSL style sheet to Eeschema Generic Netlist Format to CADSTAR netlist format
Copyright (C) 2010, Jean-Pierre Charras.
Copyright (C) 2010, SoftPLC Corporation.
GPL v2. -->
<!DOCTYPE xsl:stylesheet [
<!ENTITY nl "
"> <!--new line CR, LF -->
]>
<xsl:stylesheet version="1.0" xmlns:xsl="http://www.w3.org/1999/XSL/Transform">
<xsl:output method="text" omit-xml-declaration="yes" indent="no"/>
<!-- Netlist header -->
<xsl:template match="/export">
<xsl:text>.HEA&nl;</xsl:text>
<xsl:apply-templates select="design/date"/> <!-- Generate line .TIM <time> -->
<xsl:apply-templates select="design/tool"/> <!-- Generate line .APP <eeschema version> -->
<xsl:apply-templates select="components/comp"/> <!-- Generate list of components -->
<xsl:text>&nl;&nl;</xsl:text>
<xsl:apply-templates select="nets/net"/> <!-- Generate list of nets and connections -->
<xsl:text>&nl;.END&nl;</xsl:text>
</xsl:template>
<!-- Generate line .TIM 20/08/2010 10:45:33 -->
<xsl:template match="tool">
<xsl:text>.APP "</xsl:text>
<xsl:apply-templates/>
<xsl:text>"&nl;</xsl:text>
</xsl:template>
<!-- Generate line .APP "eeschema (2010-08-17 BZR 2450)-unstable" -->
<xsl:template match="date">
<xsl:text>.TIM </xsl:text>
<xsl:apply-templates/>
<xsl:text>&nl;</xsl:text>
</xsl:template>
<!-- for each component -->
<xsl:template match="comp">
<xsl:text>.ADD_COM </xsl:text>
<xsl:value-of select="@ref"/>
<xsl:text> </xsl:text>
<xsl:choose>
<xsl:when test = "value != '' ">
<xsl:text>"</xsl:text> <xsl:apply-templates select="value"/> <xsl:text>"</xsl:text>
</xsl:when>
<xsl:otherwise>
<xsl:text>""</xsl:text>
</xsl:otherwise>
</xsl:choose>
<xsl:text>&nl;</xsl:text>
</xsl:template>
<!-- for each net -->
<xsl:template match="net">
<!-- nets are output only if there is more than one pin in net -->
<xsl:if test="count(node)>1">
<xsl:variable name="netname">
<xsl:text>"</xsl:text>
<xsl:choose>
<xsl:when test = "@name != '' ">
<xsl:value-of select="@name"/>
</xsl:when>
<xsl:otherwise>
<xsl:text>N-</xsl:text>
<xsl:value-of select="@code"/>
</xsl:otherwise>
</xsl:choose>
<xsl:text>"&nl;</xsl:text>
</xsl:variable>
<xsl:apply-templates select="node" mode="first"/>
<xsl:value-of select="$netname"/>
<xsl:apply-templates select="node" mode="others"/>
</xsl:if>
</xsl:template>
<!-- for each node -->
<xsl:template match="node" mode="first">
<xsl:if test="position()=1">
<xsl:text>.ADD_TER </xsl:text>
<xsl:value-of select="@ref"/>
<xsl:text>.</xsl:text>
<xsl:value-of select="@pin"/>
<xsl:text> </xsl:text>
</xsl:if>
</xsl:template>
<xsl:template match="node" mode="others">
<xsl:choose>
<xsl:when test='position()=1'>
</xsl:when>
<xsl:when test='position()=2'>
<xsl:text>.TER </xsl:text>
</xsl:when>
<xsl:otherwise>
<xsl:text> </xsl:text>
</xsl:otherwise>
</xsl:choose>
<xsl:if test="position()>1">
<xsl:value-of select="@ref"/>
<xsl:text>.</xsl:text>
<xsl:value-of select="@pin"/>
<xsl:text>&nl;</xsl:text>
</xsl:if>
</xsl:template>
</xsl:stylesheet>CADSTAR 形式の出力ファイルです。
.HEA
.TIM 21/08/2010 08:12:08
.APP "eeschema (2010-08-09 BZR 2439)-unstable"
.ADD_COM P1 "CONN_4"
.ADD_COM U2 "74LS74"
.ADD_COM U1 "74LS04"
.ADD_COM C1 "CP"
.ADD_COM R1 "R"


.ADD_TER U1.7 "GND"
.TER     C1.2
         U2.7
         P1.4
.ADD_TER R1.1 "VCC"
.TER     U1.14
         U2.4
         U2.1
         U2.14
         P1.1
.ADD_TER U1.2 "N-4"
.TER     U2.3
.ADD_TER P1.2 "/SIG_OUT"
.TER     U2.5
         U2.2
.ADD_TER R1.2 "/CLOCK_IN"
.TER     C1.1
         U1.1
         P1.3

.END
OrcadPCB2 netlist example using XSLT
This format has only one section which is the footprint list. Each footprint includes a list of its pads with reference to a net.
Below is an XSL style-sheet which converts the intermediate netlist file to the Orcad netlist format.
<?xml version="1.0" encoding="ISO-8859-1"?>
<!--XSL style sheet to Eeschema Generic Netlist Format to CADSTAR netlist format
Copyright (C) 2010, SoftPLC Corporation.
GPL v2.
How to use:
https://lists.launchpad.net/kicad-developers/msg05157.html
-->
<!DOCTYPE xsl:stylesheet [
<!ENTITY nl "
"> <!--new line CR, LF -->
]>
<xsl:stylesheet version="1.0" xmlns:xsl="http://www.w3.org/1999/XSL/Transform">
<xsl:output method="text" omit-xml-declaration="yes" indent="no"/>
<!--
Netlist header
Creates the entire netlist
(can be seen as equivalent to main function in C
-->
<xsl:template match="/export">
<xsl:text>( { Eeschema Netlist Version 1.1 </xsl:text>
<!-- Generate line .TIM <time> -->
<xsl:apply-templates select="design/date"/>
<!-- Generate line eeschema version ... -->
<xsl:apply-templates select="design/tool"/>
<xsl:text>}&nl;</xsl:text>
<!-- Generate the list of components -->
<xsl:apply-templates select="components/comp"/> <!-- Generate list of components -->
<!-- end of file -->
<xsl:text>)&nl;*&nl;</xsl:text>
</xsl:template>
<!--
Generate id in header like "eeschema (2010-08-17 BZR 2450)-unstable"
-->
<xsl:template match="tool">
<xsl:apply-templates/>
</xsl:template>
<!--
Generate date in header like "20/08/2010 10:45:33"
-->
<xsl:template match="date">
<xsl:apply-templates/>
<xsl:text>&nl;</xsl:text>
</xsl:template>
<!--
This template read each component
(path = /export/components/comp)
creates lines:
( 3EBF7DBD $noname U1 74LS125
... pin list ...
)
and calls "create_pin_list" template to build the pin list
-->
<xsl:template match="comp">
<xsl:text> ( </xsl:text>
<xsl:choose>
<xsl:when test = "tstamp != '' ">
<xsl:apply-templates select="tstamp"/>
</xsl:when>
<xsl:otherwise>
<xsl:text>00000000</xsl:text>
</xsl:otherwise>
</xsl:choose>
<xsl:text> </xsl:text>
<xsl:choose>
<xsl:when test = "footprint != '' ">
<xsl:apply-templates select="footprint"/>
</xsl:when>
<xsl:otherwise>
<xsl:text>$noname</xsl:text>
</xsl:otherwise>
</xsl:choose>
<xsl:text> </xsl:text>
<xsl:value-of select="@ref"/>
<xsl:text> </xsl:text>
<xsl:choose>
<xsl:when test = "value != '' ">
<xsl:apply-templates select="value"/>
</xsl:when>
<xsl:otherwise>
<xsl:text>"~"</xsl:text>
</xsl:otherwise>
</xsl:choose>
<xsl:text>&nl;</xsl:text>
<xsl:call-template name="Search_pin_list" >
<xsl:with-param name="cmplib_id" select="libsource/@part"/>
<xsl:with-param name="cmp_ref" select="@ref"/>
</xsl:call-template>
<xsl:text> )&nl;</xsl:text>
</xsl:template>
<!--
This template search for a given lib component description in list
lib component descriptions are in /export/libparts,
and each description start at ./libpart
We search here for the list of pins of the given component
This template has 2 parameters:
"cmplib_id" (reference in libparts)
"cmp_ref" (schematic reference of the given component)
-->
<xsl:template name="Search_pin_list" >
<xsl:param name="cmplib_id" select="0" />
<xsl:param name="cmp_ref" select="0" />
<xsl:for-each select="/export/libparts/libpart">
<xsl:if test = "@part = $cmplib_id ">
<xsl:apply-templates name="build_pin_list" select="pins/pin">
<xsl:with-param name="cmp_ref" select="$cmp_ref"/>
</xsl:apply-templates>
</xsl:if>
</xsl:for-each>
</xsl:template>
<!--
This template writes the pin list of a component
from the pin list of the library description
The pin list from library description is something like
<pins>
<pin num="1" type="passive"/>
<pin num="2" type="passive"/>
</pins>
Output pin list is ( <pin num> <net name> )
something like
( 1 VCC )
( 2 GND )
-->
<xsl:template name="build_pin_list" match="pin">
<xsl:param name="cmp_ref" select="0" />
<!-- write pin numner and separator -->
<xsl:text> ( </xsl:text>
<xsl:value-of select="@num"/>
<xsl:text> </xsl:text>
<!-- search net name in nets section and write it: -->
<xsl:variable name="pinNum" select="@num" />
<xsl:for-each select="/export/nets/net">
<!-- net name is output only if there is more than one pin in net
else use "?" as net name, so count items in this net
-->
<xsl:variable name="pinCnt" select="count(node)" />
<xsl:apply-templates name="Search_pin_netname" select="node">
<xsl:with-param name="cmp_ref" select="$cmp_ref"/>
<xsl:with-param name="pin_cnt_in_net" select="$pinCnt"/>
<xsl:with-param name="pin_num"> <xsl:value-of select="$pinNum"/>
</xsl:with-param>
</xsl:apply-templates>
</xsl:for-each>
<!-- close line -->
<xsl:text> )&nl;</xsl:text>
</xsl:template>
<!--
This template writes the pin netname of a given pin of a given component
from the nets list
The nets list description is something like
<nets>
<net code="1" name="GND">
<node ref="J1" pin="20"/>
<node ref="C2" pin="2"/>
</net>
<net code="2" name="">
<node ref="U2" pin="11"/>
</net>
</nets>
This template has 2 parameters:
"cmp_ref" (schematic reference of the given component)
"pin_num" (pin number)
-->
<xsl:template name="Search_pin_netname" match="node">
<xsl:param name="cmp_ref" select="0" />
<xsl:param name="pin_num" select="0" />
<xsl:param name="pin_cnt_in_net" select="0" />
<xsl:if test = "@ref = $cmp_ref ">
<xsl:if test = "@pin = $pin_num">
<!-- net name is output only if there is more than one pin in net
else use "?" as net name
-->
<xsl:if test = "$pin_cnt_in_net>1">
<xsl:choose>
<!-- if a net has a name, use it,
else build a name from its net code
-->
<xsl:when test = "../@name != '' ">
<xsl:value-of select="../@name"/>
</xsl:when>
<xsl:otherwise>
<xsl:text>$N-0</xsl:text><xsl:value-of select="../@code"/>
</xsl:otherwise>
</xsl:choose>
</xsl:if>
<xsl:if test = "$pin_cnt_in_net <2">
<xsl:text>?</xsl:text>
</xsl:if>
</xsl:if>
</xsl:if>
</xsl:template>
</xsl:stylesheet>OrCAD PCB2 形式の出力ファイルです。
( { Eeschema Netlist Version 1.1  29/08/2010 21:07:51
eeschema (2010-08-28 BZR 2458)-unstable}
 ( 4C6E2141 $noname P1 CONN_4
  (  1 VCC )
  (  2 /SIG_OUT )
  (  3 /CLOCK_IN )
  (  4 GND )
 )
 ( 4C6E20BA $noname U2 74LS74
  (  1 VCC )
  (  2 /SIG_OUT )
  (  3 N-04 )
  (  4 VCC )
  (  5 /SIG_OUT )
  (  6 ? )
  (  7 GND )
  (  14 VCC )
 )
 ( 4C6E20A6 $noname U1 74LS04
  (  1 /CLOCK_IN )
  (  2 N-04 )
  (  7 GND )
  (  14 VCC )
 )
 ( 4C6E2094 $noname C1 CP
  (  1 /CLOCK_IN )
  (  2 GND )
 )
 ( 4C6E208A $noname R1 R
  (  1 VCC )
  (  2 /CLOCK_IN )
 )
)
*